Before we start please review the two post before we start
- The Ultimate guide to DevOps Tools Part #1 : Docker here
- Talking about docker concept , how install it.
- The Ultimate guide to DevOps Tools Part #2 : Docker here
- how to build your first application using docker
- In this post i will talk about Docker Services.
as already mentioned above this post i will describe the level up about docker which is services which mean scale the application and enable load-balancing.
When i will need to create a services ?
Regarding to Docker Documentation here
To deploy an application image when Docker Engine is in swarm mode, you create a service. Frequently a service is the image for a microservice within the context of some larger application. Examples of services might include an HTTP server, a database, or any other type of executable program that you wish to run in a distributed environment.
But First Let’s Understand what is the docker services ?
Simply It’s group of containers of the same image, services will make your life easier when you are planning to scale your application also it will be working on docker cloud, to do that you should configure the service in three steps:-
- Choose a Container Image.
- Configure the Service.
- Set Environment variables.
Before configure any docker services there is file called “docker-compose.yml” it’s define how the docker container will behave in the environment.
the below example show you how the file looks like ( taken from docker documentation), at the first look you will understand anything but luckily it’s very simple and easy to understand it.
version: "3"
services:
  web:
    # replace username/repo:tag with your name and image details
    image: username/repo:tag
    deploy:
      replicas: 5
      resources:
        limits:
          cpus: "0.1"
          memory: 50M
      restart_policy:
        condition: on-failure
    ports:
      - "4000:80"
    networks:
      - webnet
networks:
  webnet:
Let’s discuss the above file :-
- username/repo:tag –> should be replaced by your image information.
- run the same image as 5 instance and the main name will be “web”.
- Limitation will be 10% of CPU and 50 MB for each instance.
- the instance will be restarted on failure.
- mapped to port 4000 outside of docker, 80 inside the image.
- the load balancer will be mapped also on port 80 as you see from network section called webnet.
The Real Work :-
Before anything you should run the following command to be able to work and deploy your services
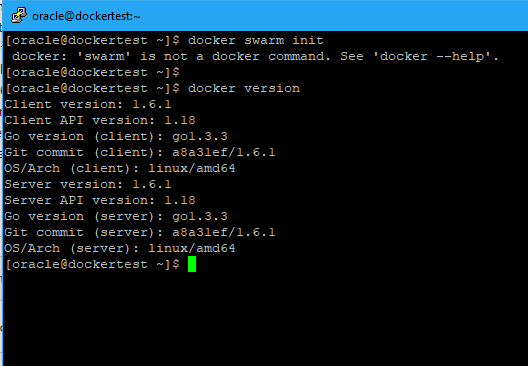
docker swarm init But in case you are facing the below issue

you have to upgrade your docker as method number#1 or uninstall it then install the newer version, after doing that and make sure you run the above command to ensure you will not get any error like “this node is not a swarm manager.” you can run the next command that allow you to create services.
docker stack deploy -c docker-compose.yml myfirstapp
where myfirstapp is my application name.
Get the ID for the one service in our application:
docker service ls
Search for our services name that are deployed called web with the application name which is myfristapp it will be like this myfirstapp_web.
Now are you scaled your application,
curl -4 http://localhost:4000
Several times in a row, or go to that URL in your browser and hit refresh a few times.
Cheers 🍻🍻
Osama

Hello, constantly i used to check weblog posts here early in the dawn, because
i love to find out more and more.
LikeLike
I really liked this post i read your blog very often, and you’re constantly coming out with some great stuff.
I shared this on mmy fb, aand my followers really lied it.
Keep up tthe very good work 🙂
LikeLike
Please mentioned the source
LikeLike