For the people who think differently Welcome aboard
Author: Osama Mustafa
Osama considered as one of the leaders in Cloud technology, DevOps and database in the Middle-East. I have more than ten years of experience within the industry. moreover, certfied 4x AWS , 4x Azure and 6x OCI, have also obtained database certifications for multiple providers.
In addition to having experience with Oracle database and Oracle products, such as middle-ware, OID, OAM and OIM, I have gained substantial knowledge with different databases.
Currently, I am architecting and implementing Cloud and DevOps. On top of that, I'm providing solutions for companies that allow them to implement the solutions and to follow the best practices.
I would like to share the following project, the idea of the project is to share the knowledge and allow people to try full implementation on AWS and hands-on experience: –
Create the VM
Install Nginx with a reverse proxy listening on port 3333 and rerouting locally on port 8080 and make a small application that just ECHOs HTTP request on port 8080 (in any language you want).
Harden it using this script (or if you want to make your own on different OS configuration or a more updated one, we will compensate you for it.)
Ensure that you are using a custom service account and not the default one.
Make sure that everything is logged in Stackdriver including system, SSH log tentative,all application servers.
Make sure that the firewall is well configured and no extra port is opened.
Publish the VM.
The Solution that i created was the following: –
Use this CloudFormation script to deploy following an instance with following setup:
Echo request application
Centralized logging to CloudWatch
Hardened Operating System
The CloudFormation Script, makes use of several scripts and configuration files. Their links and description are as follows:-
Zabbix is Open Source software used for monitoring the application, Server and networking, and cloud services, zabbix provide metrics, such as network utilization, CPU and disk space .. etc.
What Zabbix 4.4.2 can monitor
In this post i will try to mention everything for Zabbix installation and configuration, include to this some of the issues that you will face during the installation with screenshots, the idea of this post to help people and allow them to understand and simplify the installation/configuration.
You can Refer always to Zabbix documentation which include different versions, remember this post is for Zabbix 4.4.2 and maybe will work on other versions, but never tested before. The documentation HERE.
You can Download Zabbix From HERE, Depends on your operating system and version, Zabbix supporting two different databases during the installation which is MySQL & PostgreSQL.
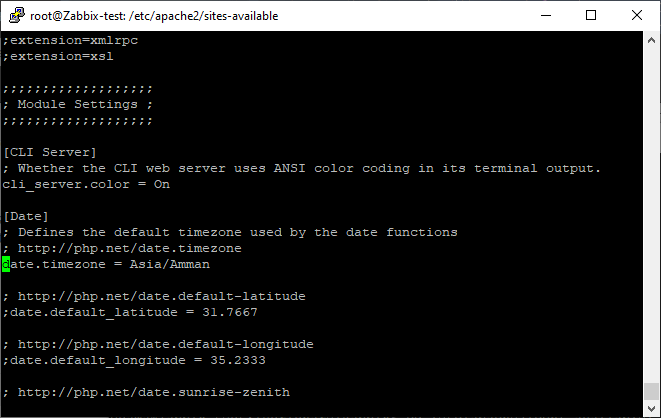
Once the installation is done, you have to update the timezone for PHP, you can do this by edit the file
/etc/php/php<version>/apache2/php.ini
Search for the line include word “Date”, remember when you edit the file you will find “;” at start of the line, in php this is comment , so you have to remove and update the timezone, the List of Supported Timezones in php HERE, once you find yours edit the file.
I also attached pictures to show you how the file will look like
php.ini from the inside
Step #2: Before Install Zabbix Server
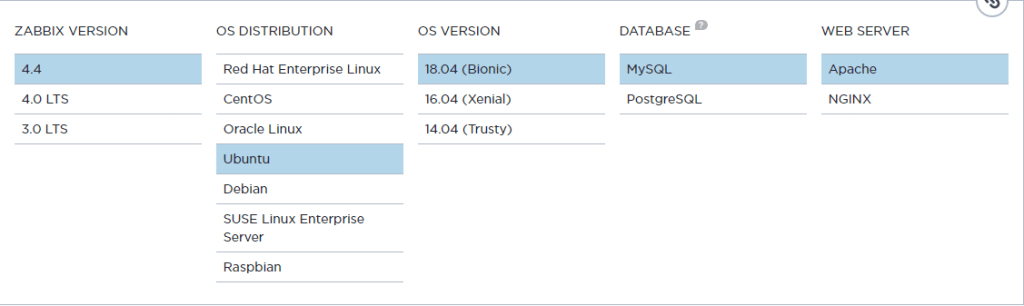
before install Zabbix server, there are one required step should be done first which is enable the zabbix repository, the download Link (HERE)that mentioned above gave you the steps , again you can find the link here and choose which Operating system Zabbix will be installed on
Zabbix Download Link shows our setup
From the above, once you choose everything, scroll down to find the repository.
Now all the necessary packages has been installed on the operating system, the configuration start from the base which is the database.
Step #4: Create Zabbix Database Schema
Login to MySQL by the below commands to create the database and user.
mysql -uroot -p
Enter the password
mysql> create database zabbix character set utf8 collate utf8_bin;
mysql> grant all privileges on zabbix.* to zabbix@localhost identified by 'zabbix';
mysql> quit;
Now we have to import the data into the schema we just create, to do this we should run the below command, notice these steps should be done in order otherwise an issue will be appeared, You will be prompted to enter your newly created password.
zcat /usr/share/doc/zabbix-server-mysql*/create.sql.gz | mysql -u zabbix -p zabbix
Step #5: Configure Zabbix file to access the database.
Edit the following file
/etc/zabbix/zabbix_server.conf
Search for the following Lines using your favorite editor either vi, vim , nano .. etc
Before doing this, which is access to above Link, i faced an issue, which is i was 100% everything is Ok, but everytime i access the link, HTTP response code with 404 NOT FOUND, i was searching about this, and the solution was like the following
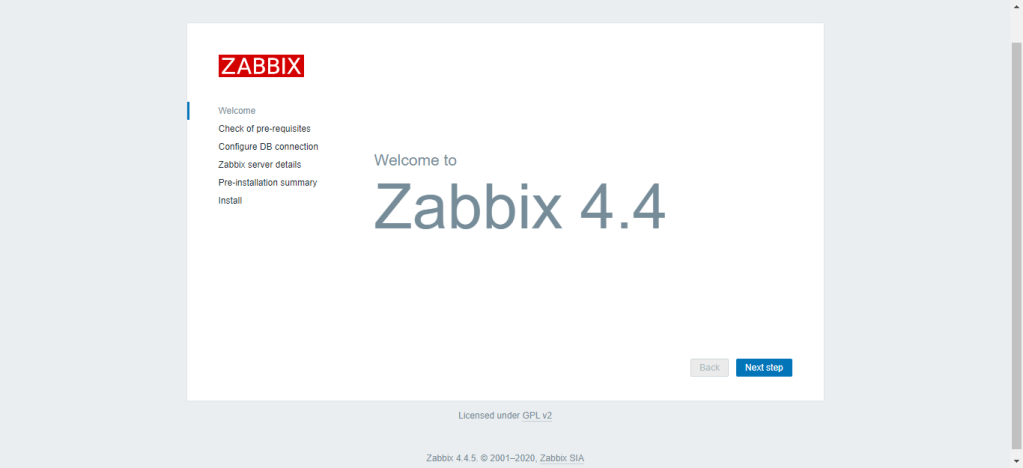
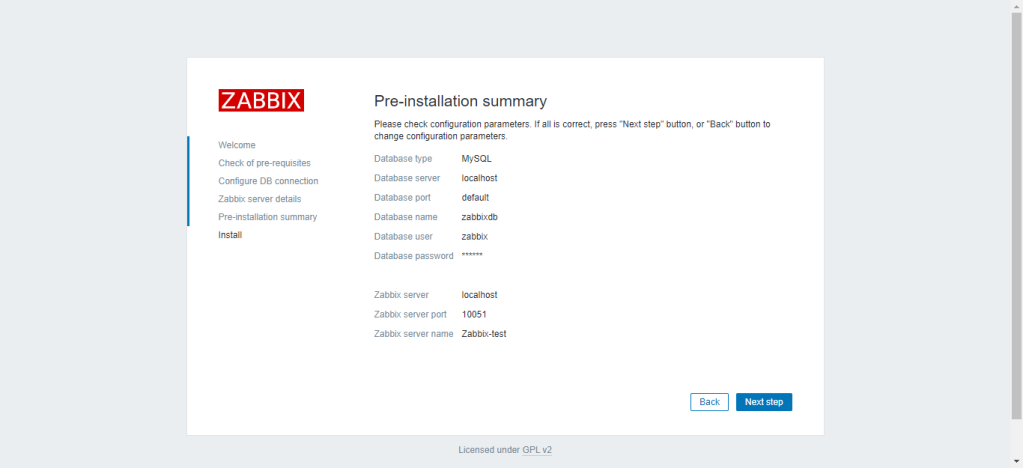
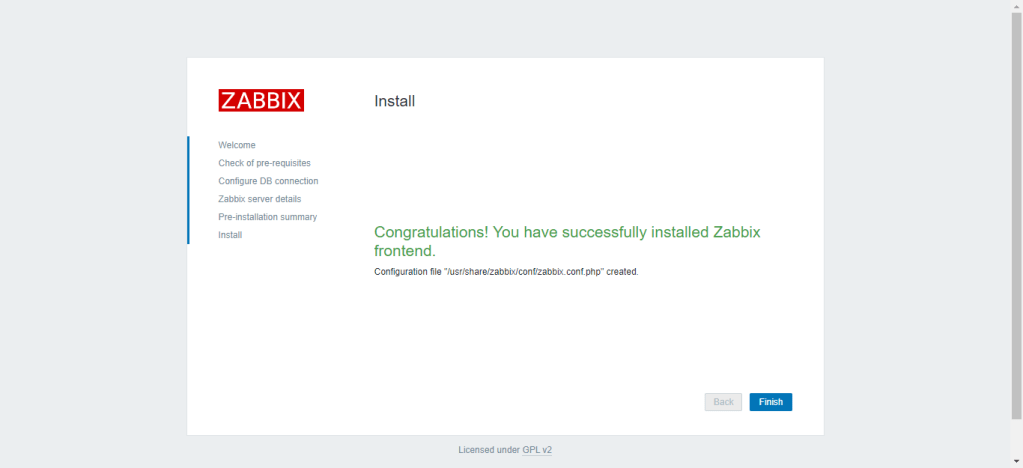
Step #7: complete the configuration via Zabbix Web Installer.
Zabbix Setup Welcome Screen
Zabbix Welcome Screen
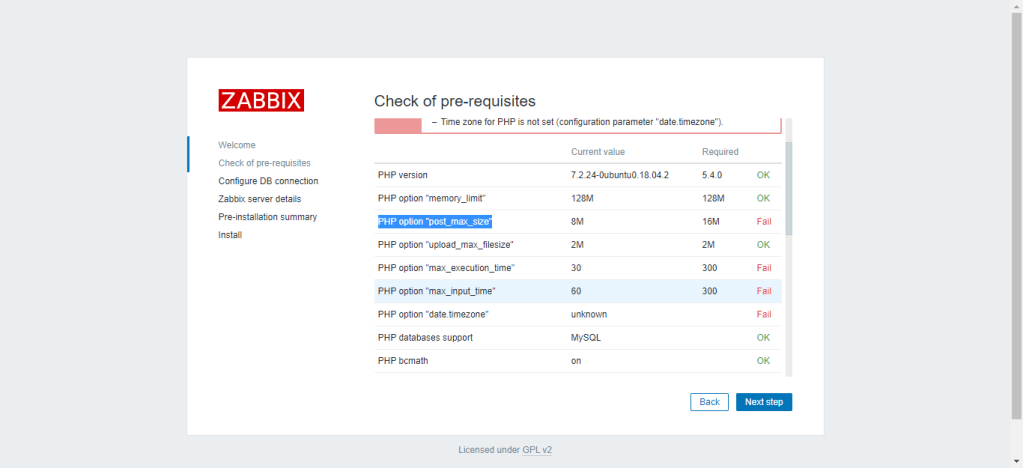
Check for pre-requisites
pre-requisites everything should be OK
to solve the above you have to fix the value from one file which is
/etc/php/php<version>/apache2/php.ini
and search for the option, for example, post_max_size the current value is 8M just change to 16M and So on, remember after you change the value you have to restart the Apache to take the effect and then check the pre-requisites again.
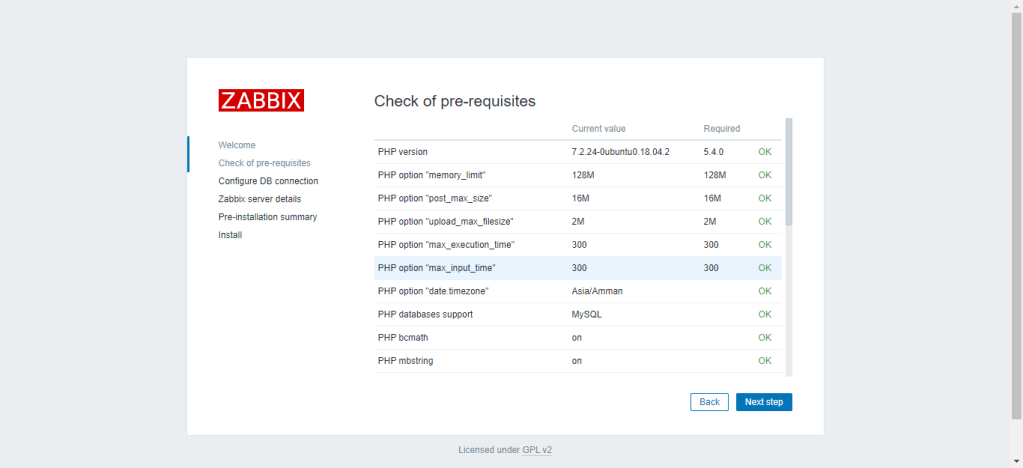
after fixing the Values.
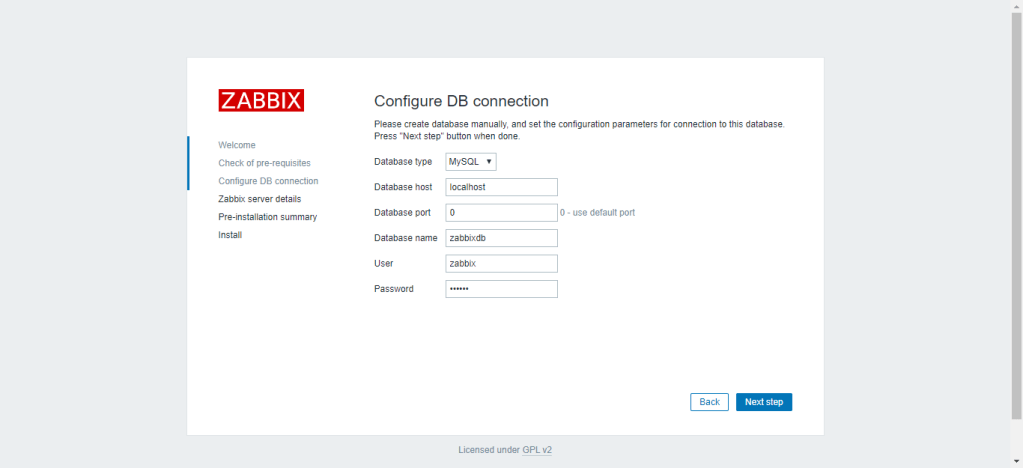
Configure DB Connection
Enter database details created in Step #4 and click next to continue.
Database Details in Step #4
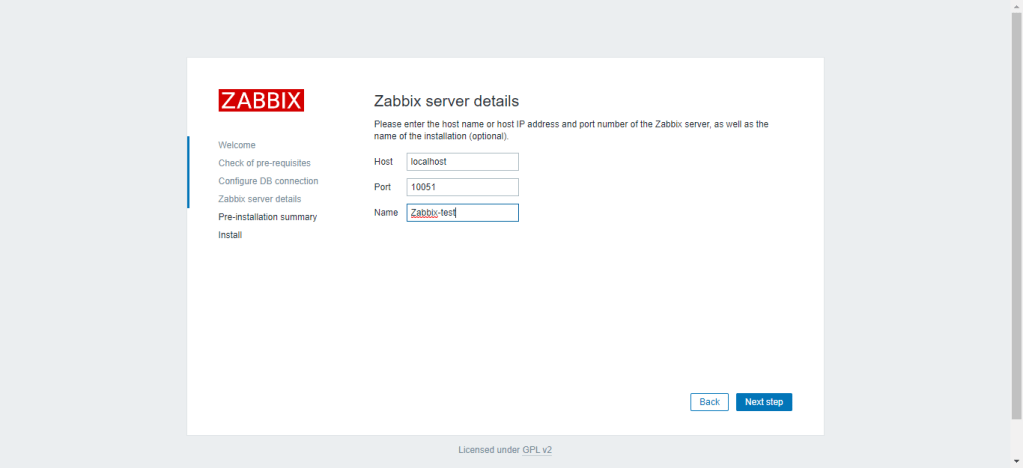
Zabbix Server Details
This is the host and port of running Zabbix server, Don’t change the values of the port and host, no need to do that, since it’s running on the same server, for the Name, you can give name for the instance.
Recently i was working on automation project for Zabbix, The idea of the project is automate the template change on multiple sites instead of doing this manually, these scripts will do the import for you, and you can import more than one template With format XML into the Zabbix server, the export script will be uploaded soon.
Make your life easier by using one Repository you can either do it for your indiviusal use or for company, Github consider as one of the most common DevOps tools.
In this post i will show how to create GitHub and use it for the first time, for more advance topics about it please review the documentation that i already mentioned in the document.
This week, i was working on Automation Project related to Zabbix, which is fix the issues automatically without human interaction, so in case for example; the file system alert reach 85% it will be delete specific folder and send an email to system administrator.
or for example the Cache has been filled and you need to clear, so need for example for someone to access the server and take an action to do this.
I wrote scripts where it’s integrate it with Zabbix and once the threshold will fire, the scripts will run automatically.
This github repository will be updated since the project is not complete yet, still has to do a lot of scripting and integration but i would like to share it with you guys.
In this post i will discuss how to install Boto3 module on Python, I am using Python 3.6, What is Boto3 ?!
Boto3 is the Amazon Web Services (AWS) Software Development Kit (SDK) for Python, which allows Python developers to write software that makes use of services like Amazon S3 and Amazon EC2. You can find the latest, most up to date, documentation at our doc site, including a list of services that are supported.
The Module is very big and covering all AWS features, you can intergrate the code and start dealing with S3 for exampel from Download/Upload, Create Bucket , Delete and more; the documentation is here
To install Boto3, you should follow the below steps
Option #1
yum install python3-pip
Once you run the above command, Pip will be installed on local machine which is a package manager for Python packages, or modules if you like.
pip3 install boto3 --user
Option #2
I prefer this method more than Option #1 because it’s run by python itself
python3 -m pip install --user boto3
Now you installed Boto3 on your machine, you can start using it by
We all know Amazon AWS, one of the AWS Features called s3, refer to Simple Storage Service which is is a service offered by Amazon Web Services that provides object storage through a web service interface.
Amazon Provide different ways to deal with s3, either by console or by AWSCLI, But In this post i choose to work with s3 in different way, as most of you know, i love python because it’s very simple, not complicated and cross-platform programming language.
You can deal and manage s3 using python by module called boto3, in previous version it was called boto (without 3), you have to install this module to allow python import the library, very simple step
pip3 install boto3
or by the project Interpreter that you are using, in my case i am using PyCharm Community, Nice to deal with, you can install any module by doing the following
File --> Setting --> Project interpreter --> Press on + sign --> and search for the module you want to install
I uploaded the scripts to my Github like usual here, the repository includes two different file
Upload to S3
Download from s3
It’s very simple scripts, but you have to update the following to ensure access to AWS S3
This is the first blog post for the 2020, i Wish everyone will have healthy and wonderful year, may your dreams come true.
I post recently or let’s say Last Year about Full automation project using DevOps tools, and i didn’t to be honest except that much download and questions on that post. you can read it from here.
I decided to create new project but this time to show the power of DevOps and how to use it more in your daily Job, task or even configuration.
The idea of this project like the following:-
You have two code, one Go based application, one Java-based application. Both are providing an HTTP service with the same endpoints.
The Endpoints which is :-
Route
Description
/
A static site. Should not appear in the final setup as it is but redirect to /hotels.
/hotels
JSON object containing hotel search results
/health
Exposes the health status of the application
/ready
Readiness probe
/metrics
Exposes metrics of the application
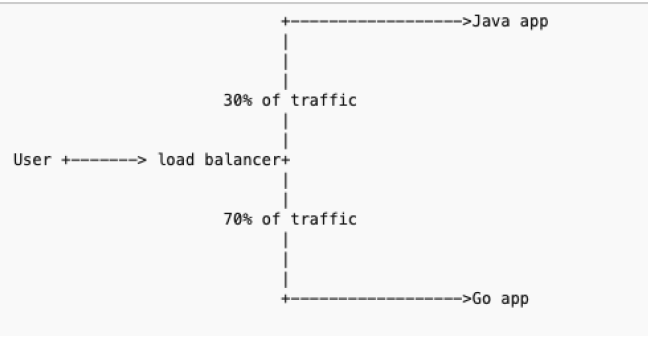
We have to setup Load Balancer for this application to be like the following :-
traffic distribution should be as follows: 70% of the requests are going to the application written in Go, 30% of the requests are going to the application written in Java, also i will do it using Docker
I upload the code, and the application ( the two part which is Go application and Java) to my Github HERE, all the configuration has been uploaded to my github,
The Solution files like the below;
docker-compose.yml file in root directory is the main compose file for setting up containers for all services
go-app directory contains binary of Golang Application and Dockerfile of relavant setup
java-app directory contains binary of Java Application and Dockerfile of relavant setup
load-balancer directory contains nginx.conf file which is configuration file of Nginx and have load balancer rules written in it. And containers a Dockerfile for setting up Nginx with defined configurations
The final architecture will be like this instead of the image you saw above
The aim of test is to create a simple HTTP service that stores and returns configurations that satisfy certain conditions. Since I love automating things, the service should be automatically deployed to kubernetes.
You can read more about the project, once you access to my GitHub using the README.MD, I explained the project step by step also the documentation explained every thing.
the code has been uploaded to GitHub, include to this, the documentation uploaded to Slide-share.