Share Folder On Solaris For Window Purpose

In this article i will show how to share folder in Solaris and use this folder for Copy/Paste in windows , I will use NFS so you need to make sure it’s already enable in Windows

  • Select Control Panel.
  • Select Programs.
  • Select Programs and Features.
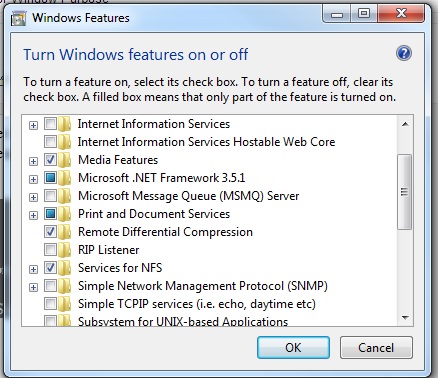
  • Select Turn Windows Features on or off.
  • Select Services for NFS.
  • Select the check box Client for NFS and click OK.
Now On Solaris Side , Using Share command 

share [-F fstype] [ -o options] [-d “”] [resource]

Create Folder and use the below command to share 

share -F nfs -o rw -d “codereview dirs” /u01/Shared –> my Shared Folder


root@Host:/u01# cat /etc/dfs/sharetab 

/u01/hmmdb u01_hmmdb nfs sec=sys,rw codereview
/u01/Shared u01_Shared nfs sec=sys,rw

Now back to windows open Command Prompt “cmd”
and run the below command :
showmount -e Server-IP 

Exports list on :
/u01/Shared                        All Machines
/u01/hmmdb                         All Machines

Command to share on windows :
mount -o mtype=hard Server-IP:Path_for_share_folder name drive letter or *
mount -o mtype=hard server-ip:/u01/Shared Z:
Done
Thank you 
Osama mustafa

Oracle Java SE Critical Patch Released

“The June 2013 Oracle Java SE Critical Patch Update was released on June 18, 2013. Oracle strongly recommends applying the patches as soon as possible.

The Critical Patch Update Advisory is the starting point for relevant information. It includes the list of products affected, a summary of the security vulnerabilities, and a pointer to obtain the latest releases and patches.”

June 2013 Oracle Java SE Critical Patch Update: Here

The next four scheduled dates for Oracle Java SE Critical Patch Updates are:
16 April 2013
18 June 2013
15 October 2013
14 January 2014

Thank you
Osama mustafa

Extend File system On Solaris Using ZFS Command

The below is demostration for extend File system On Solaris 11 :  

root@TEST:~# zfs list
NAME                      USED  AVAIL  REFER  MOUNTPOINT
oracle                    107G  10.6G  1.11M  /oracle
oracle/u01                105G  13.0G   105G  /u01
rpool                    32.2G  46.0G    39K  /rpool
rpool/ROOT               5.40G  46.0G    31K  legacy
rpool/ROOT/solaris       5.40G  46.0G  5.03G  /
rpool/ROOT/solaris/var    318M  46.0G   314M  /var
rpool/dump               1.03G  46.1G  1.00G  –
rpool/export              854K  46.0G    32K  /export
rpool/export/home         822K  46.0G    32K  /export/home
rpool/export/home/omnix   790K  46.0G   790K  /export/home/omnix
rpool/swap               25.8G  46.8G  25.0G  –

 root@TEST:~# zpool list

NAME     SIZE  ALLOC   FREE  CAP  DEDUP  HEALTH  ALTROOT
oracle   140G   105G  34.9G  75%  1.00x  ONLINE  –
rpool   79.5G  31.4G  48.1G  39%  1.00x  ONLINE  –

root@TEST:~# zpool set autoexpand=on oracle

root@TEST:~# zpool list
NAME     SIZE  ALLOC   FREE  CAP  DEDUP  HEALTH  ALTROOT
oracle   140G   105G  34.9G  75%  1.00x  ONLINE  –
rpool   79.5G  31.4G  48.1G  39%  1.00x  ONLINE  –

now you have to do the below :

root@TEST:~# zfs get volsize,reservation oracle

         NAME    PROPERTY     VALUE    SOURCE

oracle  volsize      –        –
oracle  reservation  107G     local

root@TEST:~# zfs set reservation=140G oracle/u01

          root@TEST:~# zfs get reservation oracle/u01

NAME        PROPERTY     VALUE   SOURCE
oracle/u01  reservation  140     local

–> zfs set quota=140G oracle

Finally Check df -h and size are increased 🙂

Thank you
Osama mustafa 

cannot unmount ‘/export/home/oracle’: Device busy

Operating System : Solaris 11

When run the below command :

zfs destroy rpool/export/home/grid

 cannot unmount ‘/export/home/oracle’: Device busy

Solution :

zfs unmount rpool/export/home/grid
zfs destroy rpool/export/home/grid

Thank you
Osama mustafa

cannot mount ‘rpool/u01’ on ‘/u01’: mountpoint or dataset is busy

When you try to use the below command :

zfs create -o mountpoint=/u01 rpool/u01

Error :
cannot mount ‘rpool/u01’ on ‘/u01’: mountpoint or dataset is busy
The Solution :
  • First destroy rpool/u01
  • zfs create rpool/u01
  • zfs set mountpoint=/u01 rpool/u01
  • mkdir /u01
  • zfs mount /u01
Thank you 
Osama Mustafa

Example on how to add Virtual Host On em12c

Active/Passive Clusterware , how to use it with em12c ? How to monitor OS and Database ? As One Single host Agent will deploy on Both Hosts without Any problem but in this case you will only Deal with one Host as Single not as Clusterware.

i will provide example how to add active/passive Clusterware to em12c :
First Agent should be deploy for single Host not acitve/passive clusterware, after do that Run the below command from Single Host 
 
emctl deploy agent -o -n “Service_name” -A  
The Below Commands should be run from new agent Location 
emctl secure agent
emctl start agent
emctl config agent addinternaltargets
**I prefer to set Service_name —> OracleAgent12cShared.
** Re run the above command on the passive Node after Failover shared storage on it.
Thank you 
Osama Mustafa

Increase /tmp Using Zfs Solaris 11

zfs create -V 1gb rpool/newtmp
swap -a /dev/zvol/dsk/rpool/newtmp

 Old Size :

swap                   159M   212K       159M     1%    /tmp
rpool/export            78G    32K        67G     1%    /export
rpool/export/home       78G    32K        67G     1%    /export/home
rpool/export/home/omnix
                        78G   790K        67G     1%    /export/home/omnix
oracle                 118G   1.1M        11G     1%    /oracle
rpool                   78G    39K        67G     1%    /rpool
oracle/u01             118G    93G        25G    79%    /u01
/oracle                 11G   1.1M        11G     1%    /home/oracle

New Size :

root@HMMDB:/# zfs create -V 1gb rpool/extraswap
root@HMMDB:/# zfs list
NAME                      USED  AVAIL  REFER  MOUNTPOINT
oracle                    107G  10.6G  1.11M  /oracle
oracle/u01               92.6G  25.0G  92.6G  /u01
rpool                    12.6G  65.6G    39K  /rpool
rpool/ROOT               5.39G  65.6G    31K  legacy
rpool/ROOT/solaris       5.39G  65.6G  5.03G  /
rpool/ROOT/solaris/var    316M  65.6G   312M  /var
rpool/dump               1.03G  65.7G  1.00G  –
rpool/export              854K  65.6G    32K  /export
rpool/export/home         822K  65.6G    32K  /export/home
rpool/export/home/omnix   790K  65.6G   790K  /export/home/omnix
rpool/extraswap          1.03G  66.7G    16K  –
rpool/swap               5.16G  65.8G  5.00G  –

root@HMMDB:/# swap -a /dev/zvol/dsk/rpool/extraswap

Now Check New Size for /tmp

swap                   1.2G   212K       1.2G     1%    /tmp
rpool/export            78G    32K        66G     1%    /export
rpool/export/home       78G    32K        66G     1%    /export/hom

Thank you
Osama Mustafa

Flashback version query/Operation Column is Unknown

SQL > SELECT START_SCN,OPERATION,LOGON_USER,XID FROM  FLASHBACK_TRANSACTION_QUERY WHERE TABLE_NAME=’TEST’;

The Output will be like this :

XID              TABLE_OWNER TABLE_NAME OPERATION           LOGON_USER UNDO_SQL
—————- ———– ———- ——————————– ———-              —————
0600090064030000              TX         UNKNOWN                          TEST
0600090064030000              TX         UNKNOWN                          TEST

To avoid Unknown Status enable  supplemental logging by

SQL> ALTER DATABASE ADD SUPPLEMENTAL LOG DATA ;

Database altered.

Thank you
Osama mustafa

Enable FTP On Redhat

to enable FTP on Redhat on you have to follow to follow the below step,you need to define which user will use the FTP, in this article i will use root user :

Edit the files /etc/vsftpd.ftpusers and /etc/vsftpd.user_list looks like :

#

# List of users denied access to the FTP server, see ftpusers(4).
#
root
daemon
bin
sys
adm
lp
uucp
nuucp
dladm
netadm
netcfg
smmsp
xvm
mysql
openldap
webservd
nobody
noaccess
nobody4
unknown
zfssnap
aiuser

and remove root user from each file.

You can control ftp as services from

/etc/init.d/vsftpd

Thank you
Osama Mustafa