AWS offers a wide variety of services and Partner tools to help you migrate your data sets, whether they are files, databases, machine images, block volumes, or even tape backups.
AWS Storage Gateway
AWS Storage Gateway is a service that gives your applications seamless and secure integration between on-premises environments and AWS storage.
It provides you low-latency access to cloud data with a Storage Gateway appliance.
Storage Gateway types
Choose a Storage Gateway type that is the best fit for your workload.
Amazon s3 file Gateway
Amazon FSx file Gateway
Tape Gateway
Volume Gateway
The Storage Gateway Appliance supports the following protocols to connect to your local data:
NFS or SMB for files
iSCSI for volumes
iSCSI VTL for tapes
Your storage gateway appliance runs in one of four modes: Amazon S3 File Gateway, Amazon FSx File Gateway, Tape Gateway, or Volume Gateway.
Data moved to AWS using Storage Gateway can be sent to the following destinations through the Storage Gateway managed service:
Amazon FSx for Windows File Server (Amazon FSx File Gateway)
Amazon EBS (Volume Gateway)
AWS Datasync
Manual tasks related to data transfers can slow down migrations and burden IT operations. DataSync facilitates moving large amounts of data between on-premises storage and Amazon S3 and Amazon EFS, or FSx for Windows File Server. By default, data is encrypted in transit using Transport Layer Security (TLS) 1.2. DataSync automatically handles scripting copy jobs, scheduling and monitoring transfers, validating data, and optimizing network usage.
Reduce on-premises storage infrastructure by shifting SMB-based data stores and content repositories from file servers and NAS arrays to Amazon S3 and Amazon EFS for analytics.
DataSync deploys as a single software agent that can connect to multiple shared file systems and run multiple tasks. The software agent is typically deployed on premises through a virtual machine to handle the transfer of data over the wide area network (WAN) to AWS. On the AWS side, the agent connects to the DataSync service infrastructure. Because DataSync is a service, there is no infrastructure for customers to set up or maintain in the cloud. DataSync configuration is managed directly from the console.
AWS Snow Family service models
The AWS Snow Family helps customers that need to run operations in austere, non-data center environments and in locations where there’s lack of consistent network connectivity. The AWS Snow Family, comprised of AWS Snowcone, AWS Snowball, and AWS Snowmobile, offers several physical devices and capacity points.
There are three types of cloud storage: object, file, and block. Each storage option has a unique combination of performance, durability, cost, and interface.
Block storage – Enterprise applications like databases or enterprise resource planning (ERP) systems often require dedicated, low-latency storage for each host. This is similar to direct-attached storage (DAS) or a Storage Area Network (SAN). Block-based cloud storage solutions like Amazon Elastic Block Store (Amazon EBS) are provisioned with each virtual server and offer the ultra-low latency required for high-performance workloads.
File storage – Many applications must access shared files and require a file system. This type of storage is often supported with a Network Attached Storage (NAS) server. File storage solutions like Amazon Elastic File System (Amazon EFS) are ideal for use cases such as large content repositories, development environments, media stores, or user home directories.
Object storage – Applications developed in the cloud need the vast scalability and metadata of object storage. Object storage solutions like Amazon Simple Storage Service (Amazon S3) are ideal for building modern applications. Amazon S3 provides scale and flexibility. You can use it to import existing data stores for analytics, backup, or archive.
AWS provides you with services for your block, file and object storage needs. Select each hotspot in the image to see what services are available for you to explore to build solutions.
Amazon S3 use cases
Backup and restore.
Data Lake for analytics.
Media storage
Static website.
Archiving
Buckets and objects
Amazon S3 stores data as objects within buckets. An object is composed of a file and any metadata that describes that file. The diagram below contains a URL comprised of a bucket and an object key. The object key is the unique identifier of an object in a bucket. The combination of a bucket, key, and version ID uniquely identifies each object. The object is uniquely addressed through the combination of the web service endpoint, bucket name, key, and optionally, a version.
To store an object in Amazon S3, upload the file into a bucket. When you upload a file, you can set permissions on the object and add metadata. You can have one or more buckets in your account. For each bucket, you control who can create, delete, and list objects in the bucket.
Amazon S3 access control
By default, all Amazon S3 resources—buckets, objects, and related resources (for example, lifecycle configuration and website configuration)—are private. Only the resource owner, an AWS account that created it, can access the resource. The resource owner can grant access permissions to others by writing access policies.
AWS provides several different tools to help developers configure buckets for a wide variety of workloads.
Most Amazon S3 use cases do not require public access.
Amazon S3 usually stores data from other applications. Public access is not recommended for these types of buckets.
Amazon S3 includes a block public access feature. This acts as an additional layer of protection to prevent accidental exposure of customer data.
Amazon S3 Event Notifications
Amazon S3 event notifications enable you to receive notifications when certain object events happen in your bucket. Here is an example of an event notification workflow to convert images to thumbnails. To learn more, select each of the three hotspots in the diagram below.
Amazon S3 cost factors and best practices
Cost is an important part of choosing the right Amazon S3 storage solution. Some of the Amazon S3 cost factors to consider include the following:
Storage – Per-gigabyte cost to hold your objects. You pay for storing objects in your S3 buckets. The rate you’re charged depends on your objects’ size, how long you stored the objects during the month, and the storage class. There are per-request ingest charges when using PUT, COPY, or lifecycle rules to move data into any S3 storage class.
Requests and retrievals – The number of API calls: PUT and GET requests. You pay for requests made against your S3 buckets and objects. S3 request costs are based on the request type, and are charged on the quantity of requests. When you use the Amazon S3 console to browse your storage, you incur charges for GET, LIST, and other requests that are made to facilitate browsing.
Data transfer – Usually no transfer fee for data-in from the internet and, depending on the requestor location and medium of data transfer, different charges for data-out.
Management and analytics – You pay for the storage management features and analytics that are enabled on your account’s buckets. These features are not discussed in detail in this course.
S3 Replication and S3 Versioning can have a big impact on your AWS bill. These services both create multiple copies of your objects and you pay for each PUT request in addition to the storage tier charge. S3 Cross-Region Replication also requires data transfer between AWS Regions.
Shared file systems
Using a fully managed cloud shared file system solution removes complexities, reduces costs, and simplifies management. To learn more about shared file systems, select each hotspot in the image below.
Amazon Elastic File System (EFS)
Amazon EFS provides a scalable, elastic file system for Linux-based workloads for use with AWS Cloud services and on-premises resources.
You’re able to access your file system across Availability Zones, AWS Regions, and VPCs while sharing files between thousands of EC2 instances and on-premises servers through AWS Direct Connect or AWS VPN.
You can create a file system, mount the file system on an Amazon EC2 instance, and then read and write data to and from your file system.
Amazon EFS provides a shared, persistent layer that allows stateful applications to elastically scale up and down. Examples include DevOps, web serving, web content systems, media processing, machine learning, analytics, search index, and stateful microservices applications. Amazon EFS can support a petabyte-scale file system, and the throughput of the file system also scales with the capacity of the file system.
Because Amazon EFS is serverless, you don’t need to provision or manage the infrastructure or capacity. Amazon EFS file systems can be shared with up to tens of thousands of concurrent clients, no matter the type. These could be traditional EC2 instances, containers running in one of your self-managed clusters or in one of the AWS container services, Amazon ECS, Amazon EKS, and Fargate, or in a serverless function running in Lambda.
Use Amazon EFS to lower your total cost of ownership for shared file storage. Choose Amazon EFS One Zone for data that does not require replication across multiple Availability Zones and save on storage costs. Amazon EFS Standard-Infrequent Access (EFS Standard-IA) and Amazon EFS One Zone-Infrequent Access (EFS One Zone-IA) are storage classes that provide price/performance that is cost-optimized for files not accessed every day.
Use Amazon EFS scaling and automation to save on management costs, and pay only for what you use.
Amazon FSx
With Amazon FSx, you can quickly launch and run feature-rich and high-performing file systems. The service provides you with four file systems to choose from. This choice is based on your familiarity with a given file system or by matching the feature sets, performance profiles, and data management capabilities to your needs.
Amazon FSx for Windows File Server
FSx for Windows File Server provides fully managed Microsoft Windows file servers that are backed by a native Windows file system. Built on Windows Server, Amazon FSx delivers a wide range of administrative features such as data deduplication, end-user file restore, and Microsoft Active Directory.
Amazon FSx for Lustre (FSx for Lustre)
FSx for Lustre is a fully managed service that provides high-performance, cost-effective storage. FSx for Lustre is compatible with the most popular Linux-based AMIs, including Amazon Linux, Amazon Linux 2, Red Hat Enterprise Linux (RHEL), CentOS, SUSE Linux, and Ubuntu.
Amazon FSx for NETapp ONTAP
FSx for NETapp ONTAP provides fully managed shared storage in the AWS Cloud with the popular data access and management capabilities of ONTAP.
Amazon FSx for OpenZFS
Where the road leads, I will go. Along the stark desert, across the wide plains, into the deep forests I will follow the call of the world and embrace its ferocious beauty.
Welcome to our deep dive into the world of containerization and cloud orchestration! In this blog post, we’re going to explore the innovative realm of AWS ECS Fargate, a game-changer in the world of container management and deployment. AWS ECS Fargate simplifies the process of running containers by eliminating the need to manage servers or clusters, offering a more streamlined and efficient way to deploy your applications.
But that’s not all. We understand the importance of infrastructure as code (IaC) in today’s fast-paced tech environment. That’s why we’re also providing you with a powerful resource – a GitHub repository containing Terraform code, meticulously crafted to help you deploy AWS ECS Fargate services with ease. Terraform, an open-source infrastructure as code software tool, enables you to define and provision a datacenter infrastructure using a declarative configuration language. This integration with Terraform not only automates your deployments but also ensures consistency and reliability in your infrastructure setup.
Whether you’re new to AWS ECS Fargate or looking to enhance your existing knowledge, this post aims to provide you with actionable insights and practical know-how. From setting up your first Fargate service to scaling and managing it effectively, we’ve got you covered. So, gear up as we embark on this journey to harness the full potential of AWS ECS Fargate, supplemented by the power of Terraform automation.
Stay tuned, and don’t forget to check out our GitHub repository linked at the end of this post for the Terraform code that will be your ally in deploying and managing your Fargate services efficiently.
AWS edge computing services provide infrastructure and software that move data processing and analysis as close to the endpoint as necessary. This includes deploying AWS managed hardware and software to locations outside AWS data centers, and even onto customer-owned devices.
You can extend the cloud for a consistent hybrid experience using these AWS edge services related to locations:
AWS edge locations – Edge locations are connected to the AWS Regions through the AWS network backbone. Amazon CloudFront, AWS WAF, and AWS Shield are services you use here.
AWS Local Zones – Local Zones are an extension of the AWS Cloud located close to large population and industry centers. You learned about Local Zones in Module 1: Architecting Fundamentals.
AWS Outposts – With AWS Outposts, you can run some AWS services on premises or at your own data center.
AWS Snow Family – The Snow Family of products provides offline storage at the edge, which is used to deliver data back to AWS Regions.
Edge services architecture
Review the edge services architecture. A user sends a request to an application partly hosted on premises. The user’s request interacts with Amazon Route 53, AWS WAF, Amazon CloudFront and AWS Outposts. The AWS services hosted in the cloud are protected with AWS Shield.
Amazon Route 53
Amazon Route 53 provides a DNS, domain name registration, and health-checks. Route 53 was designed to give developers and businesses a reliable and cost-effective way to route end users to internet applications. It translates names like example.com into the numeric IP addresses that computers use to connect to each other.
Route 53 effectively connects user requests to infrastructure running in AWS—such as EC2 instances, ELB load balancers, or Amazon S3 buckets—and can also be used to route users to infrastructure outside of AWS.
You can configure a Amazon CloudWatch alarm to check on the state of your endpoints. Combine your DNS with Health Check Metrics to monitor and route traffic to healthy endpoints.
Amazon Route 53 public and private DNS
A hosted zone is a container for records. Records contain information about how you want to route traffic for a specific domain, such as example.com, and its subdomains such as dev.example.com or mail.example.com. A hosted zone and the corresponding domain have the same name.
PUBLIC HOSTED ZONE
Public hosted zones contain records that specify how you want to route traffic on the internet.
For internet name resolution
Delegation set – for authoritative name servers to be provided to the registrar or parent domain
Route to internet-facing resources
Resolve from the internet
Global routing policies
PRIVATE HOSTED ZONE
Private hosted zones contain records that specify how you want to route traffic in your Amazon VPC.
For name resolution inside a VPC
Can be associated with multiple VPCs and across accounts
Route to VPC resources
Resolve from inside the VPC
Integrate with on-premises private zones using forwarding rules and endpoints
Routing policies
When you create a record, you choose a routing policy, which determines how Amazon Route 53 responds to queries.
Failover routing
Amazon Route 53 health checks monitor the health and performance of your web applications, web servers, and other resources.
Each health check that you create can monitor one of the following:
The health of a specified resource, such as a web server
The status of other health checks
The status of an Amazon CloudWatch alarm
After you create a health check, you can get the status of the health check, get notifications when the status changes, and configure DNS failover.
Geolocation routing
Geolocation routing lets you choose the resources that serve your traffic based on the geographic location of your users, meaning the location that DNS queries originate from. For example, you might want all queries from Europe to be routed to an ELB load balancer in the Frankfurt Region.
Geoproximity routing
Geoproximity routing lets Amazon Route 53 route traffic to your resources based on the geographic location of your users and your resources. You can also optionally choose to route more traffic or less to a given resource by specifying a value, known as a bias. A bias expands or shrinks the size of the geographic Region from which traffic is routed to a resource.
Latency-based routing
If your application is hosted in multiple AWS Regions, you can improve performance for your users by serving their requests from the AWS Region that provides the lowest latency.
Data about the latency between users and your resources is based entirely on traffic between users and AWS data centers. If you aren’t using resources in an AWS Region, the actual latency between your users and your resources can vary significantly from AWS latency data. This is true even if your resources are located in the same city as an AWS Region.
Multivalue answer routing
Multivalue answer routing lets you configure Route 53 to return multiple values, such as IP addresses for your web servers, in response to DNS queries. You can specify multiple values for almost any record, but multivalue answer routing also lets you check the health of each resource. Route 53 returns only values for healthy resources.
The ability to return multiple health-checkable IP addresses is a way for you to use DNS to improve availability and load balancing. However, it is not a substitute for a load balancer.
Weighted routing
Weighted routing enables you to assign weights to a resource record set to specify the frequency with which different responses are served.
In this example of a blue/green deployment, a weighted routing policy is used to send a small amount of traffic to a new production environment. If the new environment is operating as intended, the amount of weighted traffic can be increased to confirm it can handle the increased load. If the test is successful, all traffic can be sent to the new environment.
Amazon CloudFront
Content delivery networks
It’s not always possible to replicate your entire infrastructure across the globe when your web traffic is geo-dispersed. It is also not cost effective. With a content delivery network (CDN), you can use its global network of edge locations to deliver a cached copy of your web content to your customers.
To reduce response time, the CDN uses the nearest edge location to the customer or the originating request location. Using the nearest edge location dramatically increases throughput because the web assets are delivered from cache. For dynamic data, you can configure many CDNs to retrieve data from the origin servers.
Use Regional edge caches when you have content that is not accessed frequently enough to remain in an edge location. Regional edge caches absorb this content and provide an alternative to having to retrieve that content from the origin server.
Edge caching
Edge caching helps applications perform dramatically faster and cost significantly less at scale. Review the content below to learn the benefits of edge caching.
WITHOUT EDGE CACHING
As an example, let’s say you are serving an image from a traditional web server, not from Amazon CloudFront. You might serve an image named sunsetphoto.png using the URL:
Your users can easily navigate to this URL and see the image. They don’t realize that their request was routed from one network to another (through the complex collection of interconnected networks that comprise the internet) until the image was found.
WITH EDGE CACHING
Amazon CloudFront speeds up the distribution of your content by routing each user request through the AWS backbone network to the edge location that can best serve your content. Typically, this is a CloudFront edge server that provides the fastest delivery to the viewer.
Using the AWS network can dramatically reduce the number of networks your users’ requests must pass through, which improves performance. Users get lower latency (the time it takes to load the first byte of the file) and higher data transfer rates.
You also get increased reliability and availability because copies of your files (also called objects) are now held (or cached) in multiple edge locations around the world.
Amazon CloudFront
Amazon CloudFront is a global CDN service that accelerates delivery of your websites, APIs, video content, or other web assets. It integrates with other AWS products to give developers and businesses a straightforward way to accelerate content to end users. There are no minimum usage commitments.
Amazon CloudFront provides extensive flexibility for optimizing cache behavior, coupled with network-layer optimizations for latency and throughput. The CDN offers a multi-tier cache by default, with regional edge caches that improve latency and lower the load on your origin servers when the object is not already cached at the edge.
Amazon CloudFront supports real-time, bidirectional communication over the WebSocket protocol. This persistent connection permits clients and servers to send real-time data to one another without the overhead of repeatedly opening connections. This is especially useful for communications applications such as chat, collaboration, gaming, and financial trading.
Support for WebSockets in Amazon CloudFront makes it possible for customers to manage WebSocket traffic through the same avenues as any other dynamic and static content. With CloudFront, customers can take advantage of distributed denial of service (DDoS) protection using the built-in CloudFront integrations with Shield and AWS WAF.
Amazon CloudFront caching
When a user requests content that you are serving with Amazon CloudFront, the user is routed to the edge location that provides the lowest latency. Content is delivered with the best possible performance. To review the steps for CloudFront caching, select each hotspot in the image below.
Improving CloudFront performance
WHAT AWS DOES
AWS provides features that improve the performance of your content delivery:
TCP optimization – CloudFront uses TCP optimization to observe how fast a network is already delivering your traffic and the latency of your current round trips. It then uses that data as input to automatically improve performance.
TLS 1.3 support – CloudFront supports TLS 1.3, which provides better performance with a simpler handshake process that requires fewer round trips. It also adds improved security features.
Dynamic content placement – Serve dynamic content, such as web applications or APIs from ELB load balancers or Amazon EC2 instances, by using CloudFront. You can improve the performance, availability, and security of your content.
You can also adjust the configuration of your CloudFront distribution to accommodate for better performance:
Define your caching strategy – Choosing an appropriate TTL is important. In addition, consider caching based on things like query string parameters, cookies, or request headers.
Improve your cache hit ratio – You can view the percentage of viewer requests that are hits, misses, and errors in the CloudFront console. Make changes to your distribution based on statistics collected in the CloudFront cache statistics report.
Use Origin Shield – Get an additional layer of caching between the regional edge caches and your origin. It is not always a best fit for your use case, but it can be beneficial for viewers that are spread across geographic regions or on-premises origins with capacity or bandwidth constraints.
DDoS Protection
A DDoS attack is an attack in which multiple compromised systems attempt to flood a target, such as a network or web application, with traffic. A DDoS attack can prevent legitimate users from accessing a service and can cause the system to crash due to the overwhelming traffic volume.
OSI layer attacks
In general, DDoS attacks can be segregated by which layer of the OSI model they attack. They are most common at the Network (layer 3), Transport (Layer 4), Presentation (Layer 6) and Application (Layer 7) Layers.
Infrastructure Layer Attacks – Attacks at Layer 3 and 4, are typically categorized as Infrastructure layer attacks. These are also the most common type of DDoS attack and include vectors like synchronized (SYN) floods and other reflection attacks like User Datagram Packet (UDP) floods. These attacks are usually large in volume and aim to overload the capacity of the network or the application servers. But fortunately, these are also the type of attacks that have clear signatures and are easier to detect.
Application Layer Attacks – An attacker may target the application itself by using a layer 7 or application layer attack. In these attacks, similar to SYN flood infrastructure attacks, the attacker attempts to overload specific functions of an application to make the application unavailable or extremely unresponsive to legitimate users.
AWS Solutions
AWS Shield Standard, AWS Web Application Firewall (WAF), and AWS Firewall Manager are AWS services that protect architectures against web-based attacks. Review the section below to learn more about each of these AWS services.
AWS Shield
AWS Shield is a managed DDoS protection service that safeguards your applications running on AWS. It provides you with dynamic detection and automatic inline mitigations that minimize application downtime and latency. There are two tiers of AWS Shield: Shield Standard and Shield Advanced.
AWS Shield Standard provides you protection against some of the most common and frequently occurring infrastructure (Layer 3 and 4) attacks. This includes SYN/UDP floods and reflection attacks. Shield Standard improves availability of your applications on AWS. The service applies a combination of traffic signatures, anomaly algorithms, and other analysis techniques. Shield Standard detects malicious traffic and it provides real-time issue mitigation. You are protected by Shield Standard at no additional charge.
If you need even more protection from DDoS attacks on your applications, consider using Shield Advanced. You get additional detection and mitigation against large and sophisticated DDoS attacks, near real-time visibility, and integration with AWS WAF, a web application firewall.
AWS Web Application Firewall (WAF)
AWS WAF is a web application firewall that helps protect your web applications or APIs against common web exploits and bots. AWS WAF gives you control over how traffic reaches your applications. Create security rules that control bot traffic and block common attack patterns, such as SQL injection (SQLi) or cross-site scripting (XSS). You can also monitor HTTP(S) requests that are forwarded to your compatible AWS services.
AWS WAF: Components of access control
Before configuring AWS WAF, you should understand the components used to control access to your AWS resources.
Web ACLs – You use a web ACL to protect a set of AWS resources. You create a web ACL and define its protection strategy by adding rules.
Rules – Each rule contains a statement that defines the inspection criteria and an action to take if a web request meets the criteria.
Rules groups – You can use rules individually or in reusable rule groups.
Rule statements – This is the part of a rule that tells AWS WAF how to inspect a web request.
IP set – This is a collection of IP addresses and IP address ranges that you want to use together in a rule statement.
Regex pattern set – This is a collection of regular expressions that you want to use together in a rule statement.
AWS Firewall Manager
AWS Firewall Manager simplifies your AWS WAF and Amazon VPC security groups administration and maintenance tasks. Set up your AWS WAF firewall rules, Shield protections, and Amazon VPC security groups once.
The service automatically applies the rules and protections across your accounts and resources, even as you add new resources. Firewall Manager helps you to:
Simplify management of rules across accounts and application.
Automatically discover new accounts and remediate noncompliant events.
Deploy AWS WAF rules from AWS Marketplace.
Enable rapid response to attacks across all accounts.
As new applications are created, Firewall Manager also facilitates bringing new applications and resources into compliance with a common set of security rules from day one. Now you have a single service to build firewall rules, create security policies, and enforce them in a consistent, hierarchical manner across your entire AWS infrastructure.
AWS Outposts solutions
These applications might need to generate near-real-time responses to end-user applications, or they might need to communicate with other on-premises systems or control on-site equipment. Examples include workloads running on factory floors for automated operations in manufacturing, real-time patient diagnosis or medical imaging, and content and media streaming.
You need a solution to securely store and process customer data that must remain on premises or in countries outside an AWS Region. You need to run data-intensive workloads and process data locally, or when you want closer controls on data analysis, backup, and restore.
With Outposts, you can extend the AWS Cloud to an on-premises data center. Outposts come in different form factors, each with separate requirements. Verify that your site meets the requirements for the form factor that you’re ordering.
The AWS Outposts family is made up of two types of Outposts: Outposts racks and Outposts servers. Choose each tab to learn more about the Outposts family products.
OUTPOSTS RACKS
When you order an Outposts rack, you can choose from a variety of Outposts configurations. Each configuration provides a mix of EC2 instance types and Amazon Elastic Block Store (Amazon EBS) volumes.
The benefits of Outposts racks include the following:
Scale up to 96 42U–standard racks.
Pool compute and storage capacity between multiple Outposts racks.
Get more service options than Outposts servers.
To fulfill the Outposts rack order, AWS will schedule a date and time with you. You will also receive a checklist of items to verify or provide before the installation. The team will roll the rack to the identified position, and your electrician can power the rack. The team will establish network connectivity for the rack over the uplink that you provide, and they will configure the rack’s capacity.
The installation is complete when you confirm that the Amazon EC2 and Amazon EBS capacity for your AWS Outpost is available from your AWS account.
OUTPOSTS SERVERS
With Outposts servers, you can order hardware at a smaller scale while still providing you AWS services on premises. You can choose from Arm-based or Intel-based options. Not all services available in Outposts racks are supported in Outposts servers.
Outposts servers are delivered directly to you and installed by either your own onsite personnel or a third-party vendor. Once connected to your network, AWS will remotely provision compute and storage resources.
Benefits of Outposts servers include the following:
Place in your own rack
Choose from:
1U Graviton-based processor
2U Intel Xeon Scalable processor
Outposts extend your VPC
A virtual private cloud (VPC) spans all Availability Zones in its AWS Region. You can extend any VPC in the Region to your Outpost by adding an Outpost subnet.
Outposts support multiple subnets. You choose the EC2 instance subnet when you launch the EC2 instance in your Outpost. You cannot choose the underlying hardware where the instance is deployed, because the Outpost is a pool of AWS compute and storage capacity.
Each Outpost can support multiple VPCs that can have one or more Outpost subnets.
You create Outpost subnets from the VPC CIDR range where you created the Outpost. You can use the Outpost address ranges for resources, such as EC2 instances that reside in the Outpost subnet. AWS does not directly advertise the VPC CIDR, or the Outpost subnet range to your on-premises location.
It’s common for modern cloud applications to be composed of many services and components. As applications grow, an increasing amount of code needs to be written to coordinate the interaction of all components. With AWS Step Functions, you can focus on defining the component interactions, rather than writing all the software to make the interactions work.
AWS Step Functions integrates with the AWS services listed below. You can directly call API actions from the Amazon States Language in AWS Step Functions and pass parameters to the APIs of these services:
Data processing and analytics services (Amazon Athena, AWS Batch, AWS Glue, Amazon EMR, and AWS Glue DataBrew)
Machine learning services (Amazon SageMaker)
APIs created by API Gateway
You can configure your AWS Step Functions workflow to call other AWS services using AWS Step Functions service tasks.
Step Functions: State machine
A state machine is an object that has a set number of operating conditions that depend on its previous condition to determine output.
A common example of a state machine is the soda vending machine. The machine starts in the operating state (waiting for a transaction), and then moves to soda selection when money is added. After that, it enters a vending state, where the soda is deployed to the customer. After completion, the state returns back to operating.
Build workflows using state types
States are elements in your state machine. A state is referred to by its name, which can be any string, but must be unique within the scope of the entire state machine.
States can perform a variety of functions in your state machine:
Do some work in your state machine (a Task state)
Make a choice between different branches to run (a Choice state)
Stop with a failure or success (a Fail or Succeed state)
Pass its input to its output or inject some fixed data (a Pass state)
Provide a delay for a certain amount of time or until a specified time or date (a Wait state)
Begin parallel branches (a Parallel state)
Dynamically iterate steps (a Map state)
Orchestration of complex distributed workflows
Express Workflows are ideal for high-volume, event-processing workloads such as IoT data ingestion, streaming data processing and transformation, and mobile application backends. They can run for up to 5 minutes. Express Workflows employ an at-least-once model, where there is a possibility that a code might be run more than once. This makes them ideal for orchestrating idempotent actions such as transforming input data and storing using PUT in DynamoDB. Express Workflow executions are billed by the number of executions, the duration of execution, and the memory consumed.
With API Gateway, you can create, publish, maintain, monitor, and secure APIs.
With API Gateway, you can connect your applications to AWS services and other public or private websites. It provides consistent RESTful and HTTP APIs for mobile and web applications to access AWS services and other resources hosted outside of AWS.
As a gateway, it handles all the tasks involved in accepting and processing up to hundreds of thousands of concurrent API calls. These include traffic management, authorization and access control, monitoring, and API version management.
API Gateway sample architecture
API Gateway integrates with Amazon CloudWatch by sending log messages and detailed metrics to it. You can activate logging for each stage in your API or for each method. You can set the verbosity of the logging (Error or Info), and if full request and response data should be logged.
The detailed metrics that API Gateway can send to Amazon CloudWatch are:
Number of API calls
Latency
Integration latency
HTTP 400 and 500 errors
API Gateway features
Creates a unified API front end for multiple microservices.
Provides DDoS protection and throttling for your backend.
Authenticates and authorizes requests to a backend.
Throttles, meters, and monetizes API usage by third-party developers.
I woke up today with fantastic news: AWS Community Builder has been renewed for the second time.
The AWS Community Builders program offers technical resources, education, and networking opportunities to AWS technical enthusiasts and emerging thought leaders passionate about sharing knowledge and connecting with the technical community.
Interested AWS builders should apply to the program to build relationships with AWS product teams, AWS Heroes, and the AWS community.
A load balancer distributes incoming application traffic across multiple targets, such as EC2 instances, in multiple Availability Zones to increase the availability of your application. A load balancer works with listeners. You can have more than one listener per load balancer.
A listener checks for connection requests from clients, using the protocol and port that you configure. The load balancer forwards requests to one or more target groups, based on the rules that you define.
Each rule specifies a target group, condition, and priority. The traffic is forwarded to that group when the condition is met. You define a default rule for each listener. You can add rules that specify different target groups based on the content of the request. Each target group routes requests to one or more registered targets, for example EC2 instances, using the specified protocol and port number. You can register a target with multiple target groups.
Elastic Load Balancing
AWS Elastic Load Balancing (ELB) is one of the most widely used AWS services. It has been adopted by organizations of all sizes, in all geographies, and across every industry. ELBs automatically distribute traffic across multiple targets, provide high availability, incorporate security features, and perform health checks.
ELB features
ELB load balancers are the only load balancers available on AWS that natively connect users to your EC2 instances, container deployments, and AWS Lambda functions. Some key feature sets include the following:
High availability – ELB automatically distributes your traffic across multiple targets in a single Availability Zone or multiple Availability Zones. Examples of targets include EC2 instances, containers, and IP addresses.
Layer 4 or Layer 7 HTTP and HTTPS load balancing – You can load balance your HTTP or HTTPS applications for Layer 7-specific features. Alternatively, you can use strict Layer 4 load balancing for applications that rely purely on the TCP.
Security features – Use Amazon VPC to create and manage security groups associated with load balancers to provide additional networking and security options. You can also create an internal (non-internet-facing) load balancer.
Health checks – ELB load balancers can detect unhealthy targets, stop sending traffic to them, and spread the load across the remaining healthy targets.
Monitoring operations – To monitor the performance of your applications in real time, ELB integrates with CloudWatch metrics and provides request tracing.
Types of load balancers
Application Load Balancer
This load balancer functions at the application layer, the seventh layer of the Open Systems Interconnection (OSI) model. Application Load Balancers support the following: Content-based routing, applications that run in containers, and open standard protocols (WebSocket and HTTP/2). This type of balancer is ideal for advanced load balancing of HTTP and HTTPS traffic.
Network Load Balancer
This load balancer is designed to handle tens of millions of requests per second while maintaining high throughput at ultra low-latency. Network Load Balancer operates at the connection level (Layer 4), routing connections to targets based on IP protocol data. Targets include EC2 instances, containers, and IP addresses. It is ideal for balancing TCP traffic.
Gateway Load Balancer
This load balancer makes it easy to deploy, scale, and manage your third-party virtual appliances. It provides one gateway for distributing traffic across multiple virtual appliances, and scales them up, or down, based on demand. This distribution reduces potential points of failure in your network and increases availability. Gateway Load Balancer transparently passes all Layer 3 traffic through third-party virtual appliances. It is invisible to the source and destination.
The AWS Global Cloud Infrastructure is the most secure, extensive, and reliable cloud platform, offering over 200 fully featured services from data centers globally.
AWS Data Center
AWS pioneered cloud computing in 2006 to provide rapid and secure infrastructure. AWS continuously innovates on the design and systems of data centers to protect them from man-made and natural risks. Today, AWS provides data centers at a large, global scale. AWS implements controls, builds automated systems, and conducts third-party audits to confirm security and compliance. As a result, the most highly-regulated organizations in the world trust AWS every day.
Availability Zone – AZ
An Availability Zone (AZ) is one or more discrete data centers with redundant power, networking, and connectivity in an AWS Region. Availability Zones are multiple, isolated areas within a particular geographic location. When you launch an instance, you can select an Availability Zone or let AWS choose one for you. If you distribute your instances across multiple Availability Zones and one instance fails, you can design your application so that an instance in another Availability Zone can handle requests.
Region
Each AWS Region consists of multiple, isolated, and physically separate Availability Zones within a geographic area. This achieves the greatest possible fault tolerance and stability. In your account, you determine which Regions you need. You can run applications and workloads from a Region to reduce latency to end users. You can do this while avoiding the upfront expenses, long-term commitments, and scaling challenges associated with maintaining and operating a global infrastructure.
AWS Local Zone
AWS Local Zones can be used for highly demanding applications that require single-digit millisecond latency to end users. Media and entertainment content creation, real-time multiplayer gaming, and Machine learning hosting and training are some use cases for AWS Local Zones.
CloudFront – Edge Location
An edge location is the nearest point to a requester of an AWS service. Edge locations are located in major cities around the world. They receive requests and cache copies of your content for faster delivery.
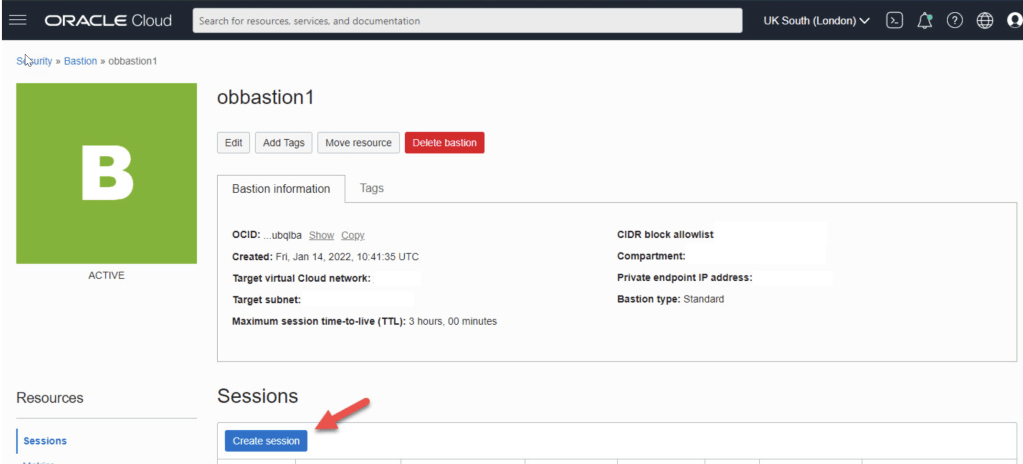
It’s essential to consider the security implications before allowing direct access to cloud services and resources, particularly as the latter expands. Some individuals get around this problem by setting up a virtual machine within the virtual cloud network and linking it to all the cloud services. This cuts down on publicly accessible services while facilitating connections for developers and system administrators. This virtual machine (VM) is like a manual bastion or leap box.
Create a Bastion
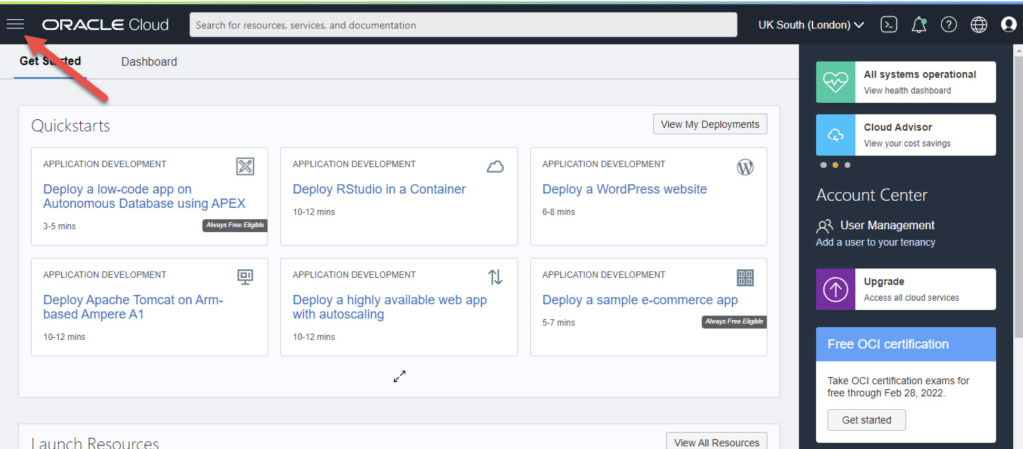
Connect to Oracle’s cloud service. To access the main menu, choose the hamburger icon in the upper left corner.
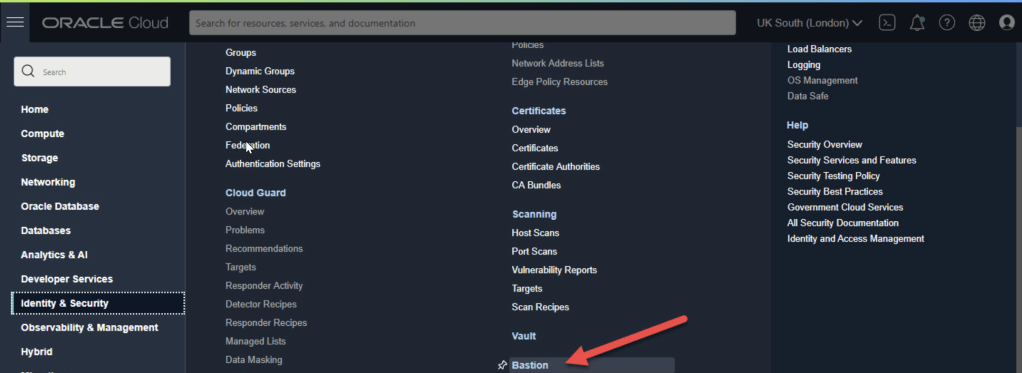
On the menu select “Identity & Security > Bastion”.
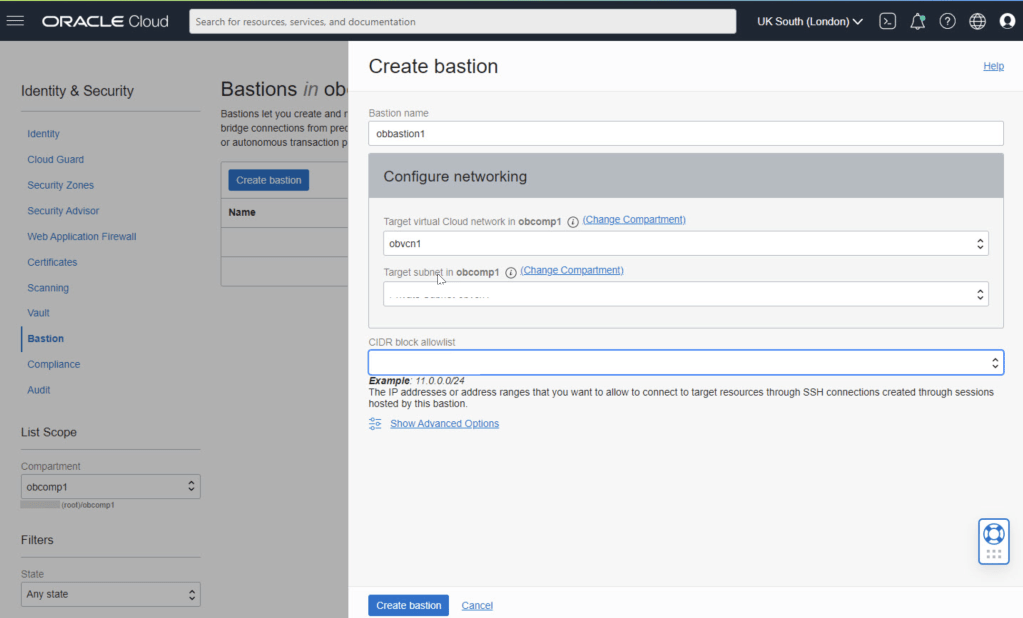
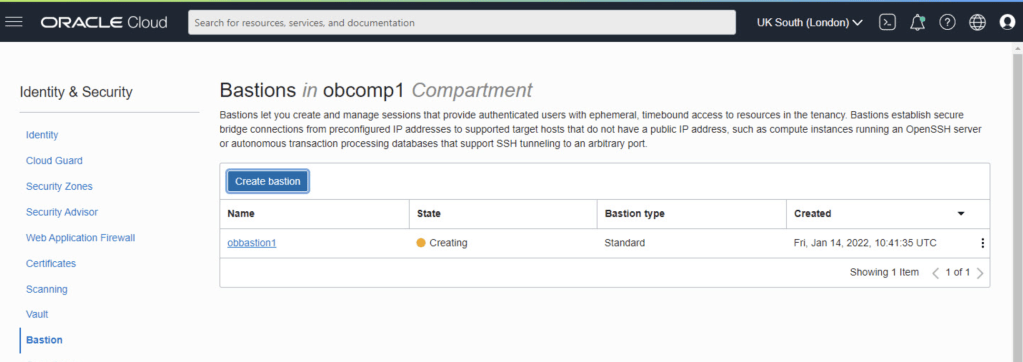
Select the compartment and click the “Create bastion” button.
Enter the bastion name and select the VCN and subnet for the bastion. We need to enter a CIDR block allowlist. In this case I’ve used the subnet for my IP address from my internet service provider. Click the “Create bastion” button.
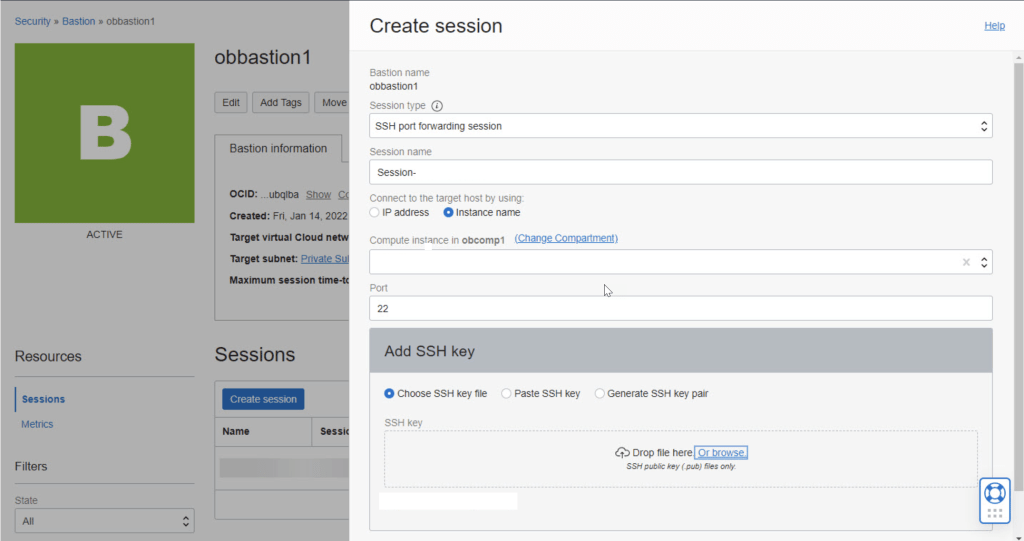
Click on the “Create session” button.
Connect
Our previously copied connection information should look something like this at this point.


