Okay, I love to post free examples/projects on my github from while to while, i choose docker and kubernetes this time, the project idea it’s very nice and easy to implement.
What this project do ?
This can be a simple web app that reads a ‘hello world’ string from the MySQL database.Run a database app. Data volume should be persistent.Application from step 1 needs to discover the database from step 2 using Kubernetes native features. Database credentials should NOT be hardcoded in application or helm chart code.The application should be accessible from the outside of Kubernetes.Create a helm chart which implements all these steps
Create an application that connects to a database, reads some data, and returns this data upon HTTP request, This can be a simple web app that reads a ‘hello world’ string from the MySQL database.
Run a database app. Data volume should be persistent.
Application from step 1 needs to discover the database from step 2 using Kubernetes native features, Database credentials should NOT be hardcoded in application or helm chart code.
The application should be accessible from the outside of Kubernetes.
Create a helm chart which implements all these steps
I Choose to use Java as programing language because the springboot frameworkit’s already defined and easy to use.
Please follow the readme file and everything will working fine without any issue, if you have any question comment below and i will answer
I posted about this earlier , since AUSOUG had Virtual conference with different topics covering Cloud and databases.
my presentation was on Thursday about Oracle on azure. it was great pleasure to present again, the virtual connect had very big names in Oracle commuinty and had pleasure to present with them.
Alibaba Cloud Most Valuable Professional (MVP) is an award for thought leaders. who are devoted to helping others fully understand and use Alibaba Cloud technologies.
Benefits
MVP Medal
Exclusive Services
Gain Exposure through Alibaba Cloud Official Channels
I was honored this year to speak in different conferences around the world, and Due to Covid-19 most of the conference was Virtual, I miss my friends around the world, but saftey comes first, i hope everyone is safe.
I am writing this post to share with people the schedule of different conferences some of them already done but in case you missed something there is always next time, register in the virtual conferences and don’t miss the chance to learn something new.
My 2020 Schedule
Rule #1 in IT, never, and I do mean NEVER, stop learning.
Percona Monitoring and Management (PMM) is a best-of-breed open source database monitoring solution. It helps you reduce complexity, optimize performance, and improve the security of your business-critical database environments, no matter where they are located or deployed.
PMM is a free and open-source solution that you can run in your own environment for maximum security and reliability. It provides thorough time-based analysis for MySQL and MongoDB servers to ensure that your data works as efficiently as possible.
PMM, at a high-level, is made up of two basic components: the client and the server. The PMM Client is installed on the database servers themselves and is used to collect metrics. The client contains technology specific exporters (which collect and export data), and an “admin interface” (which makes the management of the PMM platform very simple). The PMM server is a “pre-integrated unit” (Docker, VM or AWS AMI) that contains four components that gather the metrics from the exporters on the PMM client(s). The PMM server contains Consul, Grafana, Prometheus and a Query Analytics Engine that Percona has developed. Here is a graphic from the architecture section of our documentation. In order to keep this post to a manageable length.
Once you completed the server configuration, you have to install the client on desired one, for example in our case we want to install it to monitor MySQL so we will go to install PMM Client on MySQL server.
To install the PMM client package, follow these steps.
Configure Percona repositories using the percona-release tool
If you have previously enabled the experimental or testing Percona repository, don’t forget to disable them and enable the release component of the original repository as follows:
sudo percona-release disable all
sudo percona-release enable original release
Before doing this, there are some MySQL requirements should be done from Database side.
Enable Logs in MySQL follow these step
SET GLOBAL slow_query_log_file = '/path/to/slow_query.log';
Determine what makes a query “slow”, by setting the limit (in seconds) after which a query is logged to the slow query log. The example below logs every query that exceeds 10 seconds in duration
mysql> SET GLOBAL long_query_time = 10;
Now enable the Slow Query log.
mysql> SET GLOBAL slow_query_log = 'ON';
mysql> FLUSH LOGS;
If you want to make these changes persistent, modify the my.cnf and add these lines to the [mysqld] part of the config.
mysql> SHOW GLOBAL VARIABLES LIKE 'log_queries_not_using_indexes';
Once you are done you have to create username/password for PMM,this user should have necessary privileges for collecting data. If the pmm user already exists, you can grant the required privileges as follows:
CREATE USER 'pmm'@'localhost' IDENTIFIED BY 'pass' WITH MAX_USER_CONNECTIONS 10;

GRANT SELECT, PROCESS, SUPER, REPLICATION CLIENT, RELOAD ON *.* TO 'pmm'@'localhost';
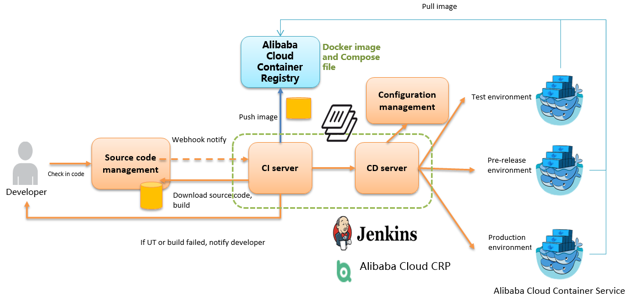
As an important step in agile development, continuous integration is designed to maintain high quality while accelerating product iteration. Every time when the codes are updated, an automatic test is performed to test the codes and function validity. The codes can only be delivered and deployed after they pass the automatic test, This post describes how to combine Jenkins, one of the most popular integration tools, with Alibaba Cloud Container Service to realize automatic test and image building pushing.
Deploying Jenkins Applications and the Slave Nodes
1. Create a Jenkins orchestration template.
Create a new template and create the orchestration based on the following content.
2. Use the template to create Jenkins applications and slave nodes.
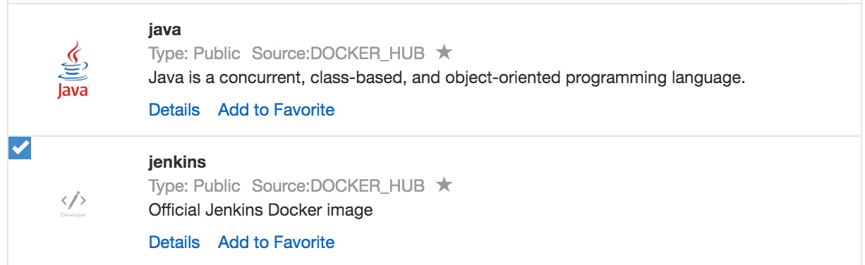
You can also directly use a Jenkins sample template provided by Alibaba Cloud Container Service to create Jenkins applications and slave nodes.
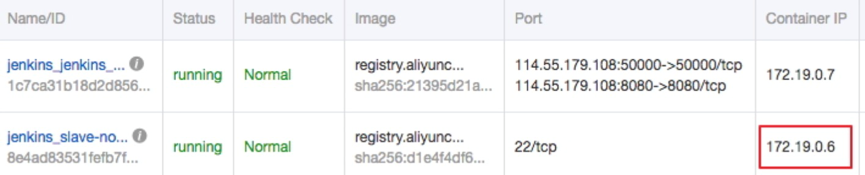
3. After the successful creation, Jenkins applications and slave nodes will be displayed in the service list.
4. After opening the access endpoint provided by the Container Service, you can use the Jenkins application deployed just now.
Realizing Automatic Test and Automatic Build and Push of Image
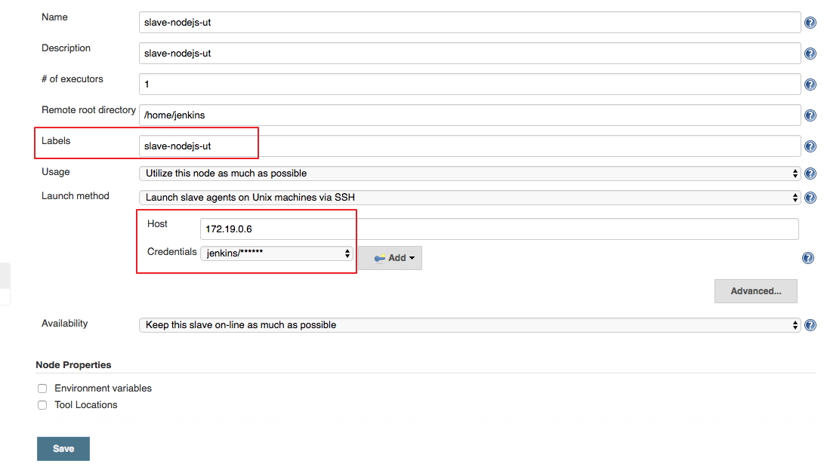
Configure the slave container as the slave node of the Jenkins application.
Open the Jenkins application and enter the System Settings interface. Select Manage Node > Create Node, and configure corresponding parameters. See the figure below.
Note: Label is the only identifier of the slave. The slave container and Jenkins container run on the Alibaba Cloud platform at the same time. Therefore, you can fill in a container node IP address that is inaccessible to the Internet to isolate the test environment.
Use the jenkins account and password (the initial password is jenkins) in Dockerfile for the creation of the slave-nodejs image when adding Credential. Image Dockerfile address HERE
1. Create a project to implement the automatic test.
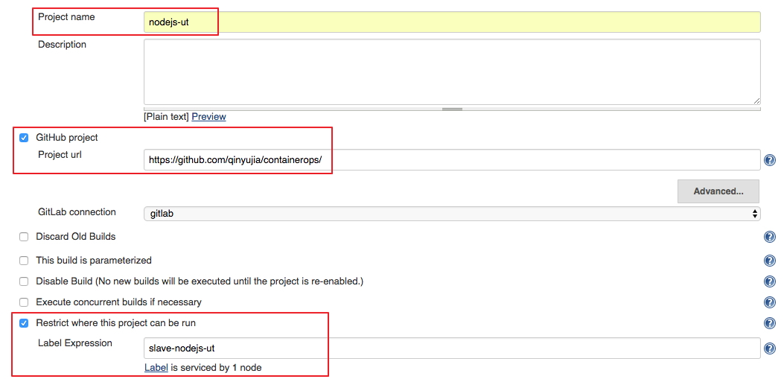
Create an item and choose to build a software project of free style.
Enter the project name and select a node for running the project. In this example, enter the slave-nodejs-ut node created above.
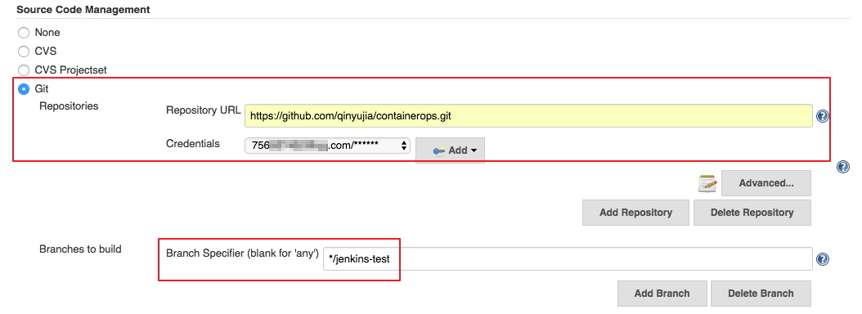
Configure the source code management and code branch. In this example, use GitHub to manage source codes.
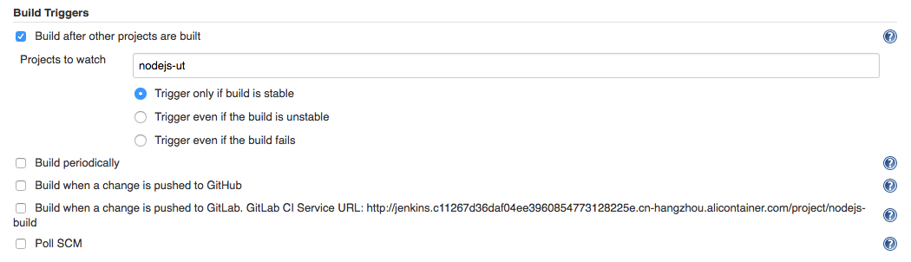
Configure the trigger for building. In this example, automatically trigger project execution by combining GitHub Webhooks and services.
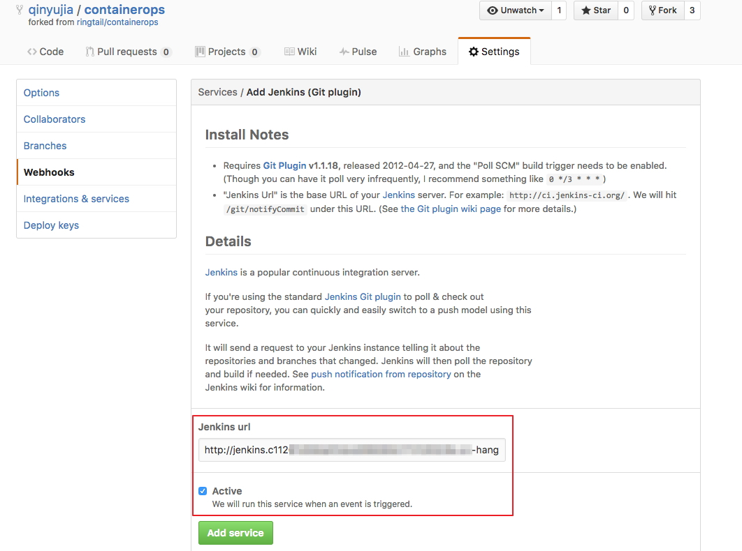
Add the Jenkins service hook to GitHub to implement automatic triggering.
Click the Settings tab on the Github project homepage, and click Webhooks & services > Add service and select Jenkins (Git plugin). Enter ${Jenkins IP}/github-webhook/ in the Jenkins hook URL dialog box.
1. Select the application nodejs-demo just created, and create the trigger.
Add a line to the shell scripts you wrote in Realize automatic test and automatic build and push of image. The address is the trigger link given by the trigger created above.
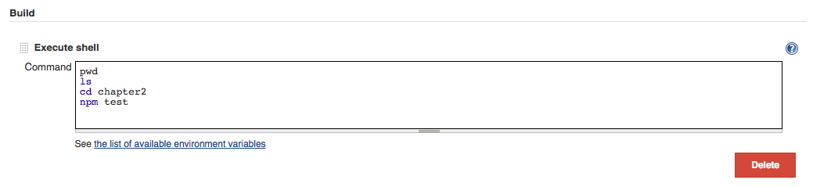
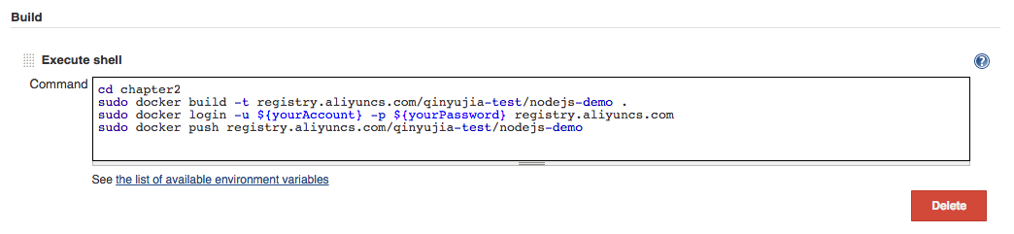
Change the Command in the example from Realize automatic test and automatic build and push of image as follows.
i. cd chapter2
ii. docker build -t registry.aliyuncs.com/qinyujia-test/nodejs-demo .
iii. docker login -u ${yourAccount} -p ${yourPassword} registry.aliyuncs.com iv.docker push registry.aliyuncs.com/qinyujia-test/nodejs-demo
v. curl 'https://cs.console.aliyun.com/hook/trigger?triggerUrl=***==&secret=***'
After pushing the image, Jenkins automatically triggers redeployment of the nodejs-demo application.
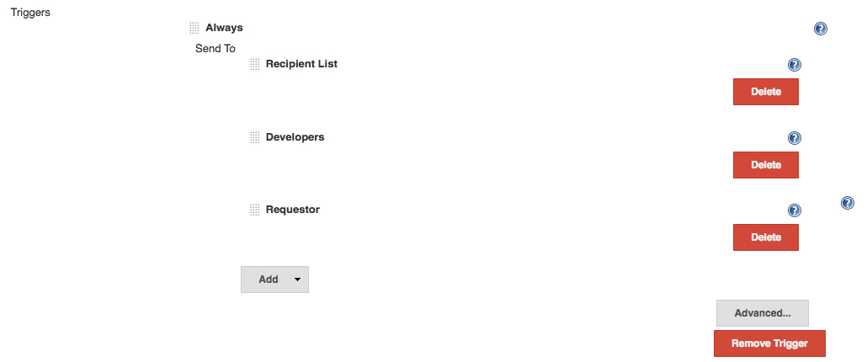
Configure The Email Notification for the Results
If you want to send the unit test or image configuration results to relevant developers or project execution initiators through email, perform the following configurations.
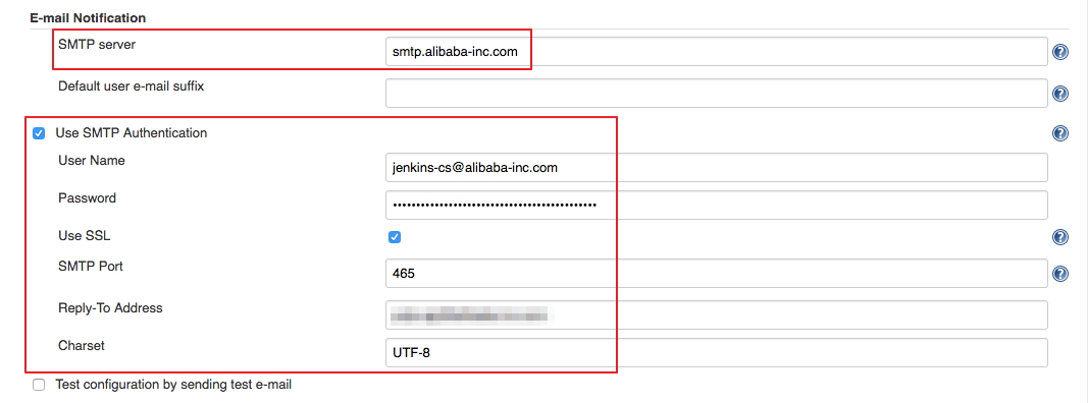
On the Jenkins homepage, click System Management > System Settings, and configure a Jenkins system administrator email.
Install the Extended Email Notification plugin, configure SMTP server and other relevant information, and set the default recipient list. See the figure below.
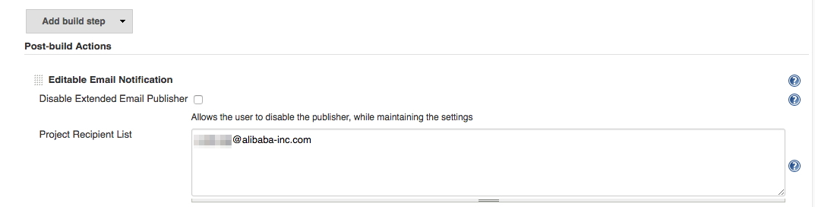
The above example shows the parameter settings of the Jenkins application system. The following example shows the relevant configurations for Jenkins projects whose results are to be pushed through email.
1. Add post-building operation steps in the Jenkins project, select Editable Email Notification, and enter a recipient list.
I posted before about AWS, Azure and OCI but this time i am trying to cover Alibaba , in this post i will show you how to setup your first Compute instance whatever OS you want CentOS or Ubuntu depeds on what you want
What you need ?
A valid Alibaba Cloud account., create free one with 300$ credit
An ECS instance running CentOS 7 or whatever OS you want.
A root password for your server.
Connect to your Alibaba Cloud
Locate the Internet IP address (Public IP address) associated with your Alibaba Cloud ECS Instance.
If you are running Linux or Mac, use a terminal application to connect to the instance via SSH. If you are on Windows, you can use PuTTy.
Change the Hostname
The hostname is a default identifier when you communicate to a Linux server. It is like a computer name that is associated with your home PC or laptop. Naming your CentOS 7 server with a descriptive hostname helps you to differentiate your machines especially if you are running a bunch of them.
check the update
$ sudo yum update
check your hostname
$ hostname
change your hostname, we need to install nano text editor using the command below:
$ sudo yum install nano
Then, edit the /etc/cloud/cloud.cfg file and find the entry preserve_hostname. Change its value from false to true.
Then, edit the /etc/hostname file using a nano editor by typing the command below:
$ sudo nano /etc/hostname
You will need to add two entries on this file just below the 127.0.0.1 localhost entry. The first entry you are adding uses the loopback interface address 127.0.1.1. Please note that this is different from the address 127.0.0.1 which have a ‘localhost’ value in the same file.
Reboot your Alibaba Cloud ECS instance for the changes to take effect by typing the command below:
$ sudo reboot
Also you can create non root user by
$ sudo adduser
For instance, to add a user identified as osama on your server, use the command below:
$ sudo adduser osama
Next, we assign a password to the user we have created above: