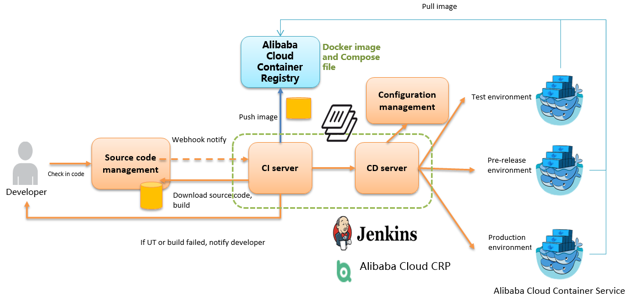
Moving to Docker container series blog post, I choose to continue with Kubernetes and discuss it more start with configuration and installation.
This configuration discuss on-premise side and to do that you have at least 2 servers
| Server | purpose | description |
| The Master | node which controls and manages a set of worker nodes (workloads runtime) and resembles a cluster in Kubernetes. A master node has the following components to help manage worker nodes: … Kube-Controller-Manager, which runs a set of controllers for the running cluster. | |
| The worker node | A Node is a worker machine in Kubernetes and may be either a virtual or a physical machine, depending on the cluster. … Each Node is managed by the Master. A Node can have multiple pods, and the Kubernetes master automatically handles scheduling the pods across the Nodes in the cluster. |
Configure The Kubernetes cluster
- On all nodes, add the Kubernetes repo to /etc/yum.repos.d:
cat <<EOF | sudo tee /etc/yum.repos.d/kubernetes.repo[kubernetes]
name=Kubernetes
baseurl=https://packages.cloud.google.com/yum/repos/kubernetes-el7-x86_64
enabled=1
gpgcheck=1
repo_gpgcheck=1
gpgkey=https://packages.cloud.google.com/yum/doc/yum-key.gpg https://packages.cloud.google.com/yum/doc/rpm-package-key.gpg
exclude=kube*
EOF- Disable SELinux:
sudo setenforce 0
sudo sed -i 's/^SELINUX=enforcing$/SELINUX=permissive/' /etc/selinux/config
- Install Kubernetes
sudo yum install -y kubelet kubeadm kubectl --disableexcludes=kubernetes- Enable and start kubelet
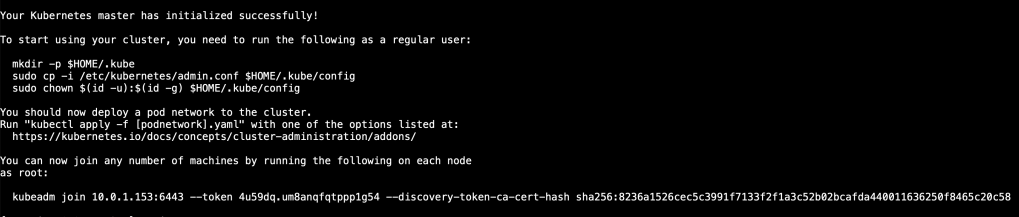
sudo systemctl enable --now kubelet- From Node 1 (Master) , initialize the controller node, and set the code network CIDR to 10.244.0.0/16 or depends on your IP range :
kubeadm init --pod-network-cidr=10.244.0.0/16- From Node 1 (Master), check the status of your cluster:
docker ps -aRepeat this step on the worker nodes. Can the worker nodes see the cluster
- Once you are done, the init command will create a commands for you , you needs to run them or you will have permission issues.
mkdir -p $HOME/.kube

sudo cp -i /etc/kubernetes/admin.conf $HOME/.kube/config

sudo chown $(id -u):$(id -g) $HOME/.kube/config
Copy the kubeadm join command, then paste and run it in your worker nodes terminal windows.
- From the worker nodes, verify that they can see the cluster
docker ps -a- From Node 1 (Master), check the status of the nodes
kubectl get nodesNow, Kubernetes installed but it’s empty to have pods or services the next will be for you, it can be change depends on your application type but it’s Just for testing to show the reader how it’s goes.
- Install flannel
kubectl apply -f https://raw.githubusercontent.com/coreos/flannel/master/Documentation/kube-flannel.yml- Create POD
vim pod.yml
apiVersion: v1

kind: Pod

metadata:

  name: nginx-pod-demo

  labels:

    app: nginx-demo

spec:

  containers:

  - image: nginx:latest

    name: nginx-demo

    ports:

    -  containerPort: 80

    imagePullPolicy: Always
- Create the pod
kubectl create -f pod.yml- Check the status of the pod
kubectl get pods- Create Services
vim service.yml
apiVersion: v1

kind: Service

metadata:

  name: service-demo

spec:

  selector:

    app: nginx-demo

  ports:

  - protocol: TCP

    port: 80

    targetPort: 80

type: NodePort- Create the service
kubectl apply -f service.yml- Run the following command to view the service
kubectl get servicesTake note of the service-demo port number.
In a web browser, navigate to the public IP address for a server in the cluster, and verify connectivity:
<PUBLIC_IP_ADDRESS>:<SERVICE_DEMO_PORT_NUMBER>
Enjoy the automation🤗
Osama