Security Features 12c

As Any Newer Version of database oracle Enhance Security This time Oracle create new users for administration purpose

Separate user duties : 

SQL> select username from dba_users where username like ‘%SYS%’;

USERNAME
———————————-
SYS  : Super user
SYSKM : Key magament tasks
SYSDG : Data Guard Managment
SYSBACKUP : backup management

DBMS_PRIVILEGE_CAPTURE

The Privilege Analysis feature allows you to: 
  • Define a privilege capture
  • Start a privilege analysis during a period of time
  • Delete capture analysis
The Capture can be Done on Three level :
  • User
  • Role
  • Context
to understand this new package check the below examples :
sqlplus / as sysdba
SQL> create user test identified  by test ;
SQL> grant create session to test ;
Grant succeeded.
SQL> grant select any table to test ;
Grant succeeded.
Create new Capture using this package :

exec SYS.DBMS_PRIVILEGE_CAPTURE.CREATE_CAPTURE ( –
        name           =>  ‘test_capture’, –
        description    =>  ‘Capture_all_thing’, –
        type           =>   dbms_privilege_capture.g_database)

Where 

Name : Package name
Description : What this package fo
type : depend on level users ( g_database ) , role (g_role )  , Context : (g_role_and_context)

we need to enable this package to start capture :

SQL> exec SYS.DBMS_PRIVILEGE_CAPTURE.ENABLE_CAPTURE (name => ‘test_capture’);
 PL/SQL procedure successfully completed.

until everything goes fine now to start capture you have to logout from sqlplus and start do what you need to do.
SQL> conn test/test ;
Connected.
SQL> select * from osama.test ;
no rows selected
SQL> select * from osama.test2 ;
   TEST_ID TEST_NAME
———- ——————–
1 JENNIFER
2 STEVE
3 USER
again reconnect as / as sysdba to disable capture then generate results like the following :
SQL> exec SYS.DBMS_PRIVILEGE_CAPTURE.DISABLE_CAPTURE (name => ‘test_capture’);
PL/SQL procedure successfully completed.
SQL> exec SYS.DBMS_PRIVILEGE_CAPTURE.GENERATE_RESULT (name => ‘test_capture’);
PL/SQL procedure successfully completed.

SQL> select username, object_owner, object_name, obj_priv
from   dba_used_objprivs
where  username in (‘OSAMA’, ‘TEST’) 

USERNAME   OBJECT_OWNER OBJECT_NAME       OBJ_PRIV
———- ———— —————————— ————————-
TEST   SYS ORA$BASE                                      USE
TEST   SYS DBMS_APPLICATION_INFO       EXECUTE
TEST   SYS DUAL                                              SELECT
TEST   SYS DUAL                                               SELECT
TEST   SYSTEM PRODUCT_PRIVS                     SELECT
Drop Capture :
exec SYS.DBMS_PRIVILEGE_CAPTURE.DROP_CAPTURE (name => ‘test_capture’)
Thank you 
Osama mustafa

tiny features : Truncate table in 12c

New Features with Database 12c , CASCADE Usually used with Drop or update command (10g,11g) But now with Database 12c , you can use this features with Truncate command

SQL> select * from test ;
no rows selected

SQL> desc test ;

 Name   Null?    Type
 —————————————– ——– —————————-
 TEST_ID   NOT NULL NUMBER
 TEST_NAME    VARCHAR2(20)

SQL> truncate table test cascade ;
Table truncated.

More Features coming up 🙂

Thank you 
Osama mustafa

Another New Features 12c : generated as identity / Sequence Replacement

in old version of oracle database if you want to create automatic generated number you have to create sequence and use attribute nextval.

But with oracle database 12c this concept is changed new features add when you create table called generated as identity.

Check the Below Demonstration which explain this new features :

SQL> create table test (test_id number generated as identity , test_name varchar2(20));

SQL> desc test ;
 Name   Null?      Type
 —————————————–   ——– ————–
 TEST_ID   NOT      NULL NUMBER
 TEST_NAME          VARCHAR2(20)

SQL> insert into test values (1,’osama’);
insert into test values (1,’osama’)
*
ERROR at line 1:
ORA-32795: cannot insert into a generated always identity column

The TEST_ID Column will be inserting automatically  no need to use in insert command.

SQL> insert into test (TEST_NAME) values ( ‘Jennifer’ );
1 row created.

SQL> select * from test ;
   TEST_ID TEST_NAME
———- ——————–
1       Jennifer 

Check another example :

SQL> create table test2 (TEST_ID NUMBER generated as identity (start with 1 increment by 1 cache 30 order), TEST_NAME varchar2(20));
Table created.

SQL> insert into test2 (test_name) values (‘JENNIFER’);
SQL> insert into test2 (test_name) values (‘STEVE’);
SQL> insert into test2 (test_name) values (‘USER’);

SQL> select * from test2 ;

   TEST_ID TEST_NAME
———- ——————–
1 JENNIFER
2 STEVE
3 USER

Thank you 
Osama mustafa

Queryable Patch Inventory New Features 12c

Again !!! Oracle 12c Under test , every time i tested it i discover new features, while i am testing today i found new folder under $ORACLE_HOME called QOPatch , for the first time when i opened this folder i only found two files,

Check the https://support.oracle.com note :

Oracle Database 12.1 : FAQ on Queryable Patch Inventory [ID 1530108.1] 

from the name you can see it’s retrieve  information  using query, and to use query you have to get access to SQL Plus, this features  allow you access to the OPatch information from within the database.  This Package called  DBMS_QOPATCH

Some of Attribute to use with this package :

  • GET_OPATCH_INSTALL_INFO
  • SET_CURRENT_OPINST
  • GET_OPATCH_LIST
  • IS_PATCH_INSTALLED
  • GET_OPATCH_DATA
  • GET_OPATCH_BUGS
  • GET_OPATCH_FILES
  • GET_OPATCH_COUNT
  • GET_OPATCH_PREQS
  • GET_OPATCH_OLAYS
  • PATCH_CONFLICT_DETECTION
  • GET_PENDING_ACTIVITY
  • GET_OPATCH_XSLT
  • GET_OPATCH_LSINVENTORY
  • GET_SQLPATCH_STATUS

Since this function used to get Opatch information within database then you have to access to SQL Plus 
Check the below examples :

SQL> select dbms_qopatch.get_opatch_lsinventory() from dual;

DBMS_QOPATCH.GET_OPATCH_LSINVENTORY()
——————————————————————————–

Another Examples :

SQL> select dbms_qopatch.GET_PENDING_ACTIVITY() from dual;
DBMS_QOPATCH.GET_PENDING_ACTIVITY()
——————————————————————————–

My Database still fresh and not patch yet So you will not find that much of information 
Thank you 
Osama mustafa

Move Datafiles Online 12c

As you know Oracle database 12c released Yesterday and we all still test it and learn what are the new features !!

For the first time in Oracle Database you can move objects online without offline or shutdown database which is very useful and helpful for any DBA’s

Check the example below :

SQL> select file_name from dba_data_files ;

FILE_NAME
——————————————————————————–
/u01/app/oracle/oradata/db12c/system01.dbf
/u01/app/oracle/oradata/db12c/sysaux01.dbf
/u01/app/oracle/oradata/db12c/users01.dbf
/u01/app/oracle/oradata/db12c/undotbs01.dbf

Let’s move system01.dbf 
SQL> alter database move datafile ‘/u01/app/oracle/oradata/db12c/system01.dbf’ to ‘/u01/system.dbf’;

SQL> select File_name from dba_data_files ;
FILE_NAME
——————————————————————————–
/u01/system.dbf
/u01/app/oracle/oradata/db12c/sysaux01.dbf
/u01/app/oracle/oradata/db12c/users01.dbf
/u01/app/oracle/oradata/db12c/undotbs01.dbf

Thank you
Osama mustafa 

New Features 12c EXPDP

While i am testing Oracle 12c i notice new features in expdp , which you can export view like the following :

SQL> create table test ( id number);
Table created.

SQL> create view test_vw as select * from test ;
View created.

SQL> create directory dump as ‘/u01/dump’;
Directory created.

SQL> grant read,write on directory dump to osama ;
Grant succeeded.

[oracle@test12c u01]$ expdp directory=dump dumpfile=test.dmp logfile=test.log VIEWS_AS_TABLES=test_vw
Export: Release 12.1.0.1.0 – Production on Wed Jun 26 18:33:52 2013
Copyright (c) 1982, 2013, Oracle and/or its affiliates.  All rights reserved.
Username: osama
Password: 
Connected to: Oracle Database 12c Enterprise Edition Release 12.1.0.1.0 – 64bit Production
With the Partitioning, OLAP, Advanced Analytics and Real Application Testing options
Starting “OSAMA”.”SYS_EXPORT_TABLE_01″:  osama/******** directory=dump dumpfile=test.dmp logfile=test.log VIEWS_AS_TABLES=test_vw 
Estimate in progress using BLOCKS method…
Processing object type TABLE_EXPORT/VIEWS_AS_TABLES/TABLE_DATA
Total estimation using BLOCKS method: 0 KB
Processing object type TABLE_EXPORT/VIEWS_AS_TABLES/TABLE
. . exported “OSAMA”.”TEST_VW”                              0 KB       0 rows
Master table “OSAMA”.”SYS_EXPORT_TABLE_01″ successfully loaded/unloaded
******************************************************************************
Dump file set for OSAMA.SYS_EXPORT_TABLE_01 is:
  /u01/dump/test.dmp
Job “OSAMA”.”SYS_EXPORT_TABLE_01″ successfully completed at Wed Jun 26 18:34:15 2013 elapsed 0 00:00:17
I dropped the view 

SQL> drop view Test_vw ;
View dropped.
impdp directory=dump dumpfile=test.dmp logfile=test.log VIEWS_AS_TABLES=test_vw


Thank you 
Osama mustafa

Database 12c Installation

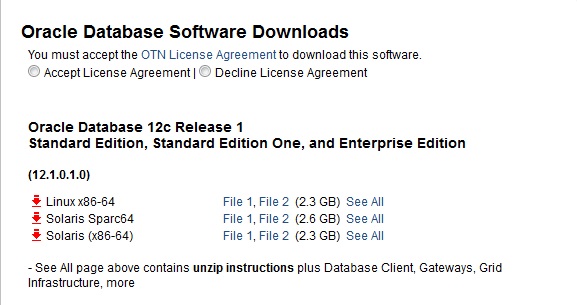
1. Download the Oracle Database 12.1 Software from OTN
2. Make sure Oracle Database Software and OS are certified using https://support.oracle.com
3. Make sure of the following

Hardware

you need to configure Swap Memory And make sure you RAM is enough to avoid Out Of memory during the installation.

Software

as i mention before check certified OS with database, in my case i will use Redhat 6 update 4.

install Packages :

binutils-2.20.51.0.2-5.11.el6 (x86_64)
glibc-2.12-1.7.el6 (x86_64)
libgcc-4.4.4-13.el6 (x86_64)
libstdc++-4.4.4-13.el6 (x86_64)
libaio-0.3.107-10.el6 (x86_64)
libXext-1.1 (x86_64)
libXtst-1.0.99.2 (x86_64)
libX11-1.3 (x86_64)
libXau-1.0.5 (x86_64)
libxcb-1.5 (x86_64)
libXi-1.3 (x86_64)
make-3.81-19.el6sysstat-9.0.4-11.el6 (x86_64)
compat-libcap1-1.10-1 (x86_64)
compat-libstdc++-33-3.2.3-69.el6 (x86_64)
gcc-4.4.4-13.el6 (x86_64)
gcc-c++-4.4.4-13.el6 (x86_64)
glibc-devel-2.12-1.7.el6 (x86_64)
ksh  <== any version of ksh is acceptable
libstdc++-devel-4.4.4-13.el6 (x86_64)
libaio-devel-0.3.107-10.el6 (x86_64)

inside /etc/sysctl.conf

fs.file-max = 6815744
kernel.sem = 250 32000 100 128
kernel.shmmni = 4096
kernel.shmall = 1073741824
kernel.shmmax = 4398046511104
net.core.rmem_default = 262144
net.core.rmem_max = 4194304
net.core.wmem_default = 262144
net.core.wmem_max = 1048576
fs.aio-max-nr = 1048576
net.ipv4.ip_local_port_range = 9000 65500

Use this command to restart kernel  /sbin/sysctl -p

/etc/hosts

  Serverip                Hostname

 /etc/security/limits.conf

oracle   soft   nofile    1024
oracle   hard   nofile    65536
oracle   soft   nproc    2047
oracle   hard   nproc    16384
oracle   soft   stack    10240
oracle   hard   stack    32768

/etc/pam.d/login

session required pam_limits.so

after edit OS parameter you need to create Oracle user :

groupadd -g 101 oinstall
groupadd -g 102 dba
groupadd -g 103 oper

 useradd -u 100 -g oinstall -G dba,oper oracle

passwd oracle

copy media to your Server , and do the following :

chown -R oracle:oinstall /u01/database
chmod -R 775 /u0/database
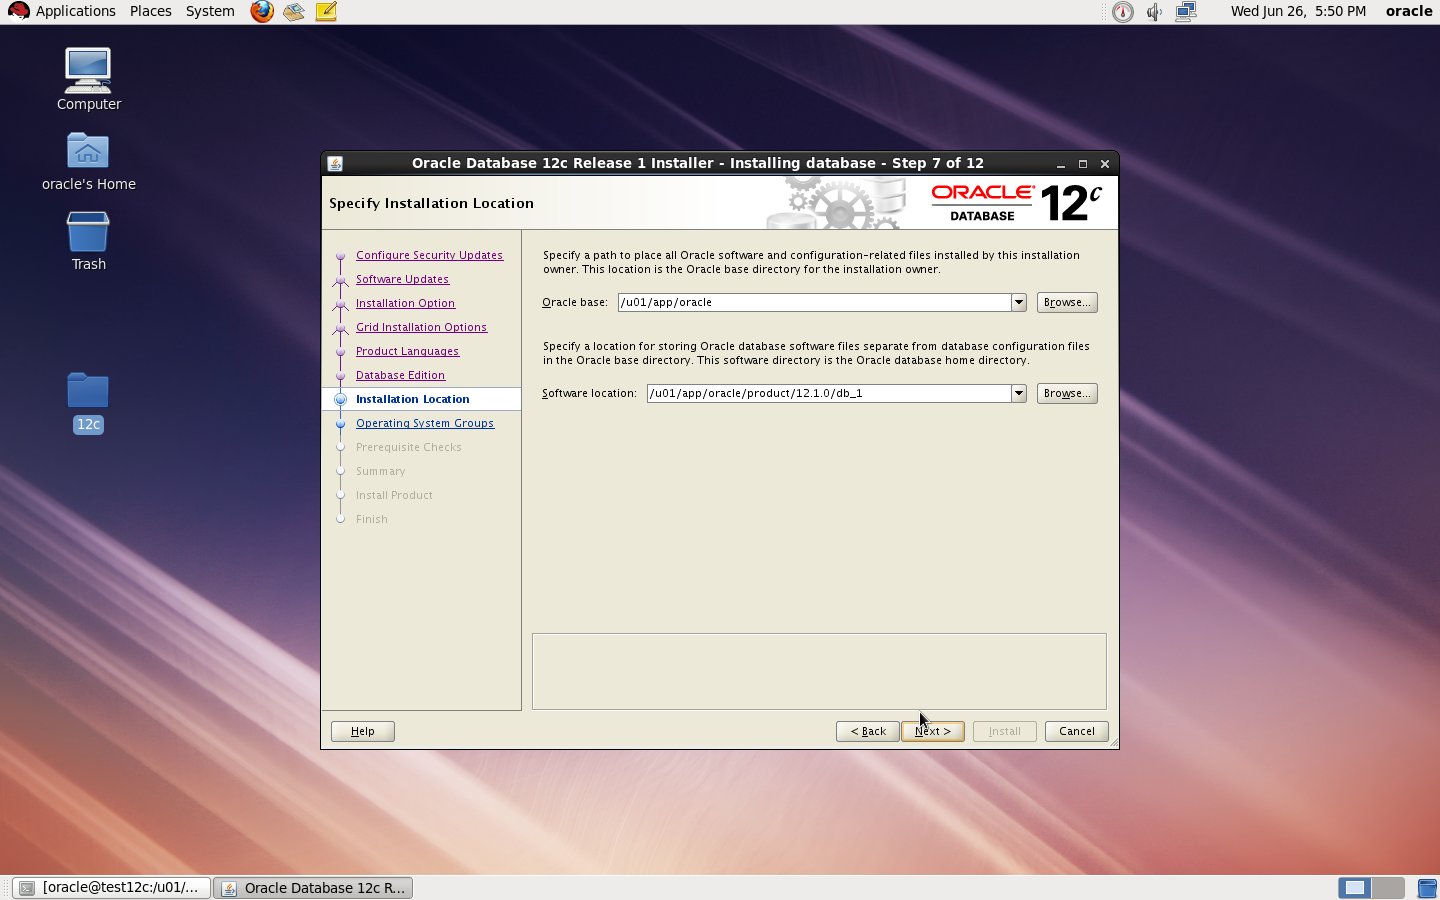
mkdir -p /u01/app/oracle/product/12.1.0/db_1
chown -R oracle:oinstall /u01
chmod -R 775 /u01

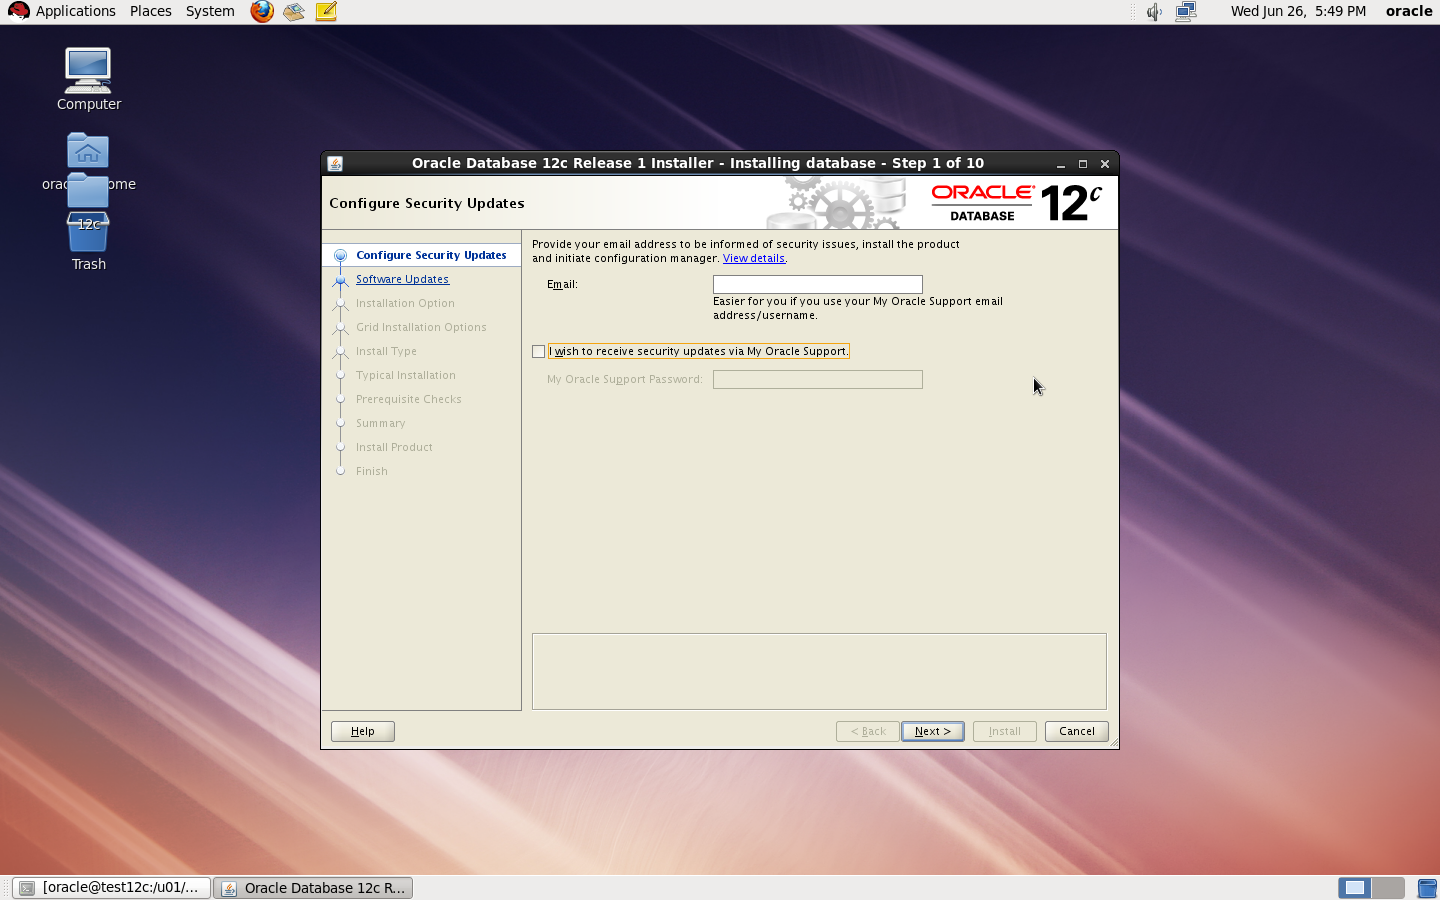
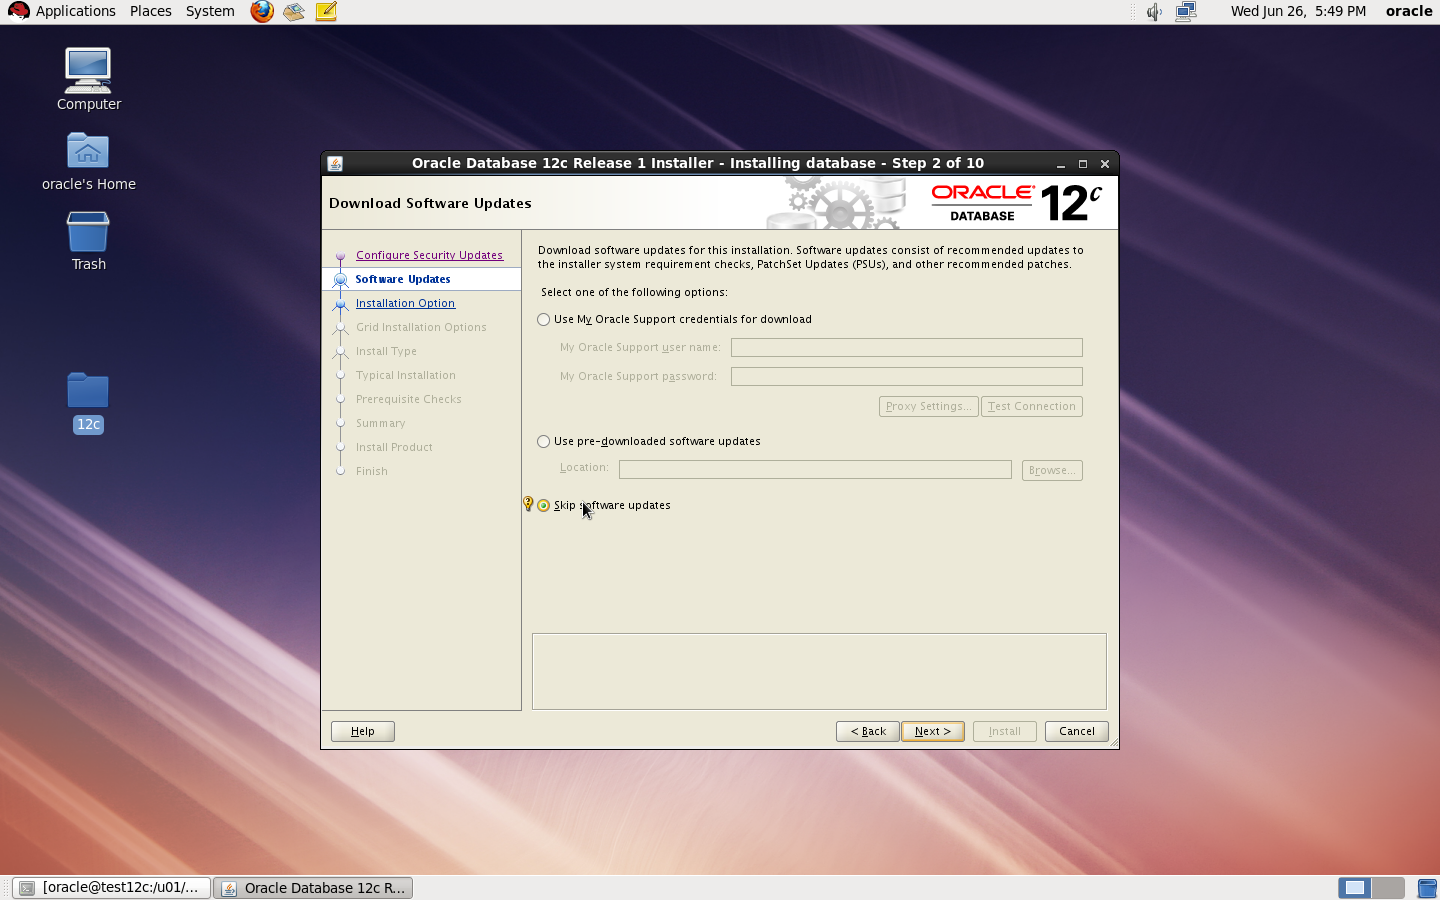
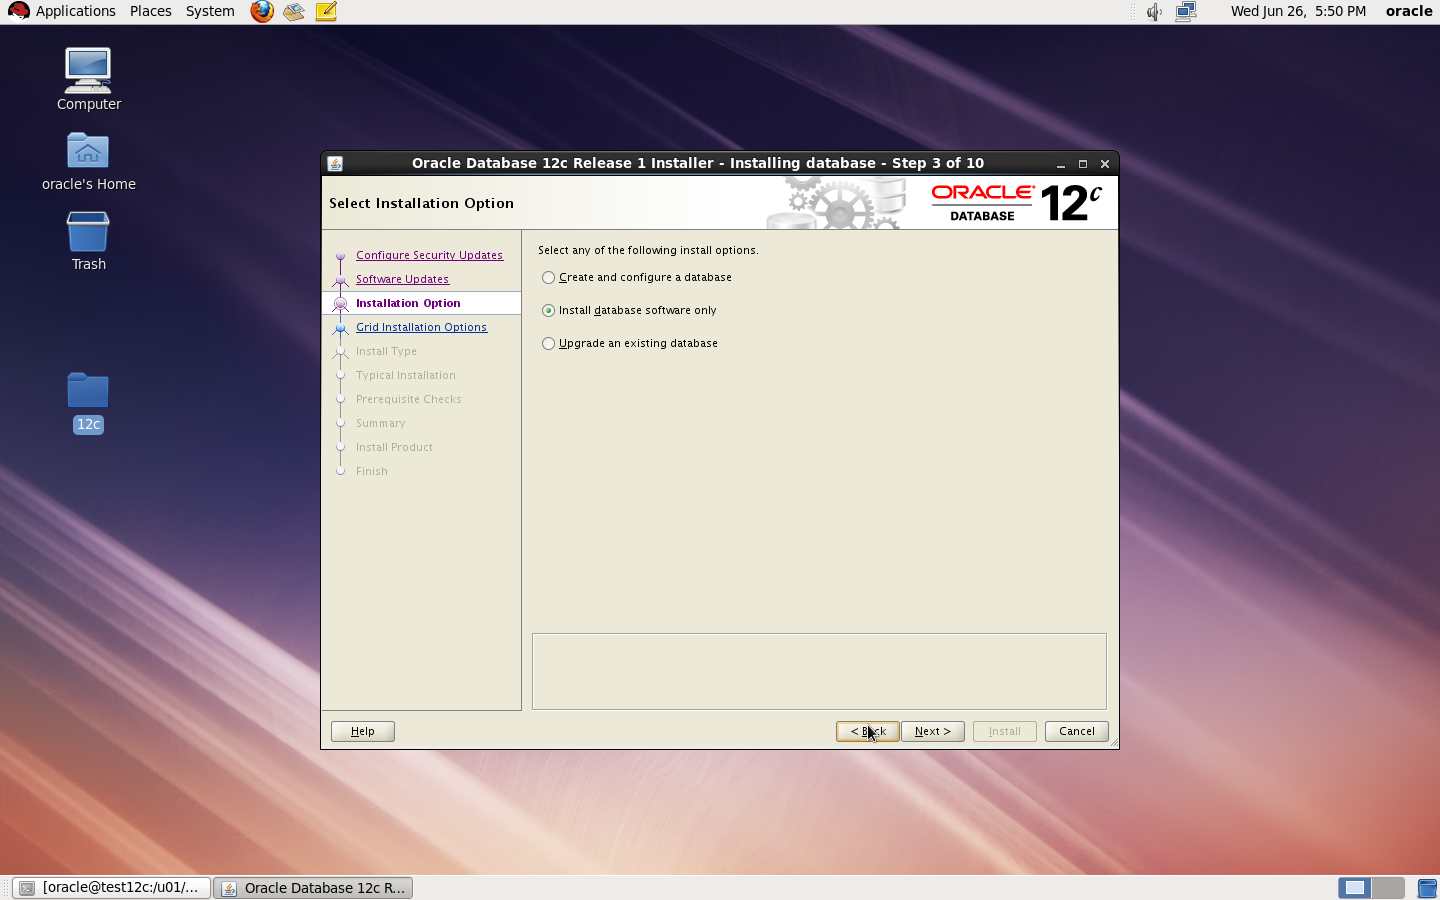
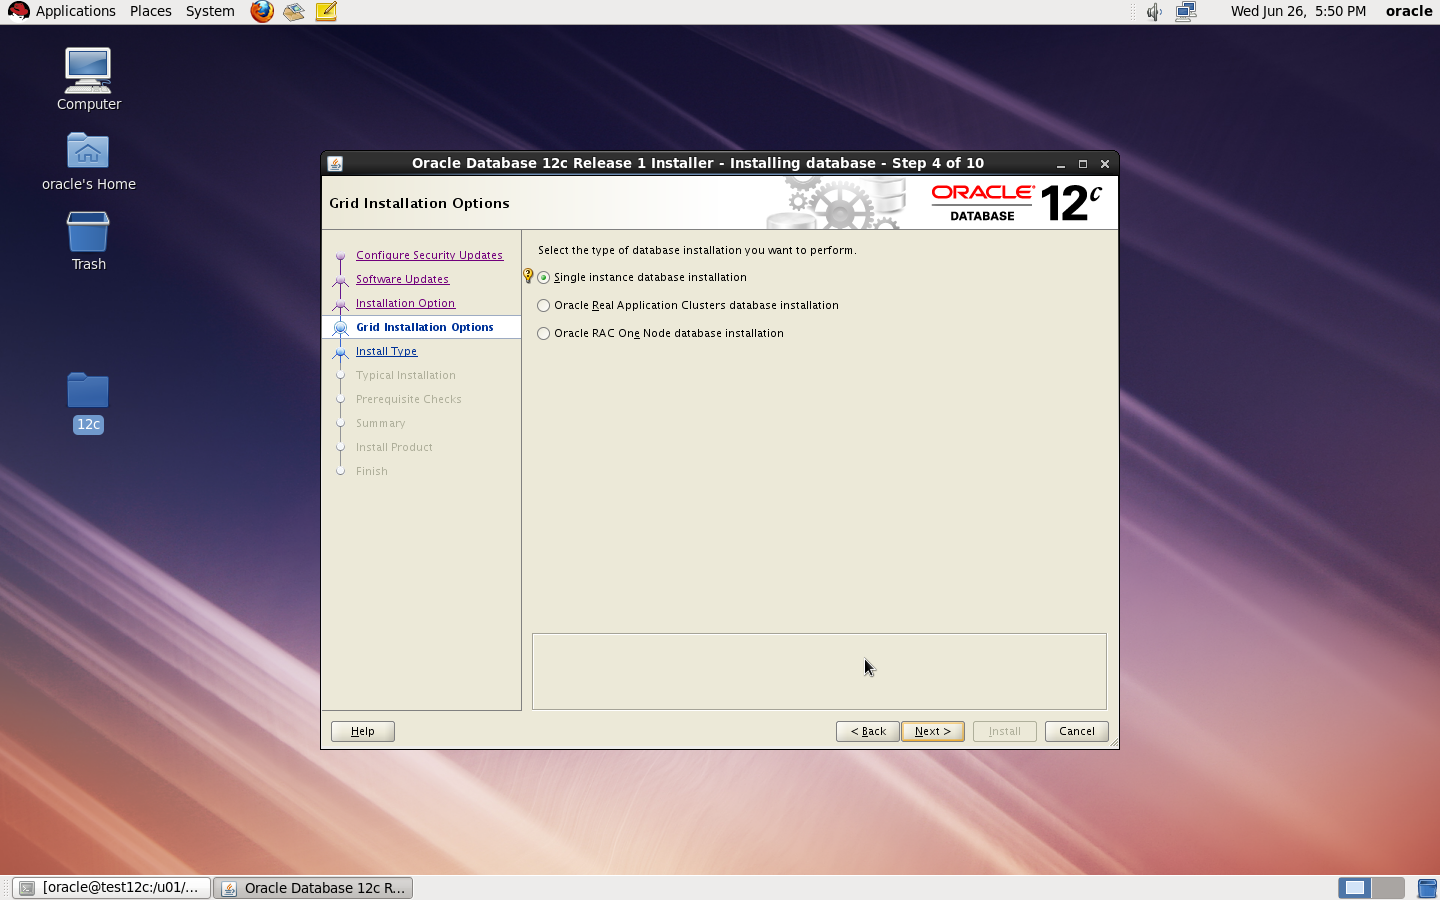
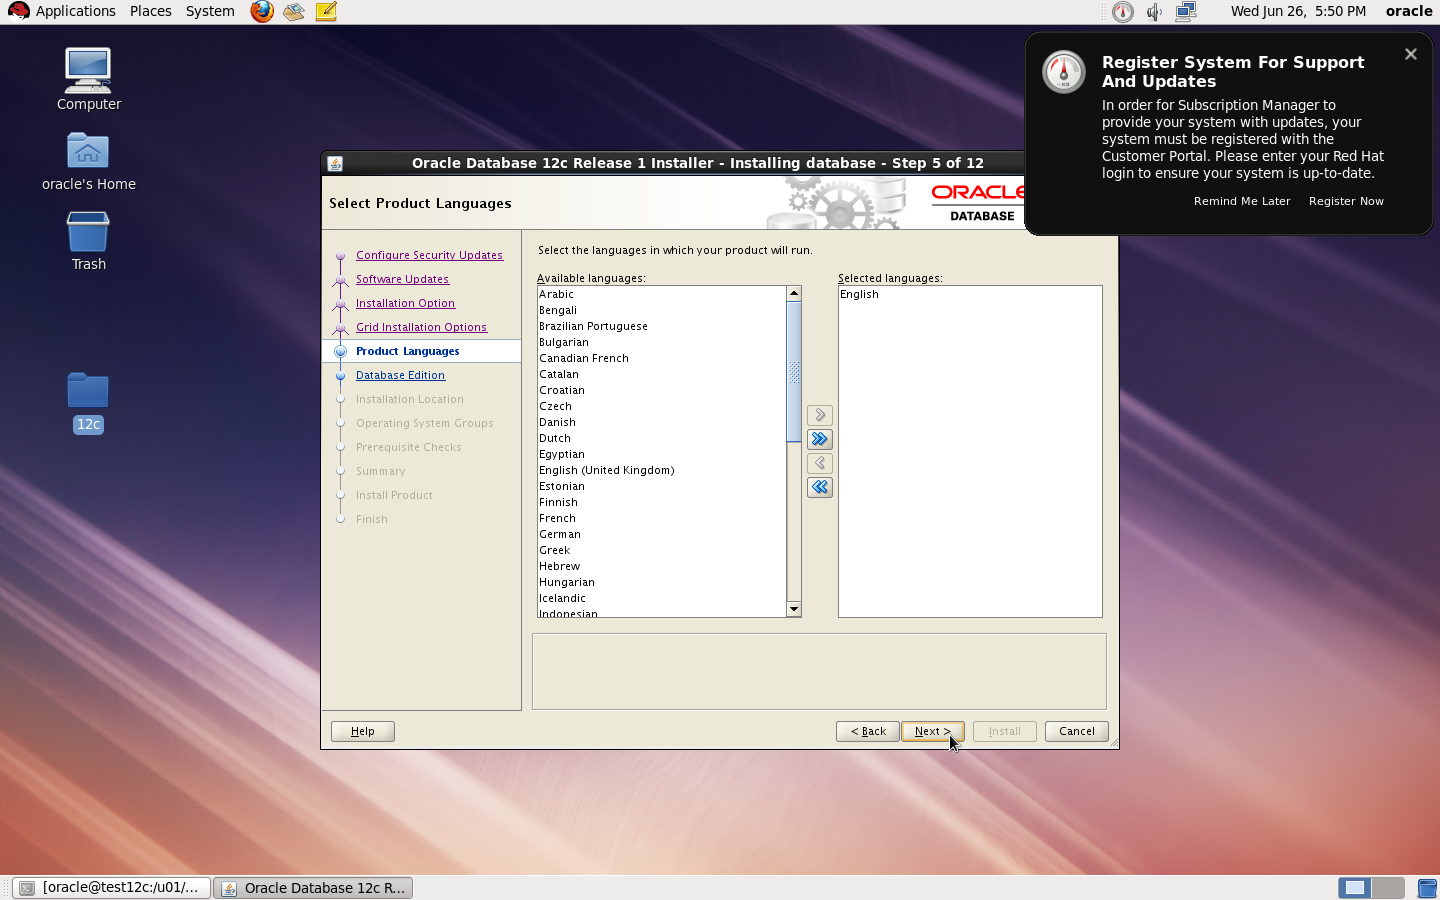
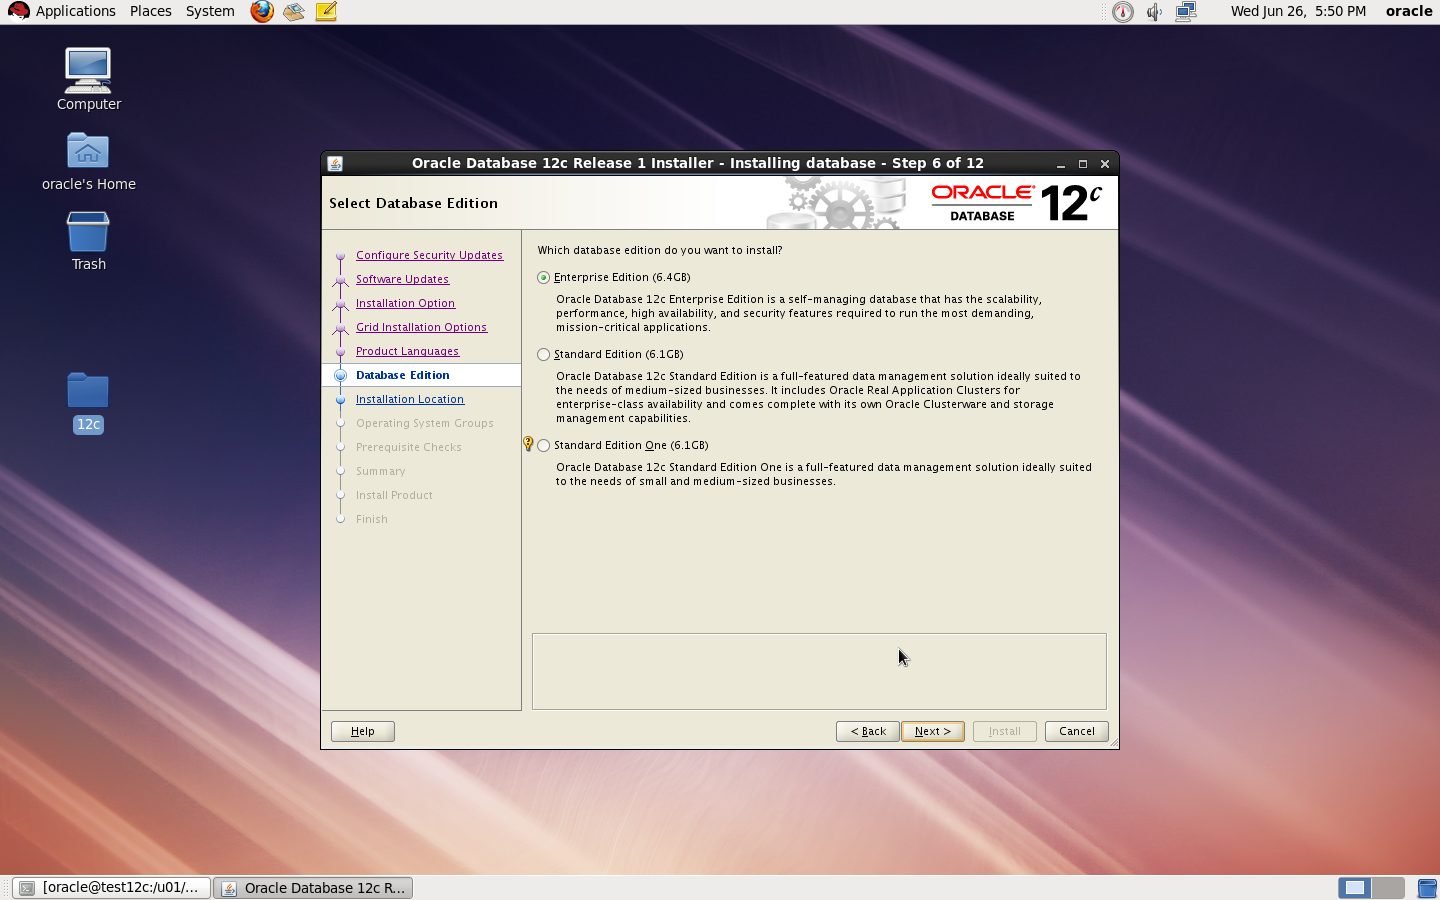
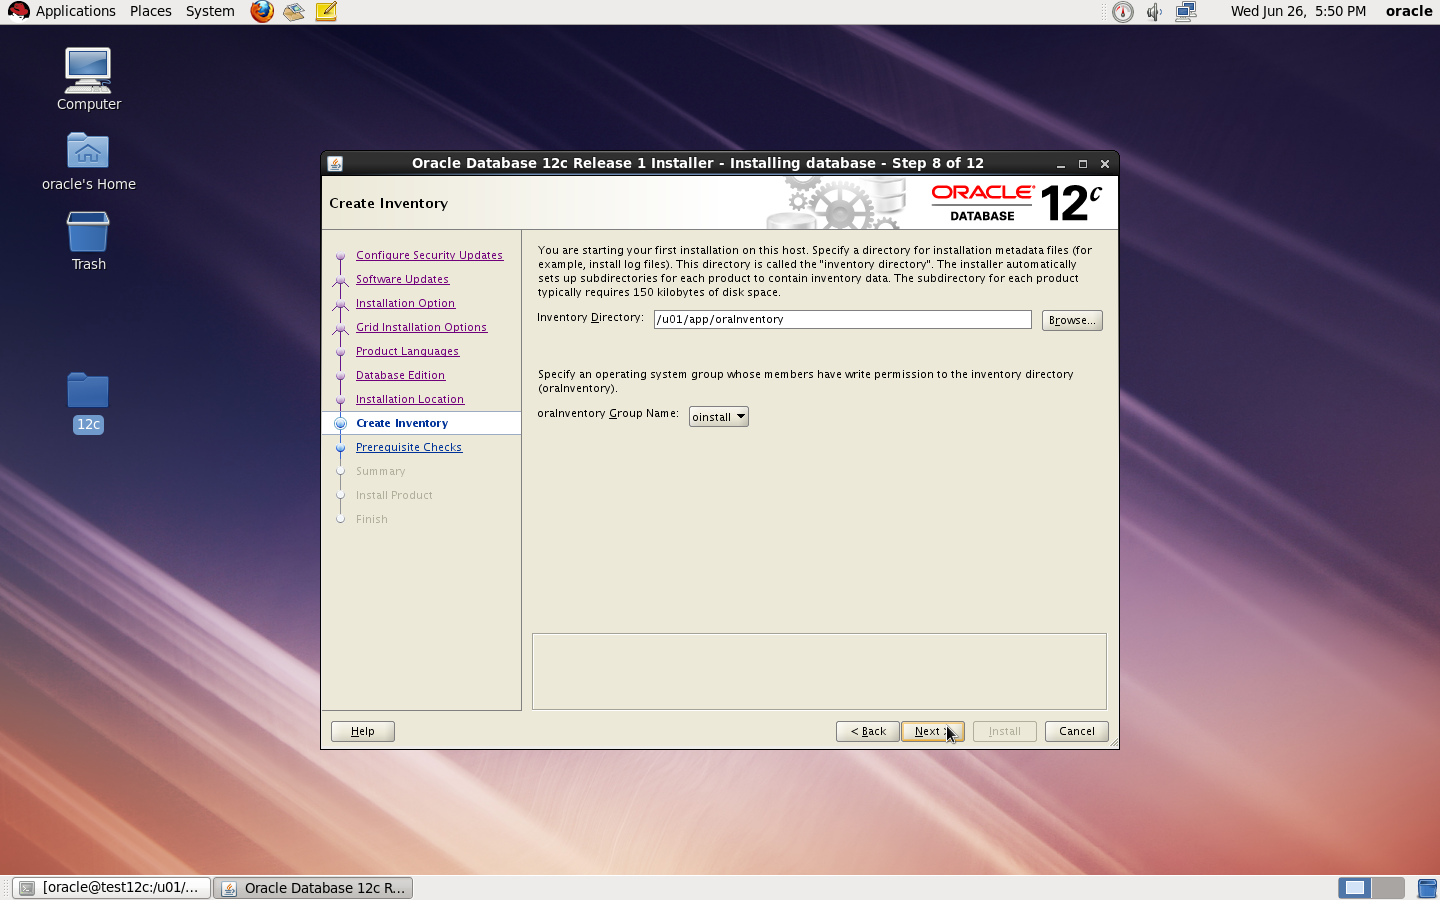
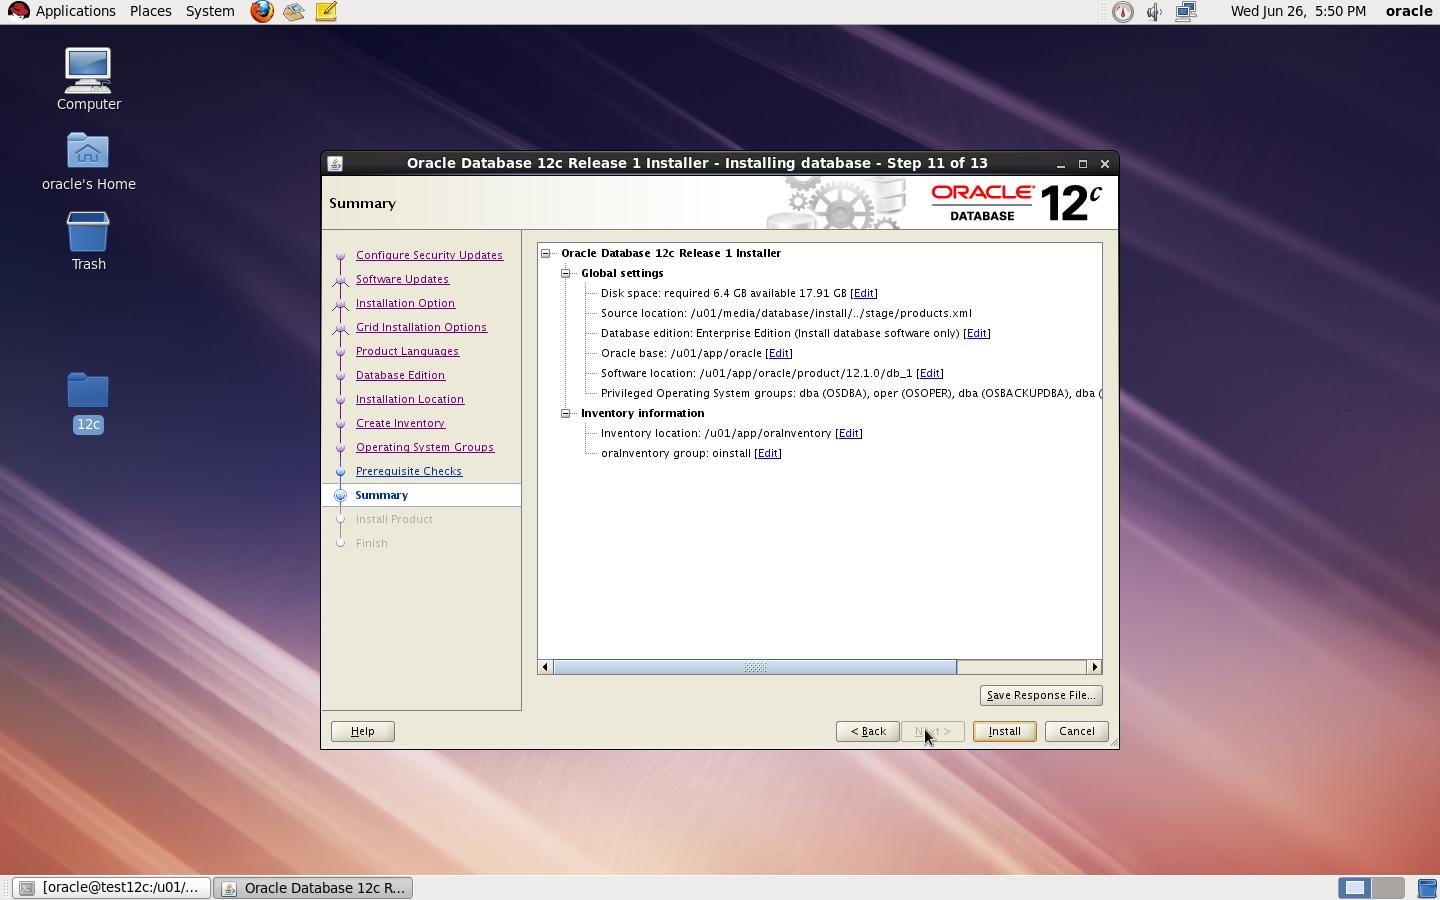
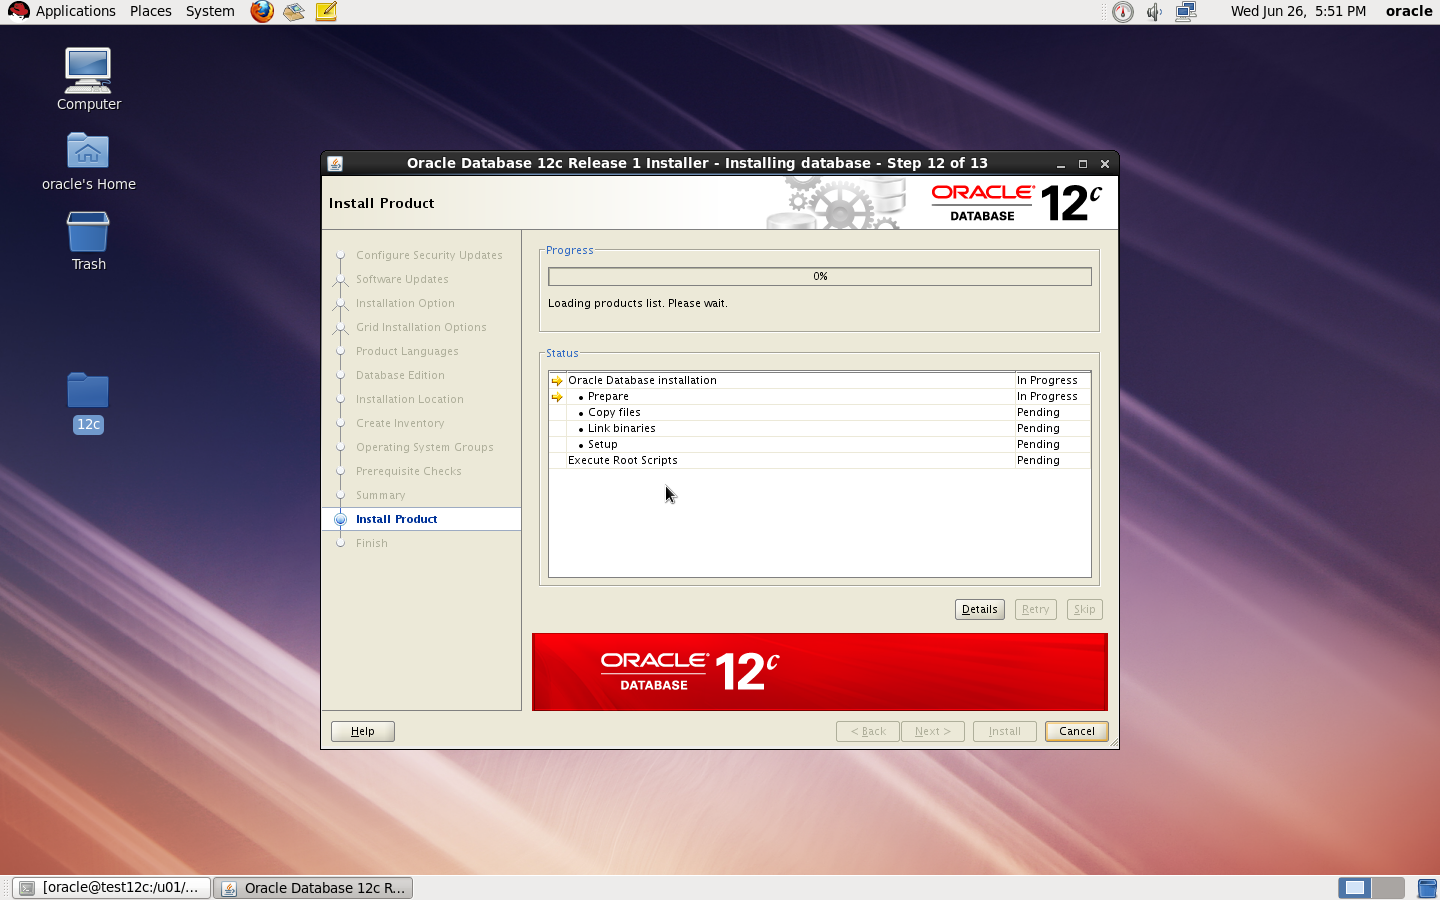
now start installation by ./runInstaller


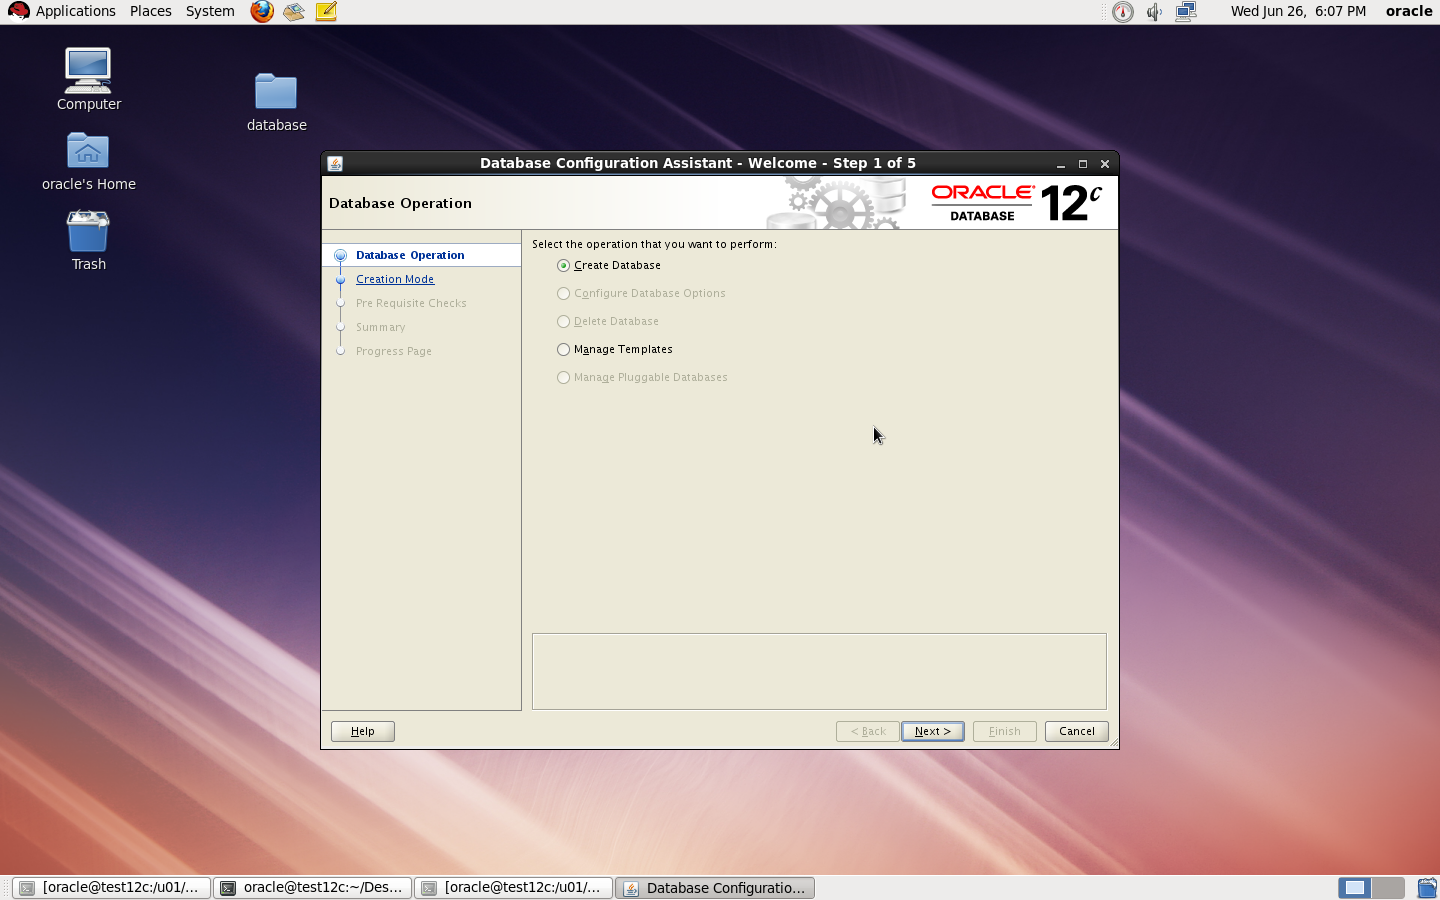
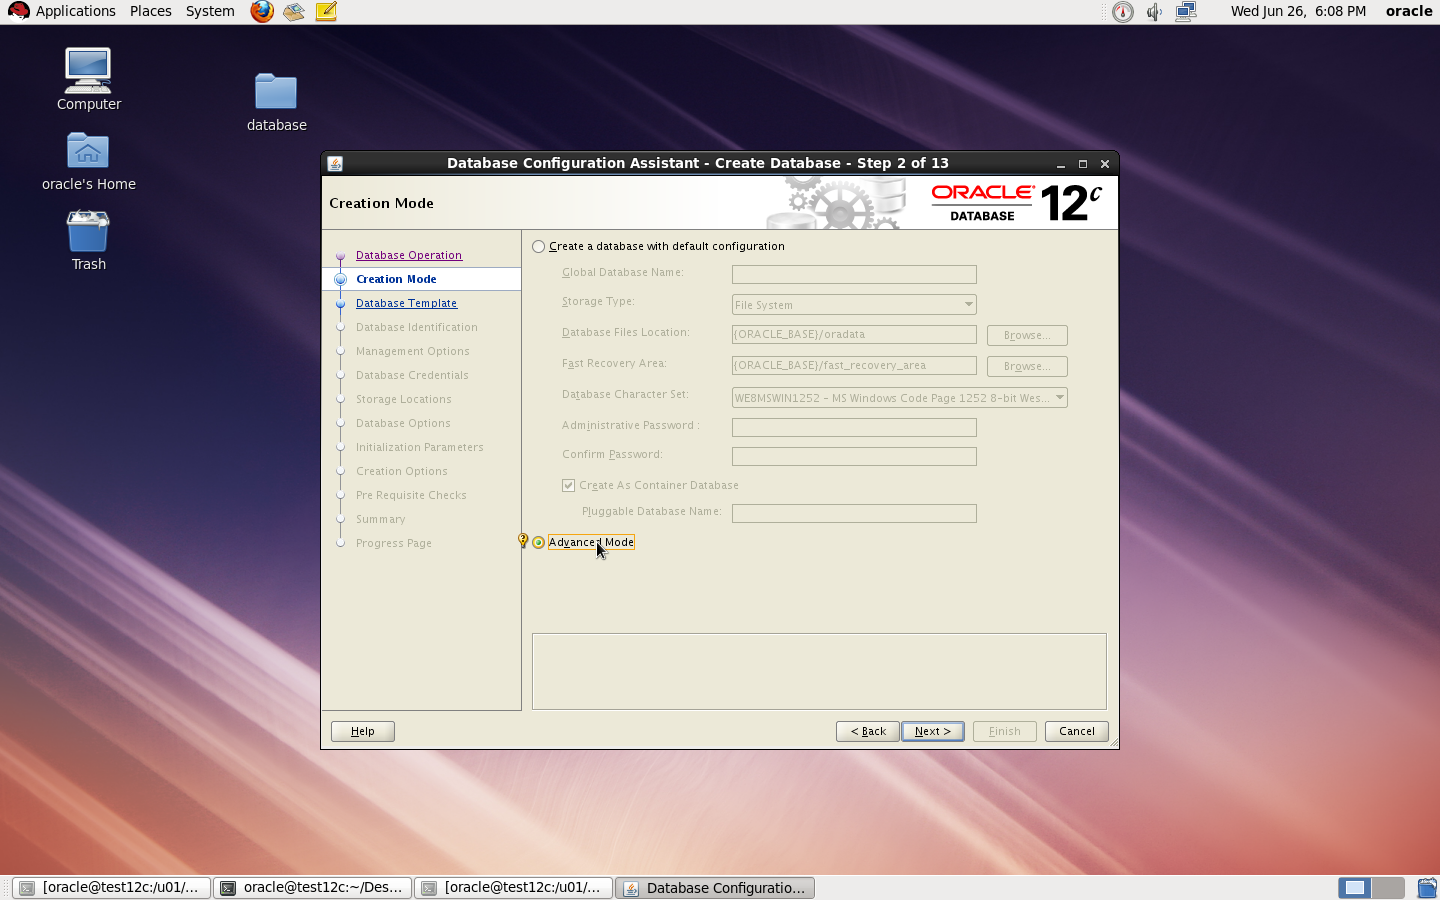
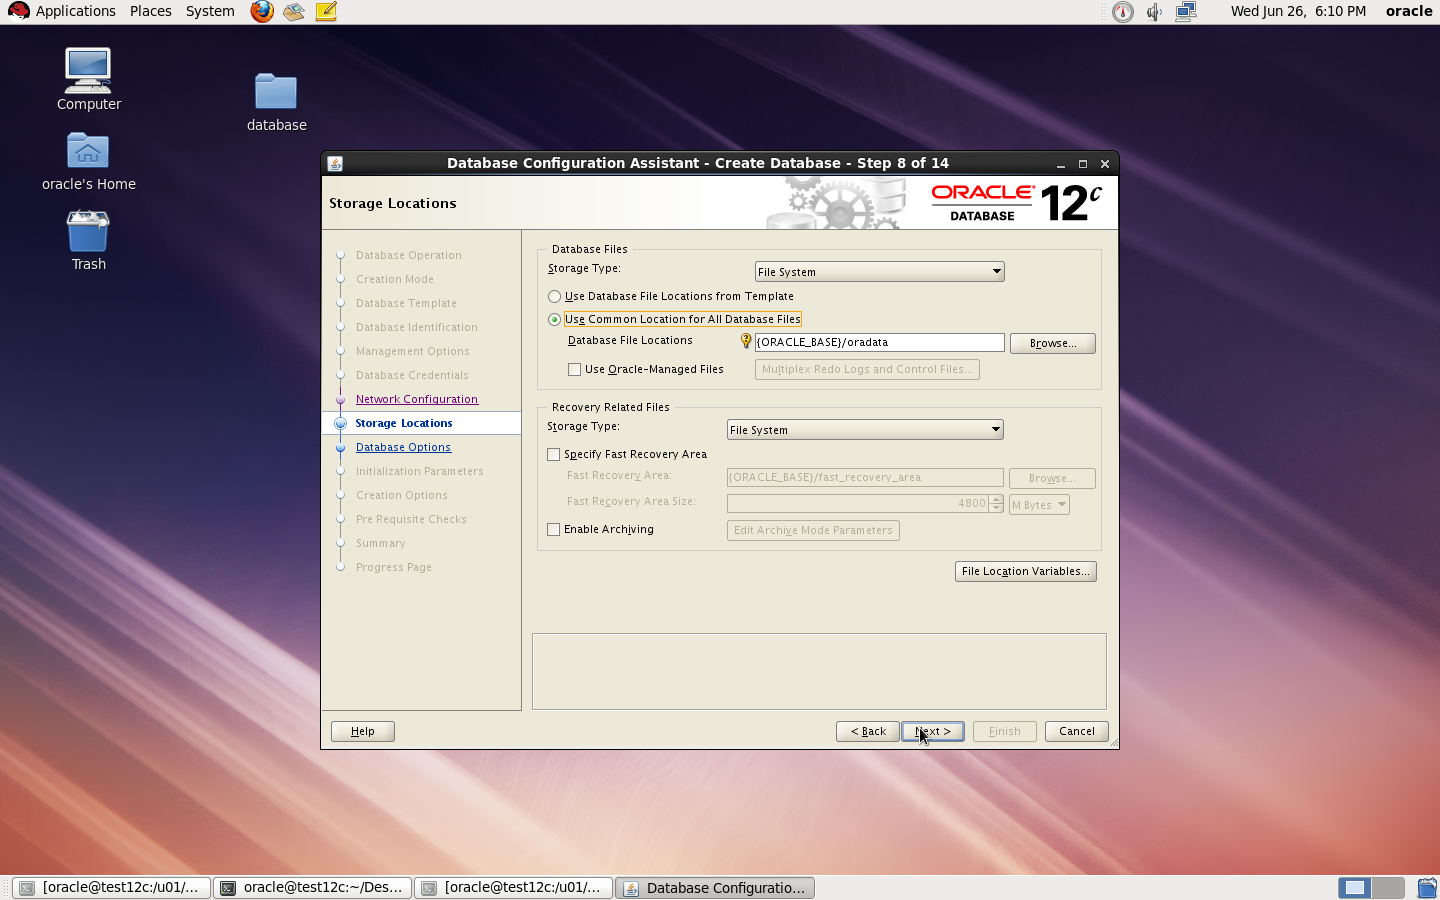
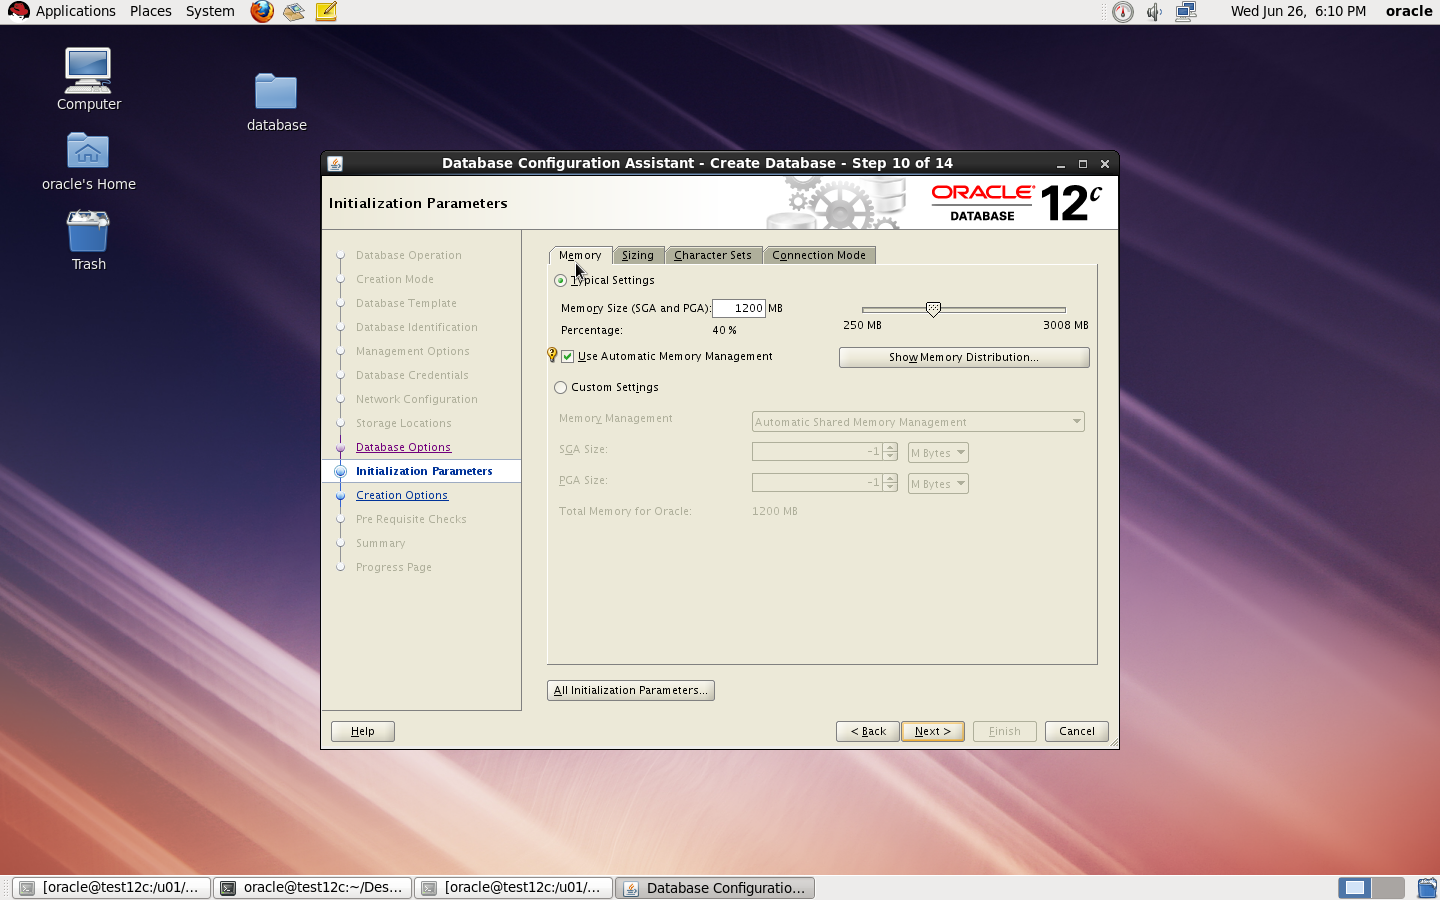
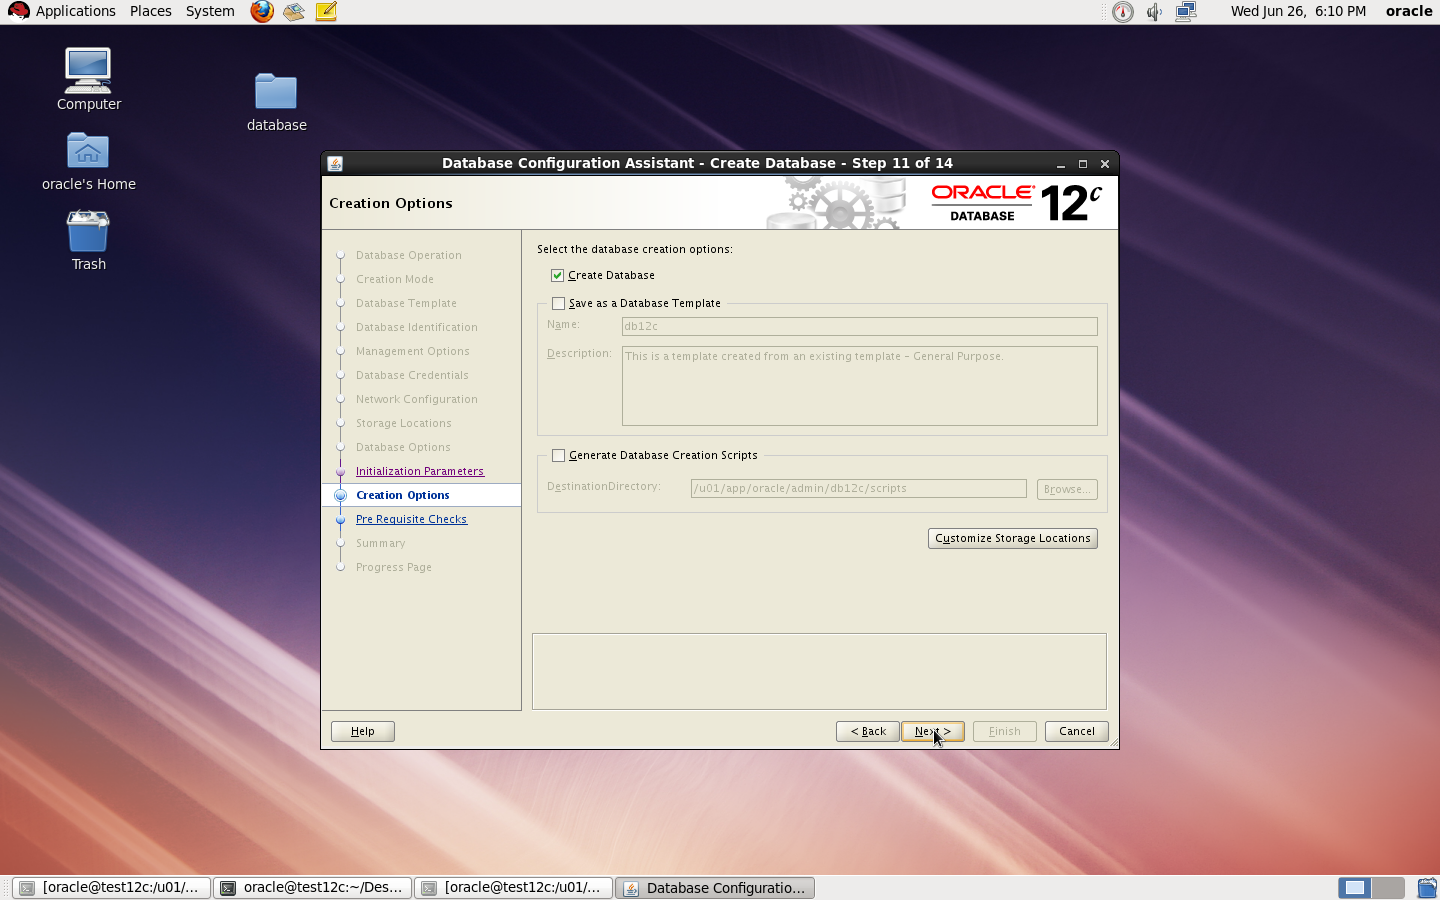
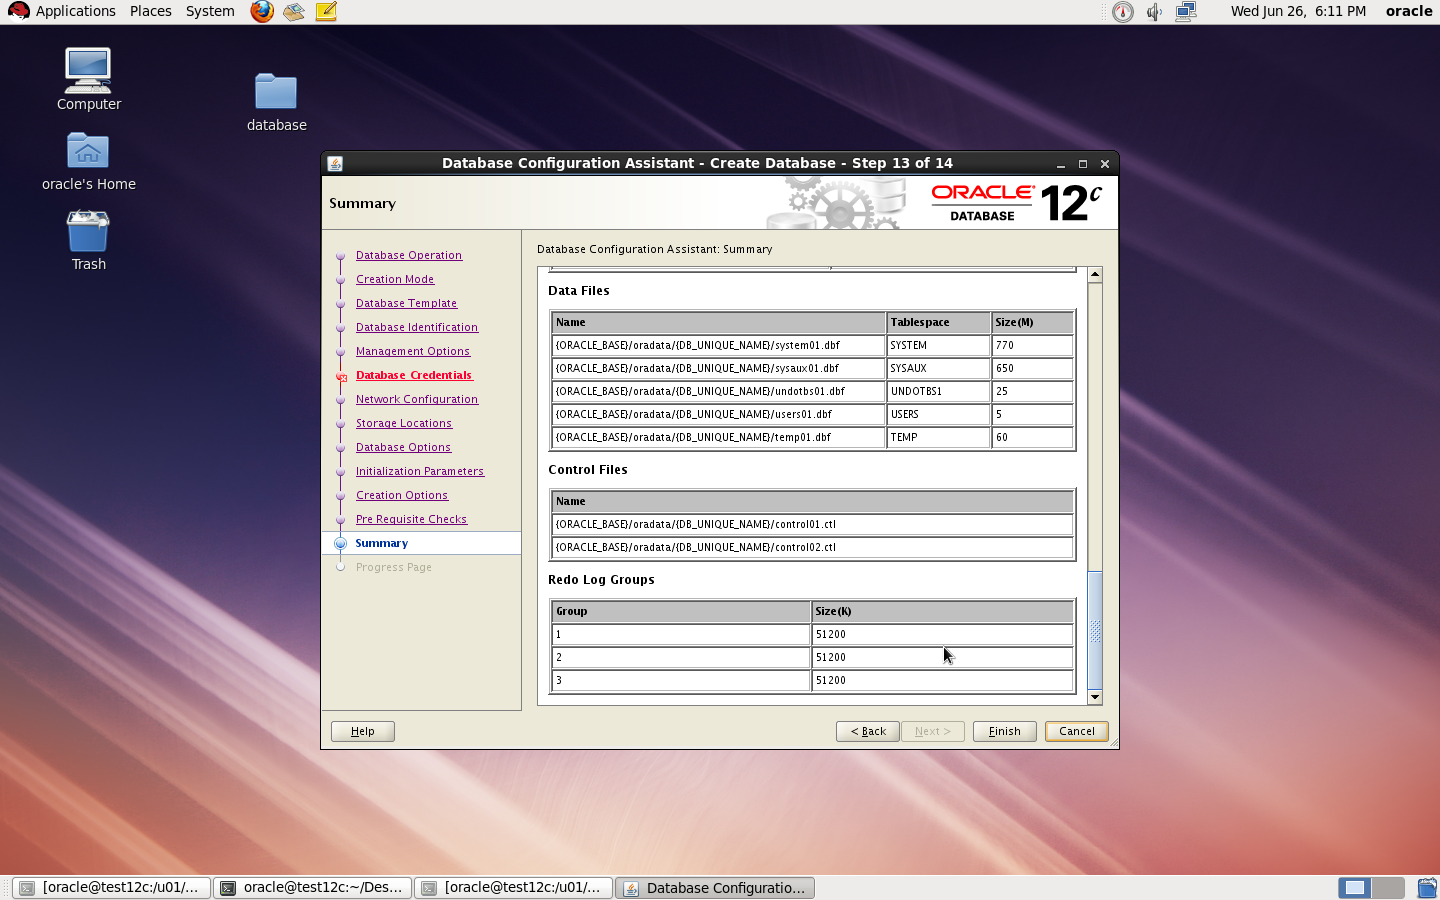
to Create Database you need to configure listener using netca and after finished successfully use dbca like below : 

I Upload the article Here
Thank you
Osama mustafa
  

Oracle Enterprise Manager unable to Start

When I checked the log Located $ORACLE_HOME/SID_HOSTNAME/sysman/log

I found the below errors :

app.ContextInitializer contextInitialized.420 – Integration Class not found

and

ERROR main: nmectla_agentctl: Error connecting to

First you need to make sure that the link in emd.properties and ports and configured right and hostname is correct, restrat dbconsole if this not works then check the below

On Host :

oracle@TEST:/u01/app/$ echo $TZ
localtime

oracle@TEST:/u01/app/$ export TZ=Etc/GMT+2

emctl config agent updateTZ

emctl resetTZ agent 

Restart Dbconsole

Emctl start dbconsole 

 Thank you
Osama mustafa

Enable Debug Mode Oracle Enterprise Manager

you need to change directory to below :

/u01/app/oracle/product/11.2.0/dbhome_1/sysman/config

under this directory you will work on

  • emd.properties
  • emagentlogging.properties
Backup two files. using cp command.
Open 

  • emagentlogging.properties
File :

change 

log4j.rootCategory=WARN, emagentlogAppender, emagenttrcAppender
TO 
log4j.rootCategory=DEBUG, emagentlogAppender, emagenttrcAppender
  • emd.properties
Change 
EMAGENT_PERL_TRACE_LEVEL=WARN
TO 
EMAGENT_PERL_TRACE_LEVEL=DEBUG
Restart dbconsole
Thank you 
Osama mustafa