With API Gateway, you can create, publish, maintain, monitor, and secure APIs.
With API Gateway, you can connect your applications to AWS services and other public or private websites. It provides consistent RESTful and HTTP APIs for mobile and web applications to access AWS services and other resources hosted outside of AWS.
As a gateway, it handles all the tasks involved in accepting and processing up to hundreds of thousands of concurrent API calls. These include traffic management, authorization and access control, monitoring, and API version management.
API Gateway sample architecture
API Gateway integrates with Amazon CloudWatch by sending log messages and detailed metrics to it. You can activate logging for each stage in your API or for each method. You can set the verbosity of the logging (Error or Info), and if full request and response data should be logged.
The detailed metrics that API Gateway can send to Amazon CloudWatch are:
Number of API calls
Latency
Integration latency
HTTP 400 and 500 errors
API Gateway features
Creates a unified API front end for multiple microservices.
Provides DDoS protection and throttling for your backend.
Authenticates and authorizes requests to a backend.
Throttles, meters, and monetizes API usage by third-party developers.
When your business or architecture becomes large enough, you will find the need to separate logical elements for security or architectural needs, or just for simplicity’s sake.
A VPC peering connection is a one-to-one relationship between two VPCs. There can only be one peering resource between any two VPCs. You can create multiple VPC peering connections for each VPC that you own, but transitive peering relationships are not supported. You will not have any peering relationship with VPCs that your VPC is not directly peered with. You can create a VPC peering connection between your own VPCs, or with a VPC in another AWS account within a single Region.
To establish a VPC peering connection, the owner of the requester VPC (or local VPC) sends a request to the owner of the peer VPC. You or another AWS account can own the peer VPC. It cannot have a Classless Inter-Domain Routing (CIDR) block that overlaps with your requester VPC’s CIDR block. The owner of the peer VPC has to accept the VPC peering connection request to activate the VPC peering connection.
To permit the flow of traffic between the peer VPCs using private IP addresses, add a route to one or more of your VPC’s route tables that points to the IP address range of the peer VPC. The owner of the peer VPC adds a route to one of their VPC’s route tables that points to the IP address range of your VPC. You might also need to update the security group rules that are associated with your instance to ensure that traffic to and from the peer VPC is not restricted.
Benefits of VPC peering
Review some of the benefits of using VPC peering to connect multiple VPCs together.
bulletBypass the internet gateway or virtual private gateway. Use VPC peering to quickly connect two or more of your networks without needing other virtual appliances in your environment.
bulletUse highly available connections. VPC peering connections are redundant by default. AWS manages your connection.
bulletAvoid bandwidth bottlenecks. All inter-Region traffic is encrypted with no single point of failure or bandwidth bottlenecks. Traffic always stays on the global AWS backbone, and never traverses the public internet, which reduces threats, such as common exploits, and distributed denial of service (DDoS) attacks.
bulletUse private IP addresses to direct traffic. The VPC peering traffic remains in the private IP space.
VPC peering for shared services
your security team provides you with a shared services VPC that each department can peer with. This VPC allows your resources to connect to a shared directory service, security scanning tools, monitoring or logging tools, and other services.
A VPC peering connection with a VPC in a different Region is present. Inter-Region VPC peering allows VPC resources that run in different AWS Regions to communicate with each other using private IP addresses. You won’t be required to use gateways, virtual private network (VPN) connections, or separate physical hardware to send traffic between your Regions.
full mesh VPC peering
each VPC must have a one-to-one connection with each VPC with which it is approved to communicate. This is because each VPC peering connection is nontransitive in nature and does not permit network traffic to pass from one peering connection to another.
The number of connections required has a direct impact on the number of potential points of failure and the requirement for monitoring. The fewer connections you need, the fewer you need to monitor and the fewer potential points of failure.
I woke up today with fantastic news: AWS Community Builder has been renewed for the second time.
The AWS Community Builders program offers technical resources, education, and networking opportunities to AWS technical enthusiasts and emerging thought leaders passionate about sharing knowledge and connecting with the technical community.
Interested AWS builders should apply to the program to build relationships with AWS product teams, AWS Heroes, and the AWS community.
A VPC endpoint enables private connections between your VPC and supported AWS services without requiring an internet gateway, NAT device, VPN connection, or Direct Connect connection. Instances in your VPC do not require public IP addresses to communicate with resources in the service. Traffic between your VPC and the other service does not leave the AWS network.
Endpoints are virtual devices. They are horizontally scaled, redundant, and highly available VPC components. They permit communication between instances in your VPC and services without imposing availability risks or bandwidth constraints on your network traffic.
Types of VPC endpoints
GATEWAY ENDPOINT
Specify a gateway endpoint as a route target in your route table. A gateway endpoint is meant for traffic destined to Amazon S3, or Amazon DynamoDB and remains inside the AWS network.
instance A in the public subnet communicates with Amazon S3 via an internet gateway. Instance A has a route to local destinations in the VPC. Instance B communicates with an Amazon S3 bucket and an Amazon DynamoDB table using unique gateway endpoints. The diagram shows an example of a private route table. The private route table directs your Amazon S3 and DynamoDB requests through each gateway endpoint using routes. The route table uses a prefix list to target the specific Region for each service.
INTERFACE ENDPOINT
With an interface VPC endpoint (interface endpoint), you can privately connect your VPC to services as if they were in your VPC. When the interface endpoint is created, traffic is directed to the new endpoint without changes to any route tables in your VPC.
For example, a Region is shown with Systems Manager outside of the example VPC. The example VPC has a public and private subnet with an Amazon Elastic Compute Cloud (Amazon EC2) instance in each. Systems Manager traffic sent to ssm.region.amazonaws.com is sent to an elastic network interface in the private subnet.
Gateway VPC endpoints and interface VPC endpoints help you access services over the AWS backbone.
A gateway VPC endpoint (gateway endpoint) is a gateway that you specify as a target for a route in your route table for traffic destined for a supported AWS service. The following AWS services are supported: Amazon S3 and Amazon DynamoDB.
An interface VPC endpoint (interface endpoint) is an elastic network interface with a private IP address from the IP address range of your subnet. The network interface serves as an entry point for traffic destined to a supported service. AWS PrivateLink powers interface endpoints and it avoids exposing traffic to the public internet.
DubOps is a unique event that brings together DevOps, IT operations, and software development experts to share their knowledge and insights with the community. This event provides a platform for attendees to learn about the latest trends and best practices in the industry, as well as network with peers and thought leaders.
Registration for the Dubops event is now open, and we encourage anyone interested in attending to sign up early, as space is limited. Don’t miss this chance to expand your knowledge, connect with peers, and stay ahead of the curve in the ever-changing world of DevOps and IT operations.
Date: May 11th, 2023 Time: 18:00 – 21:00 Location: Zabeel House, Dubai, UAE Registration link: https://lnkd.in/dCd7V-vv We look forward to seeing you there!
A load balancer distributes incoming application traffic across multiple targets, such as EC2 instances, in multiple Availability Zones to increase the availability of your application. A load balancer works with listeners. You can have more than one listener per load balancer.
A listener checks for connection requests from clients, using the protocol and port that you configure. The load balancer forwards requests to one or more target groups, based on the rules that you define.
Each rule specifies a target group, condition, and priority. The traffic is forwarded to that group when the condition is met. You define a default rule for each listener. You can add rules that specify different target groups based on the content of the request. Each target group routes requests to one or more registered targets, for example EC2 instances, using the specified protocol and port number. You can register a target with multiple target groups.
Elastic Load Balancing
AWS Elastic Load Balancing (ELB) is one of the most widely used AWS services. It has been adopted by organizations of all sizes, in all geographies, and across every industry. ELBs automatically distribute traffic across multiple targets, provide high availability, incorporate security features, and perform health checks.
ELB features
ELB load balancers are the only load balancers available on AWS that natively connect users to your EC2 instances, container deployments, and AWS Lambda functions. Some key feature sets include the following:
High availability – ELB automatically distributes your traffic across multiple targets in a single Availability Zone or multiple Availability Zones. Examples of targets include EC2 instances, containers, and IP addresses.
Layer 4 or Layer 7 HTTP and HTTPS load balancing – You can load balance your HTTP or HTTPS applications for Layer 7-specific features. Alternatively, you can use strict Layer 4 load balancing for applications that rely purely on the TCP.
Security features – Use Amazon VPC to create and manage security groups associated with load balancers to provide additional networking and security options. You can also create an internal (non-internet-facing) load balancer.
Health checks – ELB load balancers can detect unhealthy targets, stop sending traffic to them, and spread the load across the remaining healthy targets.
Monitoring operations – To monitor the performance of your applications in real time, ELB integrates with CloudWatch metrics and provides request tracing.
Types of load balancers
Application Load Balancer
This load balancer functions at the application layer, the seventh layer of the Open Systems Interconnection (OSI) model. Application Load Balancers support the following: Content-based routing, applications that run in containers, and open standard protocols (WebSocket and HTTP/2). This type of balancer is ideal for advanced load balancing of HTTP and HTTPS traffic.
Network Load Balancer
This load balancer is designed to handle tens of millions of requests per second while maintaining high throughput at ultra low-latency. Network Load Balancer operates at the connection level (Layer 4), routing connections to targets based on IP protocol data. Targets include EC2 instances, containers, and IP addresses. It is ideal for balancing TCP traffic.
Gateway Load Balancer
This load balancer makes it easy to deploy, scale, and manage your third-party virtual appliances. It provides one gateway for distributing traffic across multiple virtual appliances, and scales them up, or down, based on demand. This distribution reduces potential points of failure in your network and increases availability. Gateway Load Balancer transparently passes all Layer 3 traffic through third-party virtual appliances. It is invisible to the source and destination.
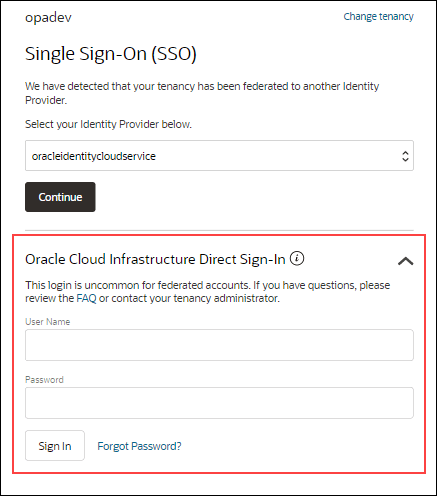
You have the ability to establish users for Oracle Cloud Infrastructure Identity and Access Management (IAM) for user situations that are not as common.
Open the navigation menu and click Identity & Security. Under Identity, click Users.
Click Create user and then select IAM User.
Fill the required fields, and click Create.
Add the user to an IAM group with specific access.
Under Identity, select Groups
From the groups list, click the group to which you want to add the user.
Click Add User to Group.
In the Add User to Group dialog, select the user you created from the drop-down list in the Users field, and click Add.
Create the user’s password.
From the Group Members table on the Group Details screen, select the user you added.
Click Create/Reset Password. The Create/Reset Password dialog is displayed with a one-time password listed.
It’s essential to consider the security implications before allowing direct access to cloud services and resources, particularly as the latter expands. Some individuals get around this problem by setting up a virtual machine within the virtual cloud network and linking it to all the cloud services. This cuts down on publicly accessible services while facilitating connections for developers and system administrators. This virtual machine (VM) is like a manual bastion or leap box.
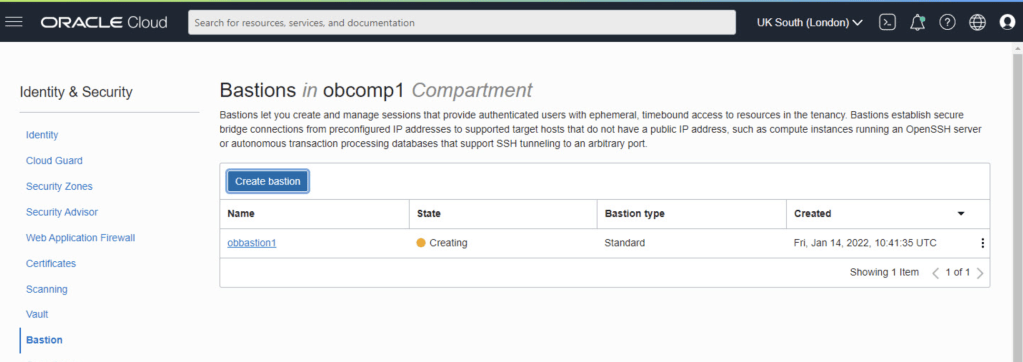
Create a Bastion
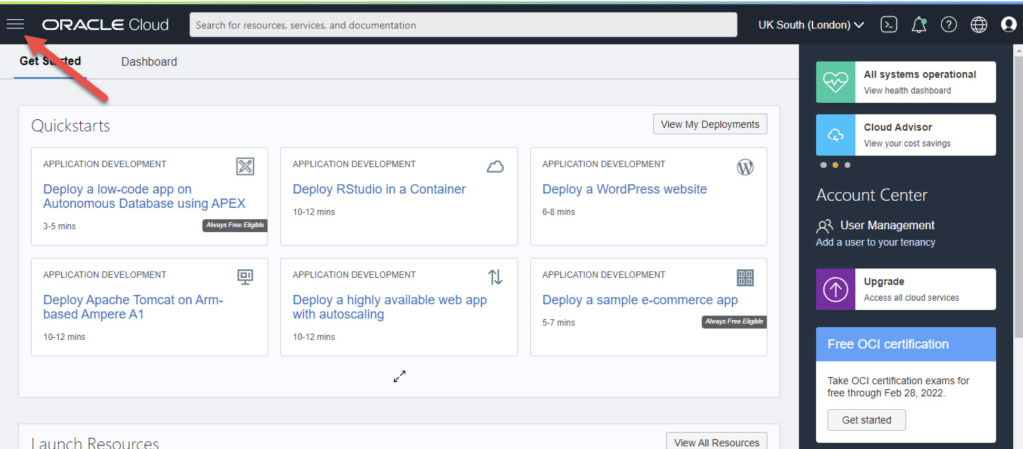
Connect to Oracle’s cloud service. To access the main menu, choose the hamburger icon in the upper left corner.
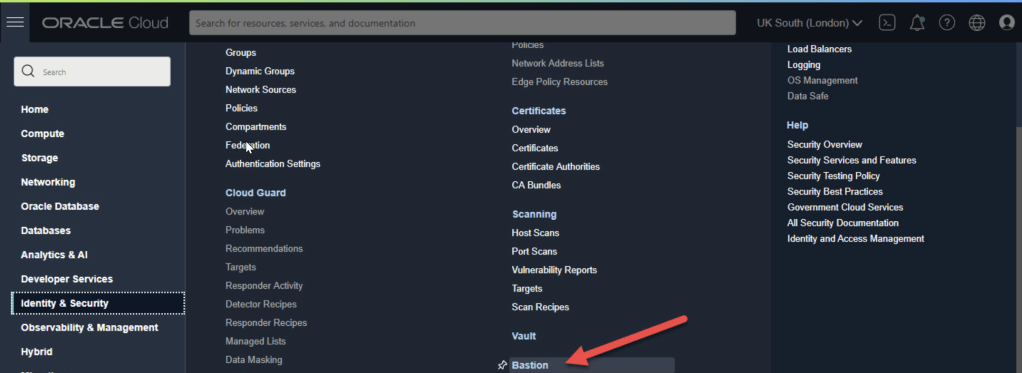
On the menu select “Identity & Security > Bastion”.
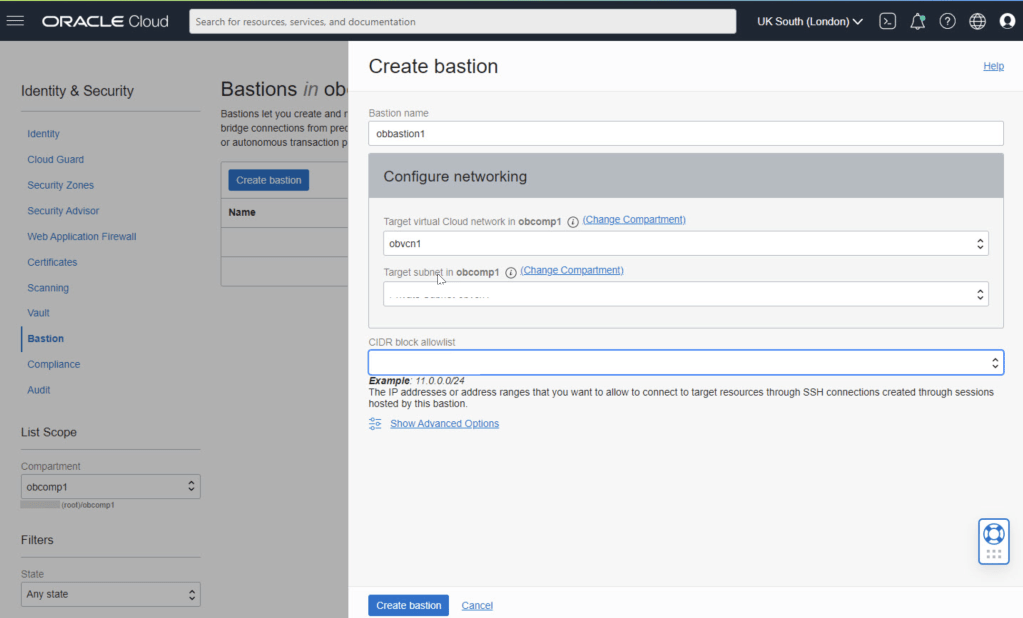
Select the compartment and click the “Create bastion” button.
Enter the bastion name and select the VCN and subnet for the bastion. We need to enter a CIDR block allowlist. In this case I’ve used the subnet for my IP address from my internet service provider. Click the “Create bastion” button.
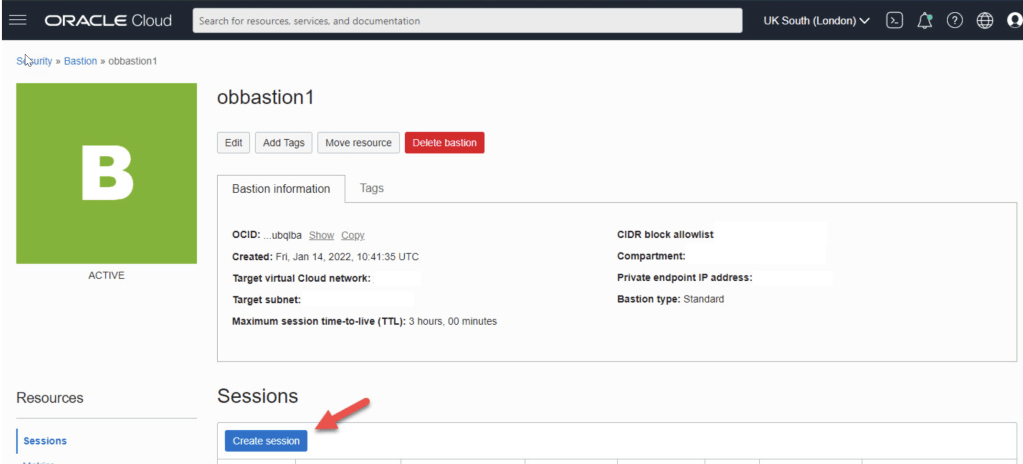
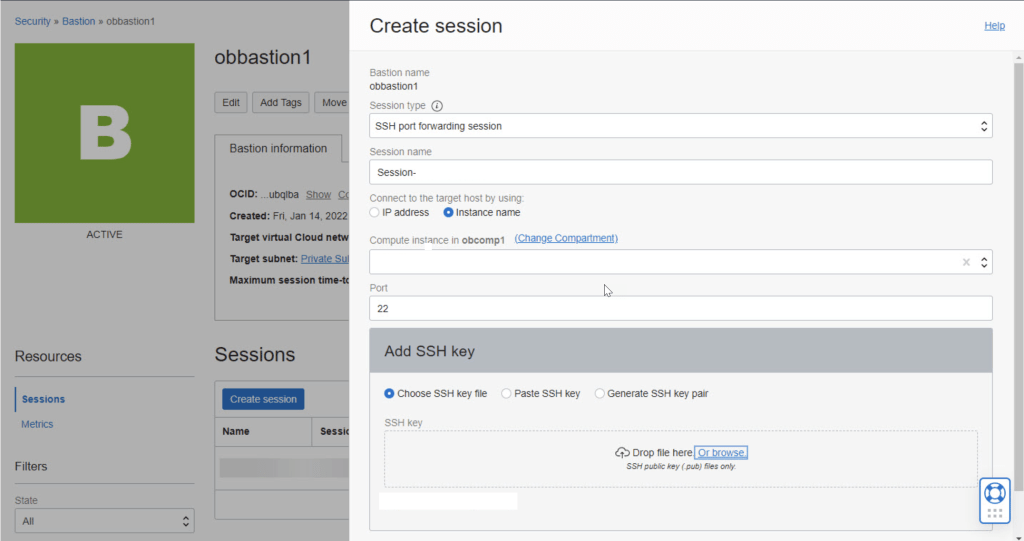
Click on the “Create session” button.
Connect
Our previously copied connection information should look something like this at this point.