I posted before about AWS, Azure and OCI but this time i am trying to cover Alibaba , in this post i will show you how to setup your first Compute instance whatever OS you want CentOS or Ubuntu depeds on what you want
What you need ?
A valid Alibaba Cloud account., create free one with 300$ credit
An ECS instance running CentOS 7 or whatever OS you want.
A root password for your server.
Connect to your Alibaba Cloud
Locate the Internet IP address (Public IP address) associated with your Alibaba Cloud ECS Instance.
If you are running Linux or Mac, use a terminal application to connect to the instance via SSH. If you are on Windows, you can use PuTTy.
Change the Hostname
The hostname is a default identifier when you communicate to a Linux server. It is like a computer name that is associated with your home PC or laptop. Naming your CentOS 7 server with a descriptive hostname helps you to differentiate your machines especially if you are running a bunch of them.
check the update
$ sudo yum update
check your hostname
$ hostname
change your hostname, we need to install nano text editor using the command below:
$ sudo yum install nano
Then, edit the /etc/cloud/cloud.cfg file and find the entry preserve_hostname. Change its value from false to true.
Then, edit the /etc/hostname file using a nano editor by typing the command below:
$ sudo nano /etc/hostname
You will need to add two entries on this file just below the 127.0.0.1 localhost entry. The first entry you are adding uses the loopback interface address 127.0.1.1. Please note that this is different from the address 127.0.0.1 which have a ‘localhost’ value in the same file.
Reboot your Alibaba Cloud ECS instance for the changes to take effect by typing the command below:
$ sudo reboot
Also you can create non root user by
$ sudo adduser
For instance, to add a user identified as osama on your server, use the command below:
$ sudo adduser osama
Next, we assign a password to the user we have created above:
Regarding to Wikipedia, Serverless computing is a cloud computing execution model in which the cloud provider runs the server, and dynamically manages the allocation of machine resources. Pricing is based on the actual amount of resources consumed by an application, rather than on pre-purchased units of capacity
Today i will show you an example how to create serverless website but this time not using Amazon AWS, Azure or OCI but Alibaba Cloud Provider.
Create a Function Compute Service
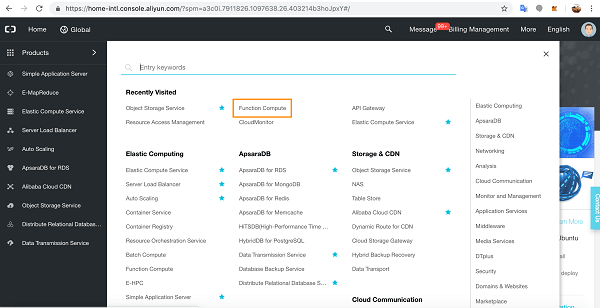
Go to the console page and click through to Function Compute.
Click the add button beside Services.
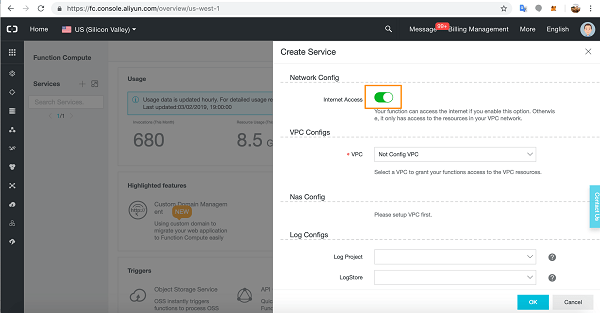
In the Service slide out, give your service a name, an optional description, and then slide open the Advanced Settings.
In Advanced Settings you can grant access for Functions to the Internet, to VPC resources, and you can attach storage and a log service to a Function. You can also configure roles.
For our tutorial, we will need Internet access so make sure this configuration is on.
We will leave VPC and Log Configs as they are.
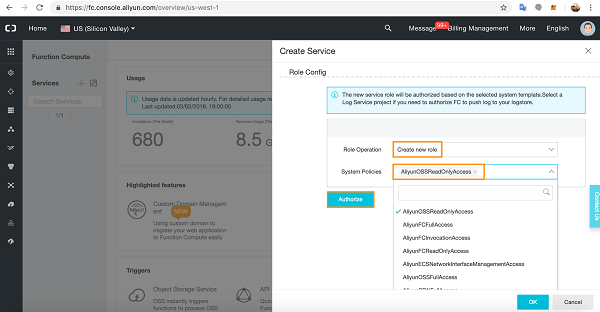
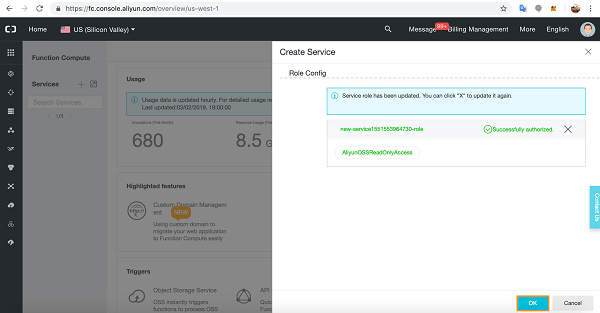
In the Role Config section, select Create New Role, and in the dropdown list pick AliyunOSSReadOnlyAccess as we will be accessing our static webpages from an Object Storage Service bucket.
Click Authorize.
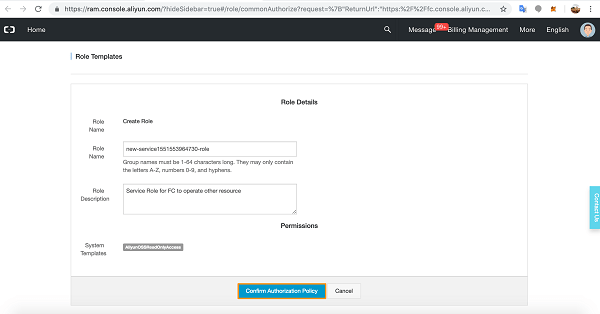
You will see a summary of the Role you created.
Click Confirm Authorization Policy.
You have successfully added the Role to the Service.
Click OK.
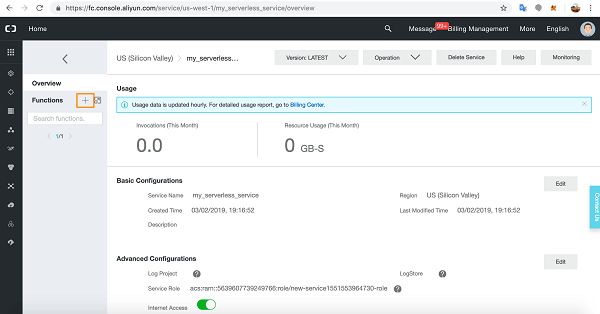
ou will see the details of the Function Compute Service you just created.
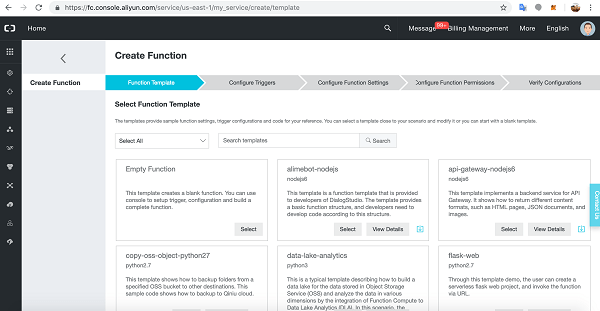
Now let’s create a Function in the Service. Click the add button next to Functions.
You will see the Create Function process. The first part of the process is Function Template.
There are many Function Templates available, including an empty Function for writing your own bespoke Functions.
Alibaba Cloud-supplied Template Functions are very useful as they have relevant method invocation and demo code for getting started quickly with Function Compute.
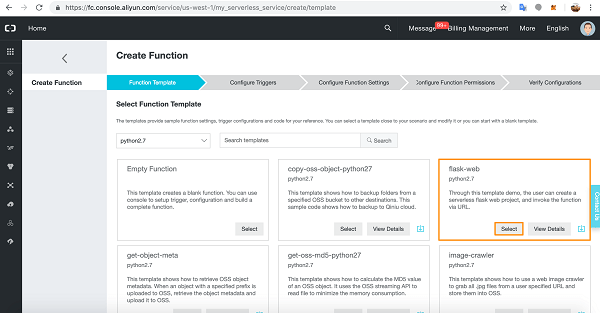
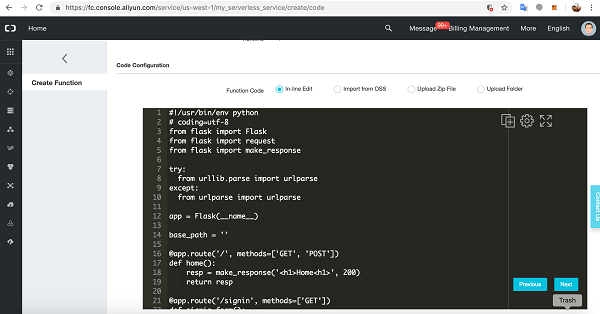
let’s choose the flask-web Function written in Python2.7.
Click Select.
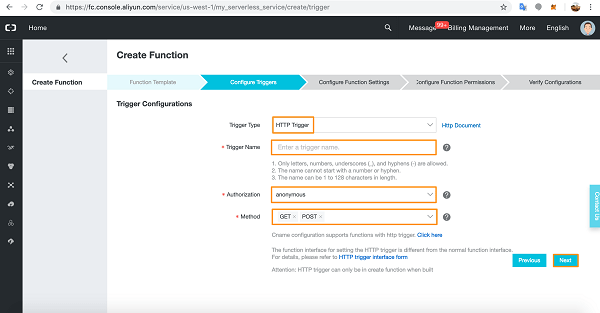
We are now at the Configure Triggers section of creating a Function.
Select HTTP Trigger from the dropdown list. Give the Trigger a name and choose Authorization details (anonymous does not require authorization).
Choose your HTTP methods and click Next. We are going to build a simple web-form application so we will need both the GET and POST HTTP methods.
Now we arrive at the Configure Function Settings.
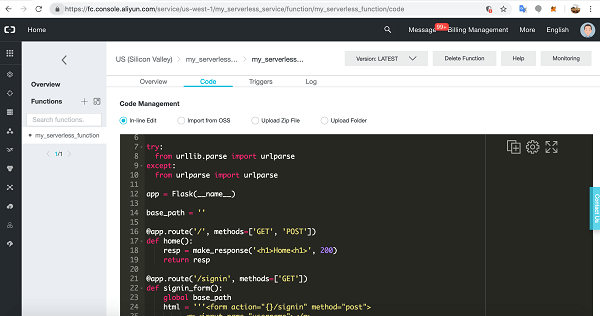
Give the Function a name then scroll down to Code details.
We’ll leave the supplied code for now. Scroll down to below the code sample.
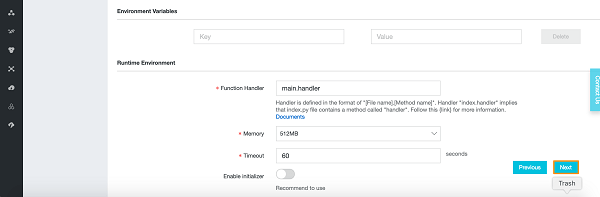
You will see Environment Variable input options and Runtime Environment details.
Click Next.
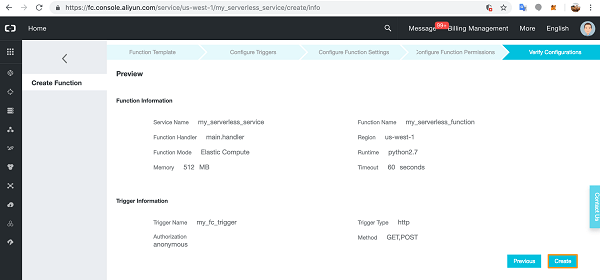
Click Next at Configure Function Permissions.
Verify the Configuration details and click Create.
You will arrive at the Function’s IDE. Here you can enter new code, edit the code directly, upload code folders, run, test, and fix your code.
Scroll down.
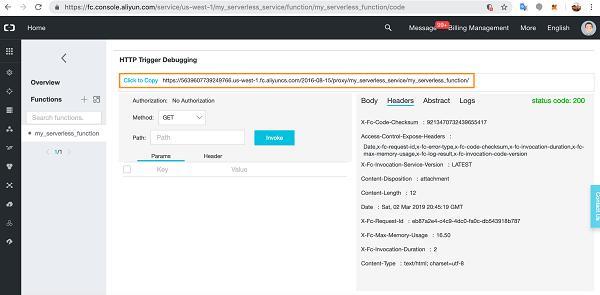
Copy the URL as we will need to add this to our static webpages so they can connect to our Function Compute Service and Function.
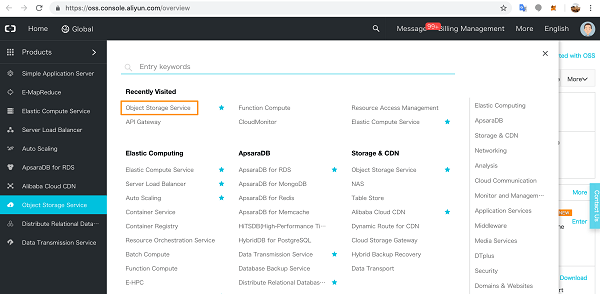
Set Up and Configure an OSS Bucket
Click through to Object Storage Service on the Products page.
If you haven’t yet activated Object Storage Service, go ahead and activate it. In the OSS console, click Create Bucket.
Choose a name for the OSS Bucket and pick the region – you cannot change the region later. Select the Storage Class – you also cannot change this later.
We have selected Public Read for the Access Control List.
When you’re ready, click OK.
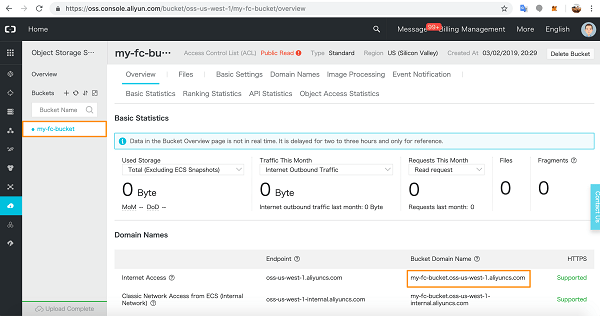
You will see the Overview page for your bucket. Make a note of the public Internet URL.
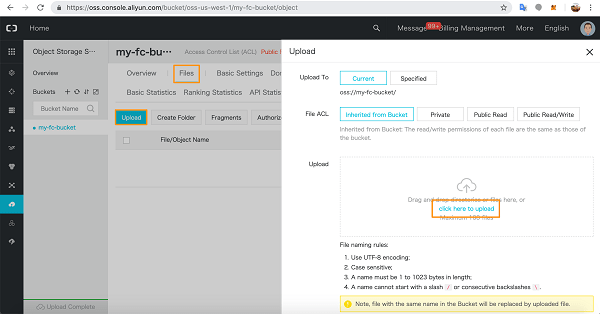
In the Files tab, upload your static web files.
I uploaded a simple index.html homepage and a background picture.
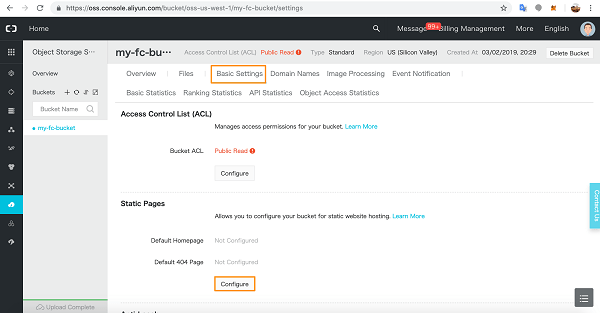
In Basic Settings, click Configure to configure your Static Pages.
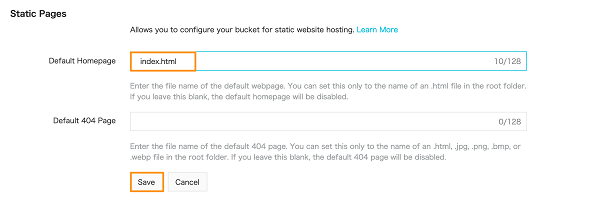
Add the homepage details and click Save.
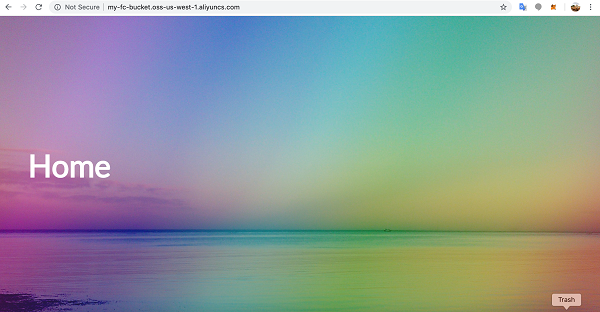
Now go to a new browser window and access the OSS URL you saved earlier.
Back in the Function Compute console, you can now test the flask-app paths directly from the code.
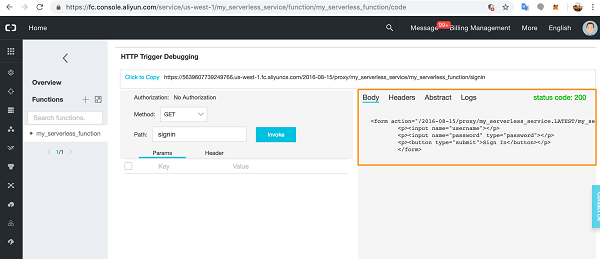
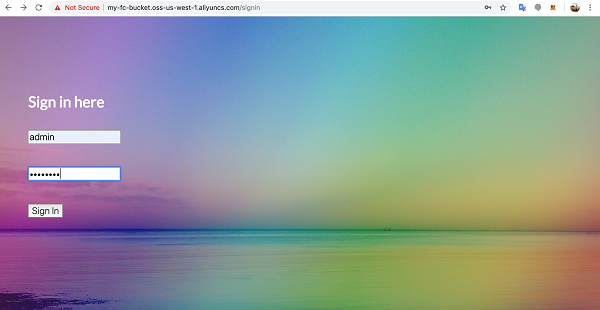
We already tested index.html with no Path variable. Next, we test the app route signin with GET and check the Headers and status code.
The signin page code is working correctly. You can also check the Body to make sure the correct HTML will render on the page. Notice that because I entered the path variable, signin is appended to the URL.
Of course, any errors you encounter will show up in the Logs section for easy debugging.
Now, let’s test this page on the Internet.
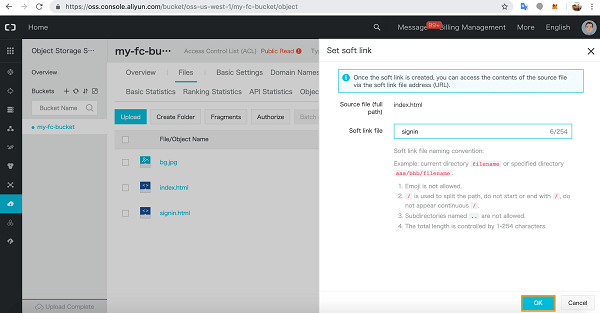
If you get an error here, implement a soft link for the page in OSS. Go to the OSS bucket and click More dropdown for the HTML file in question and choose Set soft link.
Give the link a name and click OK.
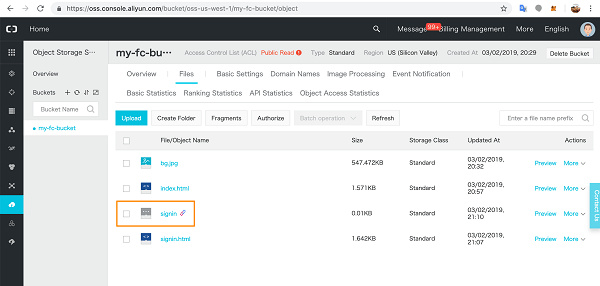
A link file will appear in the list of static files and you will now be able to access the page online with the relevant soft link and it will render as above.
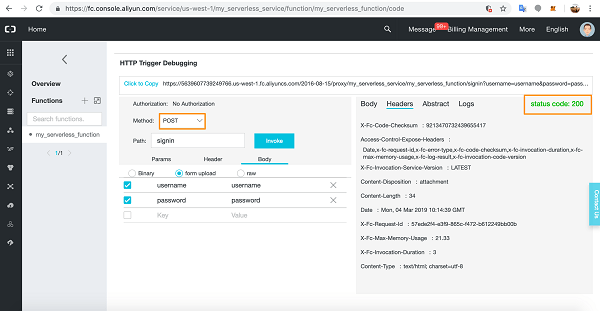
Back in Function Compute, we can test the POST method in the console with the correct username and password details in the same way.
Add the POST variables to the form upload section in the Body tab.
I had chance to work and test alibaba cloud, so i thought it’s good idea to write something about it since i already used AWS, Azure and OCI and this is will be my 4th cloud vendor.
Alibaba Cloud is the subsidiary of the e-commerce hub Alibaba Group. The group launched its cloud services in 2009. Today, cloud is the most ambitious project of Alibaba Group where they are investing their hard efforts to win over AWS.
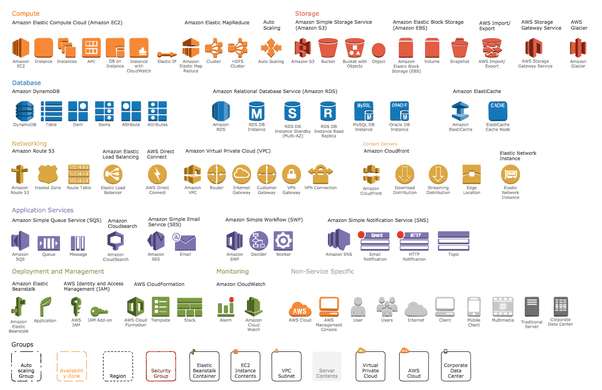
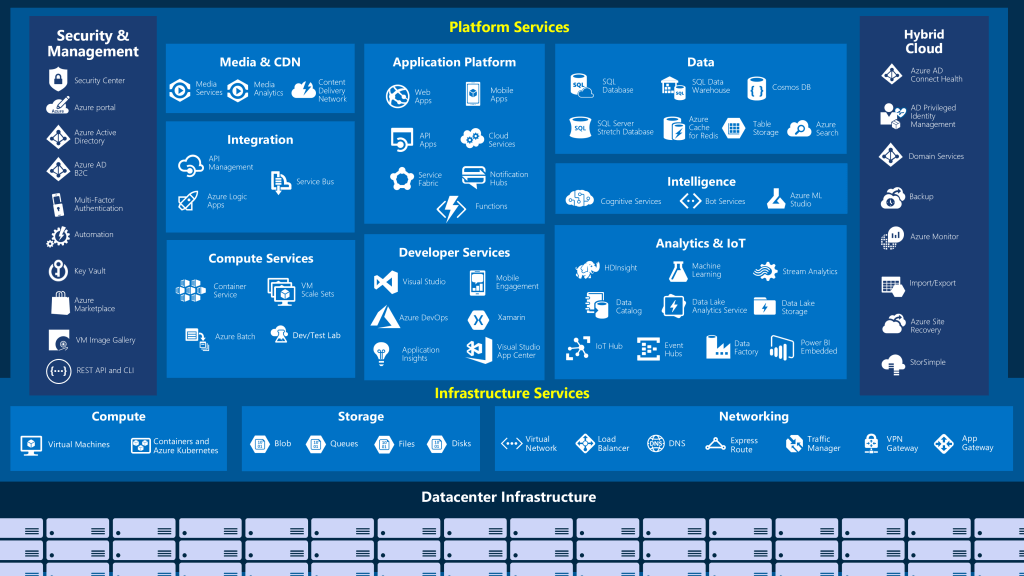
The company has an exclusive range of cloud computing products and services that are divided into 7 categories of Elastic Computing and Networking, Security and Management, Database, Application Services, Domains and website, Storage and CDN and Analytics. Customers of Alibaba Cloud are eligible to get the benefits of cloud security, record breaking computing power, cloud security, safeguard your data, etc.
I really like the cloud and the portal, it’s very simple and ease of use, include to this, having a lot of different features same as AWS, you can check them from here.
the alibaba cloud known as different name also, Aliyun, Alibaba Cloud has 19 regional data centres globally, including China North, China South, China East, US West, US East, Europe, United Kingdom, Middle East, Japan, Hong Kong, Singapore, Australia, Malaysia, India, and Indonesia, right now the Data Center in Germany is operated by Vodafone Germany
Some of the clients that using this cloud : Ford, Air Aisa, Lazada, and more.
Some of the services that providing by alibaba:-
Elastic Computing
Storage & CDN
Networking
Database Services
Security
and will discuss each one of them in different post, the next one will be alibaba services.
DevOps is the union of people, process, and products to enable continuous delivery of value to your end users. Azure DevOps is a set of services that gives you the tools you need to do just that. With Azure DevOps, you can build, test, and deploy any application, either to the cloud or on premises. DevOps practices that enable transparency, cooperation, continuous delivery and continuous deployment become embedded in your software development lifecycle.
Azure DevOps provides several tools you can use for better team collaboration. It also has tools for automated build processes, testing, version control, and package management. That’s quite a bit to cover! We’ll get to all the tools eventually. For now, let’s follow the team as they begin with an overview of what Azure DevOps is and how they can get started.
Agile is a term that’s used to describe approaches to software development, emphasizing incremental delivery, team collaboration, continual planning, and continual learning. Agile isn’t a process as much as it is a philosophy or mindset for planning the work that a team will do. It’s based on iterative development and helps a team better plan for and react to the inevitable changes that occur in software development. Let’s listen in on Mara’s discussion with Andy after the latest release.
Recommendations for adopting Agile
Create an organizational structure that supports Agile practices
Mentor team members on Agile techniques and practices
Enable in-team and cross-team collaboration:- If collaboration is the key to becoming successful at Agile, what are some of the ways you can encourage it? Here are some ideas.
Azure Boards is a tool in Azure DevOps to help teams plan the work that needs to be done. The Tailspin team will use this tool to get a better idea of what work needs to be done and how to prioritize it.
In the Description field, type The Space Game website.
Under Visibility, you choose whether to make your project public or private. For now, you can choose private.
Select Advanced.
Under Version control, make sure that Git is selected. Under Work item process, make sure that Basic is selected.
Select Create.
Create a team
Select Project settings in the lower-left corner.
On the Project details page, under General, select Teams.
Select Space Game – web Team.
Add team members
Under Members, select + Add.
Enter the email address of the user you’d like to add. Then select Save changes.
Repeat the process for any other members you’d like to add.
Create the board
In the column on the left, point to Boards and select Boards from the menu that appears.
Select Space Game – web Team boards. A blank board appears.
In the To Do column, select the green + button next to the New item field.
Enter Stabilize the build server and then press Enter.
Select the ellipsis (…), and then select Open.
In the Description field, enter this text (The build server keeps falling over. The OS, Ubuntu 16.04, requires security patches and updates. It’s also a challenge to keep build tools and other software up to date.)
Select Save & Close.
Follow the same steps for the next two items.
Title
Description
Create a Git-based workflow
Migrate source code to GitHub and define how we’ll collaborate.
Create unit tests
Add unit tests to the project to help minimize regression bugs.
Drag Stabilize the build server to the top of the stack. Then, drag Create a Git-based workflow to the second item position. Your final board looks like this.
Define a sprint
In the left-side column, select Sprints.
Select Set dates from the upper right.
Leave the name as Sprint 1.
In the Start date field, select the calendar and pick today’s date.
In the End date field, select the calendar and pick the date two weeks from today.
Select Save and Close.
Assign tasks and set the iteration
Under Boards, select Work items.
Select Stabilize the build server.
In the Iteration drop-down list, select Sprint 1.
From the same window, select Unassigned and set yourself as the task owner.
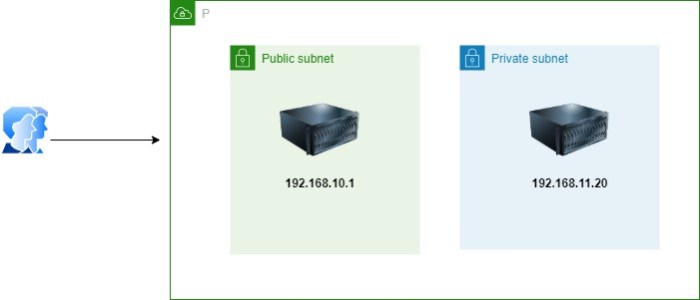
If you ever worked with cloud and configured different subnet, there will be public and private subnet, both having a different number of servers, for the public or even private have you also wonder how to access the environment without associate the VM to Public IP, in this post I will show you how.
For the figure shows one of the simple example of that, In this post you will learn how to connect to an instance that is hosted in a private subnet
This blog post is one of that kind that took much time and consume so much energy, to complete this post it took me around ten days to make sure that I will cover most of the available services and make it readable for people, Be sure the services can change while you are reading this post ; if you have any comments,or add something to this post, please send me an email – using contact us page or by comments below.
I am writing this post to share a different cloud providers services and the comparison between each one of them, this will show various naming services for each one of them.
Earlier we used to store our data to H.D.D or USB flash, Cloud Computing services have replaced such hard drive technology. Cloud Computing service is nothing but providing services like Storage, Databases, Servers, networking, and software through the Internet.
Cloud Computing is moving so fast, in 2020 the cloud now is more mature, going multi-cloud, and likely to become more focused on vertical and a sales ground war as the leading vendors battle for market share.
Notes :
GCP : Google Cloud Provider
OCI :- oracle cloud infrastructure
None : not meaning the services is not available necessarily by cloud provider but i didn’t look deeper into this or i didn’t use it before.
Just quick post to show and share what services for each cloud provider, be notice that the services can be change while we are talking now, and this is not a complete list of services but it’s only shows the basic one.
A load balancer distributes traffic evenly among each system in a pool. A load balancer can help you achieve both high availability and resiliency.
Say you start by adding additional VMs, each configured identically, to each tier. The idea is to have additional systems ready, in case one goes down, or is serving too many users at the same time.
Azure Load Balancer is a load balancer service that Microsoft provides that helps take care of the maintenance for you. Load Balancer supports inbound and outbound scenarios, provides low latency and high throughput, and scales up to millions of flows for all Transmission Control Protocol (TCP) and User Datagram Protocol (UDP) applications. You can use Load Balancer with incoming internet traffic, internal traffic across Azure services, port forwarding for specific traffic, or outbound connectivity for VMs in your virtual network.
When you manually configure typical load balancer software on a virtual machine, there’s a downside: you now have an additional system that you need to maintain. If your load balancer goes down or needs routine maintenance, you’re back to your original problem.
Azure Application Gateway
If all your traffic is HTTP, a potentially better option is to use Azure Application Gateway. Application Gateway is a load balancer designed for web applications. It uses Azure Load Balancer at the transport level (TCP) and applies sophisticated URL-based routing rules to support several advanced scenarios.
Benefits
Cookie affinity. Useful when you want to keep a user session on the same backend server.
SSL termination. Application Gateway can manage your SSL certificates and pass unencrypted traffic to the backend servers to avoid encryption/decryption overhead. It also supports full end-to-end encryption for applications that require that.
Web application firewall. Application gateway supports a sophisticated firewall (WAF) with detailed monitoring and logging to detect malicious attacks against your network infrastructure.
URL rule-based routes. Application Gateway allows you to route traffic based on URL patterns, source IP address and port to destination IP address and port. This is helpful when setting up a content delivery network.
Rewrite HTTP headers. You can add or remove information from the inbound and outbound HTTP headers of each request to enable important security scenarios, or scrub sensitive information such as server names.
What is a Content Delivery Network (CDN)?
A content delivery network (CDN) is a distributed network of servers that can efficiently deliver web content to users. It is a way to get content to users in their local region to minimize latency. CDN can be hosted in Azure or any other location. You can cache content at strategically placed physical nodes across the world and provide better performance to end users. Typical usage scenarios include web applications containing multimedia content, a product launch event in a particular region, or any event where you expect a high-bandwidth requirement in a region.
DNS
DNS, or Domain Name System, is a way to map user-friendly names to their IP addresses. You can think of DNS as the phonebook of the internet.
How can you make your site, which is located in the United States, load faster for users located in Europe or Asia?
network latency in azure
Latency refers to the time it takes for data to travel over the network. Latency is typically measured in milliseconds.
Compare latency to bandwidth. Bandwidth refers to the amount of data that can fit on the connection. Latency refers to the time it takes for that data to reach its destination.
One way to reduce latency is to provide exact copies of your service in more than one region, or Use Traffic Manager to route users to the closest endpoint, One answer is Azure Traffic Manager. Traffic Manager uses the DNS server that’s closest to the user to direct user traffic to a globally distributed endpoint, Traffic Manager doesn’t see the traffic that’s passed between the client and server. Rather, it directs the client web browser to a preferred endpoint. Traffic Manager can route traffic in a few different ways, such as to the endpoint with the lowest latency.
In this post, i will discuss how to migrate from mongoDB (in my case the database was hosted on AWS) to Azure CosmosDB, i searched online about different articles how to do that, the problem i faced most of them were discussing the same way which is Online and using 3rd party software which is not applicable for me due to security reason, thefore i decided to post about it maybe it will useful for someone else.
Usually the easiet way which is use Azure Database Migration Service to perform an offline/online migration of databases from an on-premises or cloud instance of MongoDB to Azure Cosmos DB’s API for MongoDB.
There are some prerequisite before start the migration to know more about it read here, the same link explained different ways for migrations, however before you start you should create an instance for Azure Cosmos DB.
Preparation of target Cosmos DB account
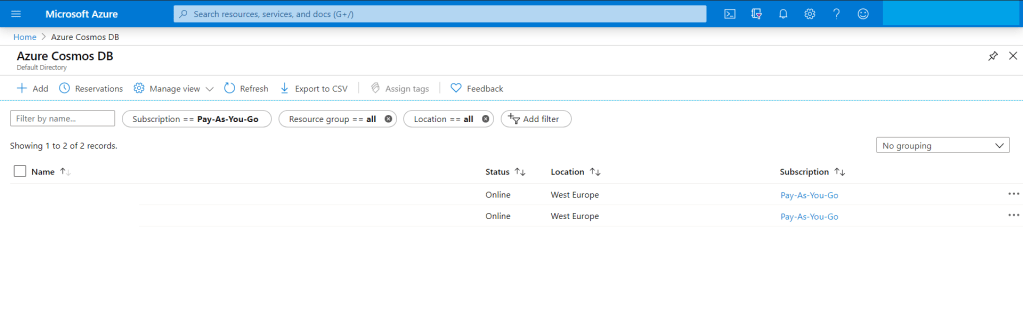
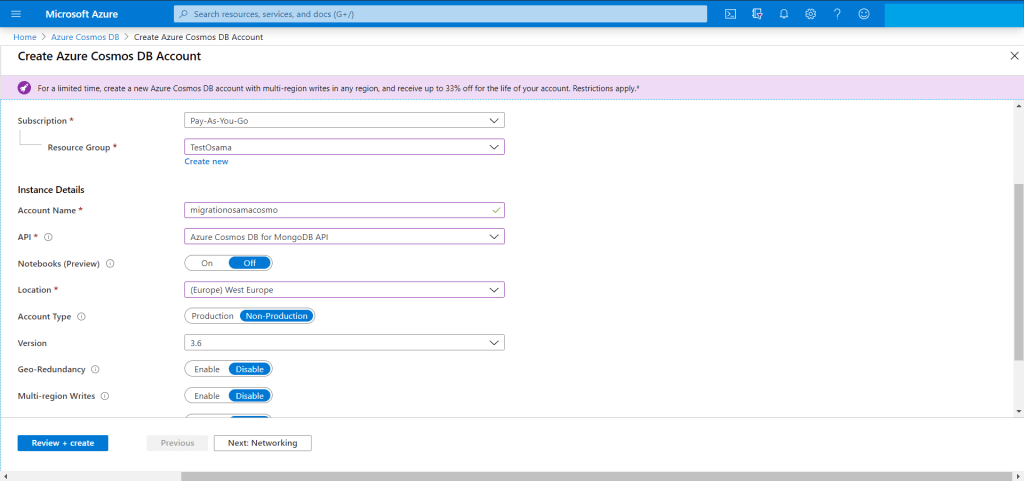
Create an Azure Cosmos DB account and select MongoDB as the API. Pre-create your databases through the Azure portal
The home page for azure Cloud
from the search bar just search for “Azure Cosmos DB”
Azure Cosomo DB
You have add new account for the new migration Since we are migrating from MongoDB then The API should be “Azure CosmosDB for MongoDB API”
Create cosmos db
The target is ready for migration but we have to check the connection string so we can use them in our migration from AWS to Azure.
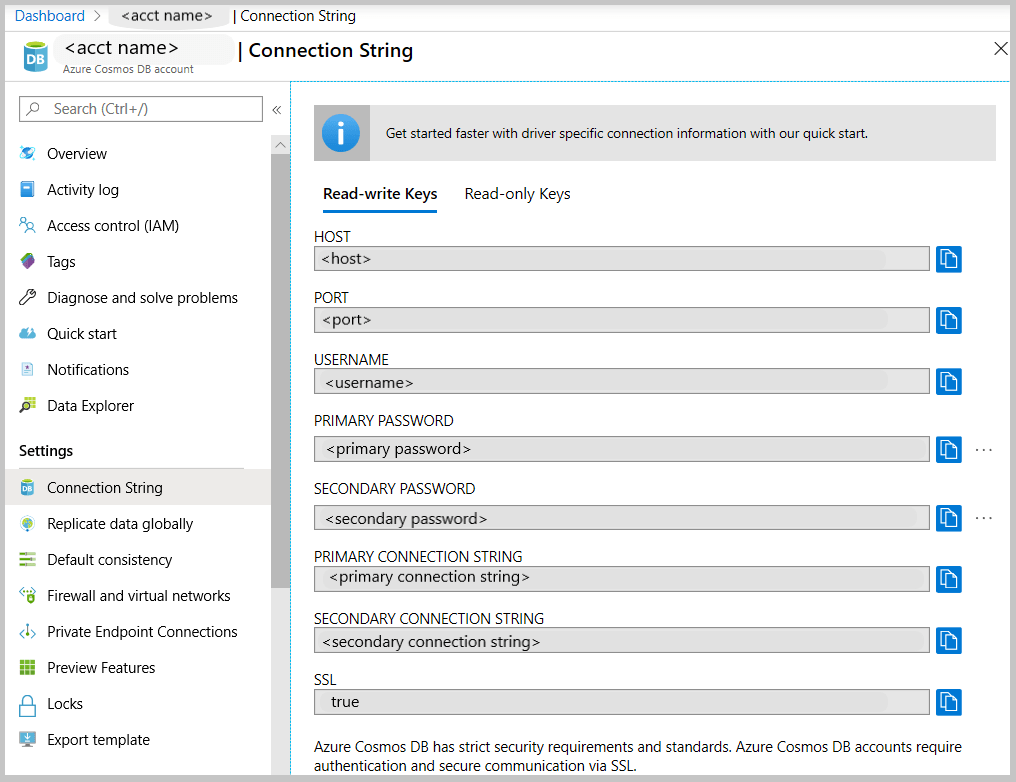
Get the MongoDB connection string to customize
the Azure Cosmos DB blade, select the API.
the left pane of the account blade, click Connection String.
The Connection String blade opens. It has all the information necessary to connect to the account by using a driver for MongoDB, including a preconstructed connection string.
Connection string
From MongoDB (Source server) you have to take backup for the database, now after the backup is completed, no need to move the backup for another server , mongo providing two way of backup either mongodump (dump) or mongoexport and will generate JSON file.
For example using monogdump
mongodump --host <hostname:port> --db <Databasename that you want to backup > --collection <collectionname> --gzip --out /u01/user/
For mongoexport
mongoexport --host<hostname:port> --db <Databasename that you want to backup > --collection <collectionname> --out=<Location for JSON file>
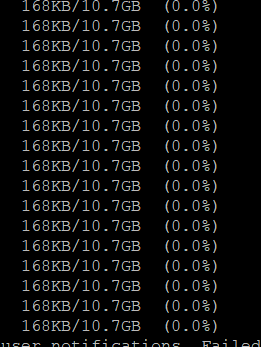
After the the above command will be finished, in my advice run them in the background specially if the database size is big and generate a log for the background process so you can check it frequently.
Run the restore/import command from the source server , do you remember the connection string, now we will use them to connect to Azure Cosmos DB using the following, if you used mongodump then to restore you have to use mongorestore like the below :-
mongorestore --host testserver.mongo.cosmos.azure.com --port 10255 -u testserver -p w3KQ5ZtJbjPwTmxa8nDzWhVYRuSe0BEOF8dROH6IUXq7rJgiinM3DCDeSWeEdcOIgyDuo4EQbrSngFS7kzVWlg== --db test --collection test /u01/user/notifications_service/user_notifications.bson.gz --gzip --ssl --sslAllowInvalidCertificates
notice the follwing :-
host : From Azure portal/connection string.
Port : From Azure portal/connection string.
Password : From Azure portal/connection string.
DB : The name of the database you want to be created in azure cosmo,this name will be created during the migration to azure.
Collection : The name of the collection you want to be created in azure cosmo,this name will be created during the migration to azure.
Location for the backup.
gzip because i compressed the backup
Migration required to use ssl authication otherwise it will fail.
using mongoimport.
mongoimport --host testserver.mongo.cosmos.azure.com:10255 -u testserver -p w3KQ5ZtJbjPwTmxa8nDzWhVYRuSe0BEOF8dROH6IUXq7rJgiinM3DCDeSWeEdcOIgyDuo4EQbrSngFS7kzVWlg== --db test --collection test --ssl --sslAllowInvalidCertificates --type json --file /u01/dump/users_notifications/service_notifications.json
Once you run the command
Note: if you migrating huge or big databases you need to increase the cosmosdb throughout and database level after the migration will be finished return everything to the normal situation because of the cost.