Migrating from MongoDB to Azure cosmos db, Using Mongorestore and mongodump manual/offline

In this post, i will discuss how to migrate from mongoDB (in my case the database was hosted on AWS) to Azure CosmosDB, i searched online about different articles how to do that, the problem i faced most of them were discussing the same way which is Online and using 3rd party software which is not applicable for me due to security reason, thefore i decided to post about it maybe it will useful for someone else.

Usually the easiet way which is use Azure Database Migration Service to perform an offline/online migration of databases from an on-premises or cloud instance of MongoDB to Azure Cosmos DB’s API for MongoDB.

There are some prerequisite before start the migration to know more about it read here, the same link explained different ways for migrations, however before you start you should create an instance for Azure Cosmos DB.

Preparation of target Cosmos DB account

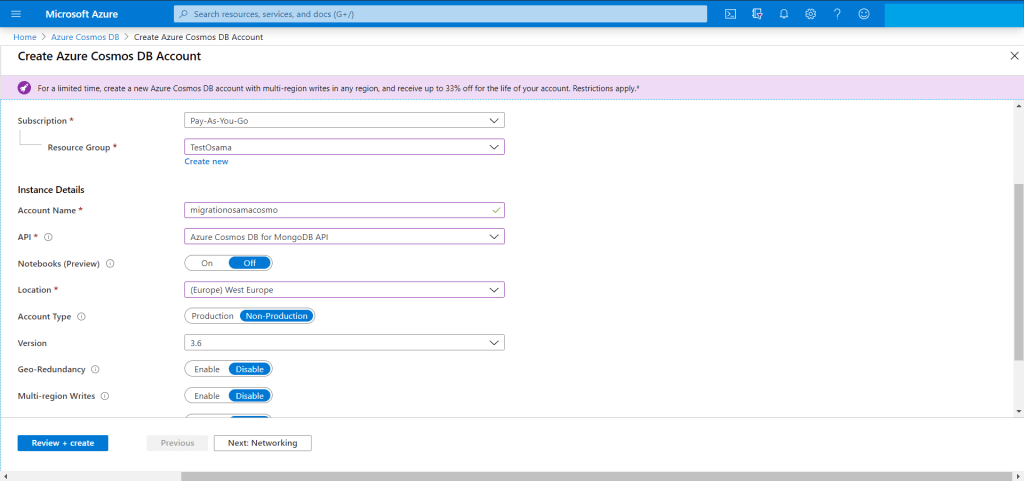
Create an Azure Cosmos DB account and select MongoDB as the API. Pre-create your databases through the Azure portal

The home page for azure Cloud

from the search bar just search for “Azure Cosmos DB”

Azure Cosomo DB

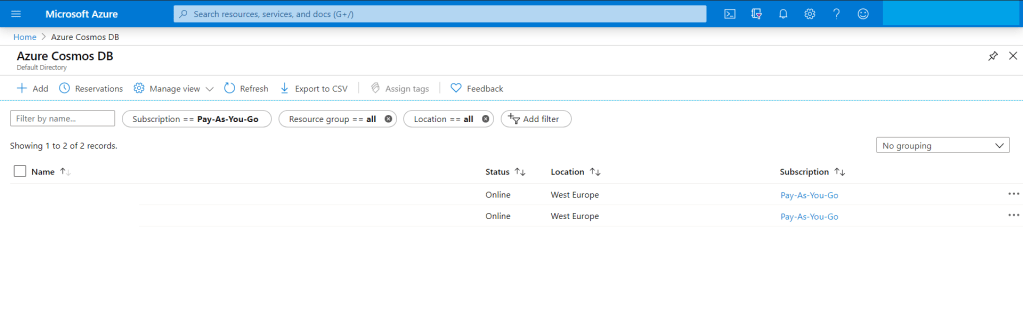
You have add new account for the new migration Since we are migrating from MongoDB then The API should be “Azure CosmosDB for MongoDB API”

Create cosmos db

The target is ready for migration but we have to check the connection string so we can use them in our migration from AWS to Azure.

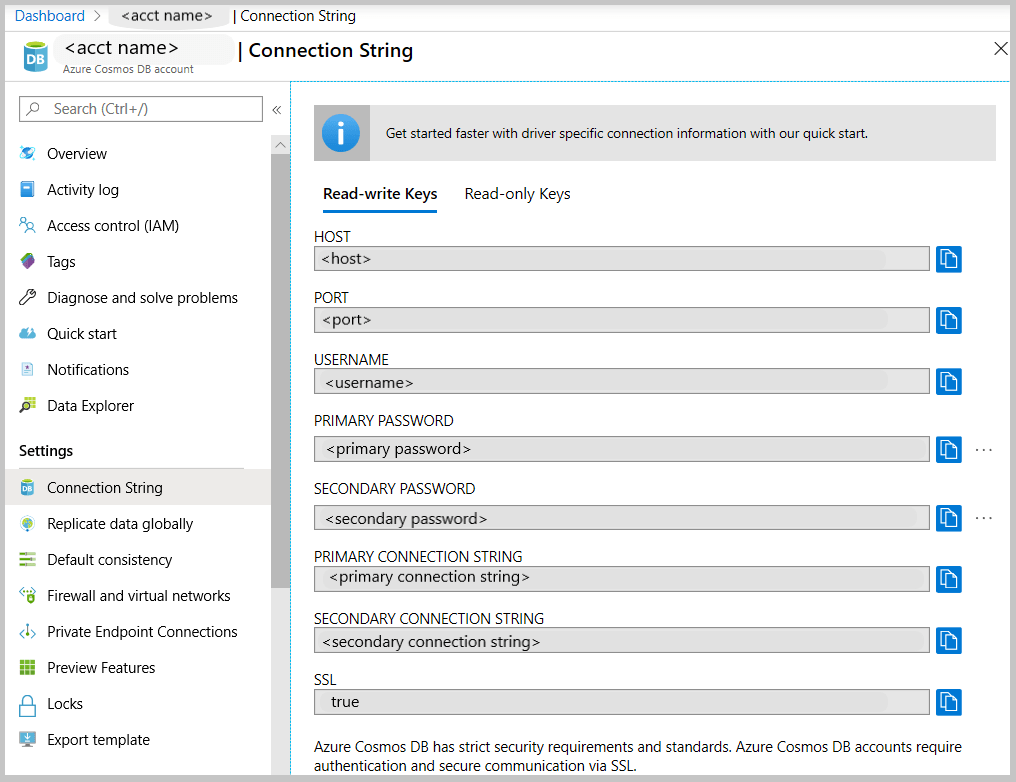
Get the MongoDB connection string to customize

  • the Azure Cosmos DB blade, select the API.
  •  the left pane of the account blade, click Connection String.
  • The Connection String blade opens. It has all the information necessary to connect to the account by using a driver for MongoDB, including a preconstructed connection string.
Connection string

From MongoDB (Source server) you have to take backup for the database, now after the backup is completed, no need to move the backup for another server , mongo providing two way of backup either mongodump (dump) or mongoexport and will generate JSON file.

For example using monogdump

mongodump --host <hostname:port> --db <Databasename that you want to backup > --collection <collectionname> --gzip --out /u01/user/

For mongoexport

mongoexport --host<hostname:port> --db <Databasename that you want to backup > --collection <collectionname> --out=<Location for JSON file>

After the the above command will be finished, in my advice run them in the background specially if the database size is big and generate a log for the background process so you can check it frequently.

Run the restore/import command from the source server , do you remember the connection string, now we will use them to connect to Azure Cosmos DB using the following, if you used mongodump then to restore you have to use mongorestore like the below :-

mongorestore --host testserver.mongo.cosmos.azure.com --port 10255 -u testserver -p  w3KQ5ZtJbjPwTmxa8nDzWhVYRuSe0BEOF8dROH6IUXq7rJgiinM3DCDeSWeEdcOIgyDuo4EQbrSngFS7kzVWlg== --db test --collection test /u01/user/notifications_service/user_notifications.bson.gz  --gzip --ssl --sslAllowInvalidCertificates

notice the follwing :-

  • host : From Azure portal/connection string.
  • Port : From Azure portal/connection string.
  • Password : From Azure portal/connection string.
  • DB : The name of the database you want to be created in azure cosmo,this name will be created during the migration to azure.
  • Collection : The name of the collection you want to be created in azure cosmo,this name will be created during the migration to azure.
  • Location for the backup.
  • gzip because i compressed the backup
  • Migration required to use ssl authication otherwise it will fail.

using mongoimport.

mongoimport --host testserver.mongo.cosmos.azure.com:10255 -u testserver -p w3KQ5ZtJbjPwTmxa8nDzWhVYRuSe0BEOF8dROH6IUXq7rJgiinM3DCDeSWeEdcOIgyDuo4EQbrSngFS7kzVWlg== --db test --collection test --ssl --sslAllowInvalidCertificates --type json --file /u01/dump/users_notifications/service_notifications.json

Once you run the command

Note: if you migrating huge or big databases you need to increase the cosmosdb throughout and database level after the migration will be finished return everything to the normal situation because of the cost.

Cheers

Osama

Oracle Database Application Security Book

Finally …

The Book is alive

For the first time the book which is dicussed critcal security issues such as database threats, and how to void them, the book also include advance topics about Oracle internet directory, Oracle access manager and how to implement full cycle single sign on,

Focus on the security aspects of designing, building, and maintaining a secure Oracle Database application. Starting with data encryption, you will learn to work with transparent data, back-up, and networks. You will then go through the key principles of audits, where you will get to know more about identity preservation, policies and fine-grained audits. Moving on to virtual private databases, you’ll set up and configure a VPD to work in concert with other security features in Oracle, followed by tips on managing configuration drift, profiles, and default users.

What You Will Learn:- 

  • Work with Oracle Internet Directory using the command-line and the console.
  • Integrate Oracle Access Manager with different applications.
  • Work with the Oracle Identity Manager console and connectors, while creating your own custom one.
  • Troubleshooting issues with OID, OAM, and OID.
  • Dive deep into file system and network security concepts.
  • First time chapter that include most of the critical database threats in real life.


You can buy the book now from amazon here


Cheers

Osama

Migrate the database From File System to ASM

I posted before Migration Database from ASM to File System,But today i will talk about How to migration File System to ASM and this is the common case I hope i will describe this topics so well,Please if you have any In-query Contact me,Comment i will answer you,Helping you is my pleasure:


Steps:

1.configure flash recovery area.
2.Migrate datafiles to ASM.
3.Control file to ASM.
4.Create Temporary tablespace.
5.Migrate Redo logfiles
6.Migrate spfile to ASM.


step 1:Configure flash recovery area.

SQL> connect sys/sys@orcl as sysdba
Connected.
 
SQL> alter database disable block change tracking;

Database altered.

SQL> alter system set db_recovery_file_dest_size=500m;

System altered.

SQL> alter system set db_recovery_file_dest=’+FRAG’;

System altered

step 2 and 3: Migrate data files and control file to ASM

Use RMAN to migrate the data files to ASM disk groups,All data files will be migrated to the newly
 created disk group, DATA
 
SQL> alter system set db_create_file_dest='+DATA';

System altered.

SQL> alter system set control_files='+DATA/control_new.ctl' scope=spfile;

System altered.

SQL> shutdown immediate

[oracle@rac1 bin]$ ./rman target /


RMAN> startup nomount
RMAN> restore controlfile from '/u01/new/oracle/oradata/mydb/control01.ctl';
RMAN> alter database mount;
RMAN> backup as copy database format '+DATA';
RMAN> switch database to copy;
RMAN> alter database open;

RMAN>Exit ;

SQL> conn sys/oracle as sysdba

Connected.

SQL> select tablespace_name,file_name from dba_data_files;

TABLESPACE_NAME FILE_NAME

------------------------------ ---------------------------------------------

USERS +DATA/mydb/datafile/users.261.705064915

UNDOTBS1 +DATA/mydb/datafile/undotbs1.259.705064821

SYSAUX +DATA/mydb/datafile/sysaux.258.705064283

SYSTEM +DATA/mydb/datafile/system.257.705063763


SQL> select name from v$controlfile;


NAME
----

+DATA/control_new.ctl


step 4:Migrate temp tablespace to ASM.
 
SQL> alter tablespace temp add tempfile size 100m;

Tablespace altered.

SQL> select file_name from dba_temp_files;
FILE_NAME

---------------------------------------------

+DATA/mydb/tempfile/temp.263.705065455

otherwise,Create temporary tablespace in ASM disk group.

SQL> CREATE TABLESPACE temp1 TEMPFILE ‘+diskgroup1’;

SQL> alter database default temporary tablespace temp1;

Database altered.


step 5:Migrate redo logs to ASM.
 
SQL> select member,group# from v$logfile;

you will find i above query the redo-log in file system start adding new one to ASM after this you can delete .

SQL> alter database add logfile group 5 size 5m;

Database altered.

SQL> alter database add logfile group 6 size 5m;

Database altered.

For example to drop , you can do the following :

SQL> alter system switch logfile;

System altered.

SQL> alter database drop logfile group 2;

Database altered.

SQL> alter database drop logfile group 3;

Database altered.

SQL> alter database drop logfile group 4;

Database altered.

SQL> alter database drop logfile group 1;

Database altered.

Now we can say we finish But we have to do Two More Steps 


Add additional control file


SQL> connect sys/sys@ORCL as sysdba
Connected to an idle instance.
SQL> startup mount
ORACLE instance started.

SQL> alter database backup controlfile to '+DATA/Control_new02.ctl';

Database altered.

SQL> alter system set control_files='+DATA/
Control_new.ctl '
,'+DATA/
Control_new02.ctl' scope=spfile;

System altered.

SQL> shutdown immediate;
ORA-01109: database not open

Database dismounted.
ORACLE instance shut down.
SQL> startup
ORACLE instance started.


Step 6:Migrate spfile to ASM:

Create a copy of the SPFILE in the ASM disk group.
 
If the database is using an SPFILE already, then run these commands:

run {
BACKUP AS BACKUPSET SPFILE;
RESTORE SPFILE TO "+DISK/spfile";

But if you are not using One :

SQL> create spfile='+DISK/spfile' from pfile='$ORACLE_HOME/dbs/initORCL.ora';


 Thank you
Osama mustafa


Step By Step To Migration ASM to File System

There’s More than One Way For this Migration you can use what you want

Lets Get The Database Data Files :


1-See your Database Files :

SQL>select file_name from dba_data_files;

 +DATA/test/datafile/undotbs1.301.697649965
+DATA/test/datafile/sysaux.300.697649963
+DATA/test/datafile/system.299.697649963
+DATA/test/datafile/users.302.697649965
+DATA/test/datafile/users.309.697650601

select tablespace_name,count(file_name) from dba_data_files group by tablespace_name ORDER BY 2

Use the above query to see how many data files under tablespace .

Now After see the DataFile , we need to create new Directory to copy the data file to it .
  mkdir /app/oracle/TEST


2- We Will Create Our Own Script And Copy our Database File to our new location :

sqlplus / as sysdba

set lines 120 pages 0

select ‘copy datafile ‘||file_id||’ to ‘||”’/app/oracle/TEST/’||substr(file_name,21,instr(file_name,’.’)-21)||’_01.dbf”’||’;’ from dba_data_files order by 1;

copy datafile 1 to ‘/app/oracle/TEST/system_01.dbf’;

copy datafile 2 to ‘/app/oracle/TEST/sysaux_01.dbf’;

copy datafile 3 to ‘/app/oracle/TEST/undotbs1_01.dbf’;

copy datafile 4 to ‘/app/oracle/TEST/users_01.dbf’;

copy datafile 5 to ‘/app/oracle/TEST/users_02.dbf’;

shutdown immediate;

startup mount;

exit

rman target /

copy datafile 1 to ‘/app/oracle/TEST/system_01.dbf’;

copy datafile 2 to ‘/app/oracle/TEST/sysaux_01.dbf’;

copy datafile 3 to ‘/app/oracle/TEST/undotbs1_01.dbf’;

copy datafile 4 to ‘/app/oracle/TEST/users_01.dbf’;

copy datafile 5 to ‘/app/oracle/TEST/users_02.dbf’;

exit

sql / as sysdba

select ‘alter database rename file ”’||file_name||”’ to ‘||”’/app/oracle/TEST/’||substr(file_name,21,instr(file_name,’.’)-21)||’_01.dbf”’||’;’ from dba_data_files order by 1;

alter database rename file ‘+DATA/test/datafile/sysaux.300.697649963’ to ‘/app/oracle/TEST/sysaux_01.dbf’;

alter database rename file ‘+DATA/test/datafile/system.299.697649963’ to ‘/app/oracle/TEST/system_01.dbf’;
alter database rename file ‘+DATA/test/datafile/undotbs1.301.697649965’ to ‘/app/oracle/TEST/undotbs1_01.dbf’;
alter database rename file ‘+DATA/test/datafile/users.302.697649965’ to ‘/app/oracle/TEST/users_01.dbf’;

alter database rename file ‘+DATA/test/datafile/users.309.697650601’ to ‘/app/oracle/TEST/users_02.dbf’;

 
 3- This not the finish , there’s some file still On A, Check it by :

open database

select name from v$controlfile
union
select name from v$tempfile
union
select member from v$logfile
union
select filename from v$block_change_tracking;

NAME
——————————————————————————–
+DATA/test/controlfile/current.303.697650047
+DATA/test/onlinelog/group_1.304.697650049
+DATA/test/onlinelog/group_2.305.697650049
+DATA/test/onlinelog/group_3.306.697650049
+DATA/test/tempfile/temp.307.697650095
+FRA/test/controlfile/current.260.697650047
+FRA/test/onlinelog/group_1.261.697650049
+FRA/test/onlinelog/group_2.262.697650049
+FRA/test/onlinelog/group_3.263.697650051

alter database rename file ‘+DATA/test/datafile/sysaux.300.697649963’ to ‘/app/oracle/TEST/sysaux_01.dbf’;

alter database rename file ‘+DATA/test/datafile/system.299.697649963’ to ‘/app/oracle/TEST/system_01.dbf’;

alter database rename file ‘+DATA/test/datafile/undotbs1.301.697649965’ to ‘/app/oracle/TEST/undotbs1_01.dbf’;

alter database rename file ‘+DATA/test/datafile/users.302.697649965’ to ‘/app/oracle/TEST/users_01.dbf’;

alter database rename file ‘+DATA/test/datafile/users.309.697650601’ to ‘/app/oracle/TEST/users_02.dbf’;

ALTER DATABASE ADD LOGFILE GROUP 4 (‘/app/oracle/TEST/redo_04a.dbf’,’/app/oracle/TEST/redo_04b.dbf’) size 50M;

ALTER DATABASE ADD LOGFILE GROUP 5 (‘/app/oracle/TEST/redo_05a.dbf’,’/app/oracle/TEST/redo_05b.dbf’) size 50M;

ALTER DATABASE ADD LOGFILE GROUP 6 (‘/app/oracle/TEST/redo_06a.dbf’,’/app/oracle/TEST/redo_06b.dbf’) size 50M; 

4-the Last Step for Control file and Spfile :


SQL>show parameter control
control_files 
————————–
+DATA/test/controlfile/current .303.697650047
SQL > Create Pfile=” from spfile ;

After Creating Pfile , Open it modify Control File Location to Our New Location /app/oracle/TEST/…

*.control_files=’/app/oracle/TEST/control01.ctl’,’/app/oracle/TEST/control02.ctl’

startup nomount

$rman target /

 restore controlfile from ‘+DATA/test/controlfile/current.303.697650047’;

 exit

create spfile=’/app/oracle/product/11.1.0/db_1/dbs/spfileTEST.ora’ from pfile=’/home/oracle/john.ora’;

File created.

shutdown immediate;
startup

show parameter control

control_files  /app/oracle/TEST/control01.ctl , /app/oracle/TEST/control02.ctl

This Steps Without Using RMAN , I will Post Another Steps Using RMAN

Thank you
Osama mustafa