A VPC endpoint lets you privately connect your VPC to supported AWS services and VPC endpoint services. With VPC endpoints, resources inside a VPC do not require public IP addresses to communicate with resources outside the VPC. Traffic between Amazon Virtual Private Cloud (Amazon VPC) and a service does not leave the Amazon network.
VPC endpoints are a security product first and a connectivity product second. VPC endpoints do not allow traffic between your VPC and the other services to leave the Amazon network.
You might have stringent compliance requirements that prevent connectivity between a VPC and a public-facing service endpoint. In this case, VPC endpoints offer a way to use AWS services from your VPCs that would otherwise not be available.
A VPC endpoint does not require an internet gateway, virtual private gateway, network address translation (NAT) device, virtual private network (VPN) connection, or Direct Connect connection. Instances in your VPC do not require a public IP address to connect to services presented through a VPC endpoint.
The following are the different types of VPC endpoints. You create the type of VPC endpoint that is required by the supported service.
Gateway VPC endpoints
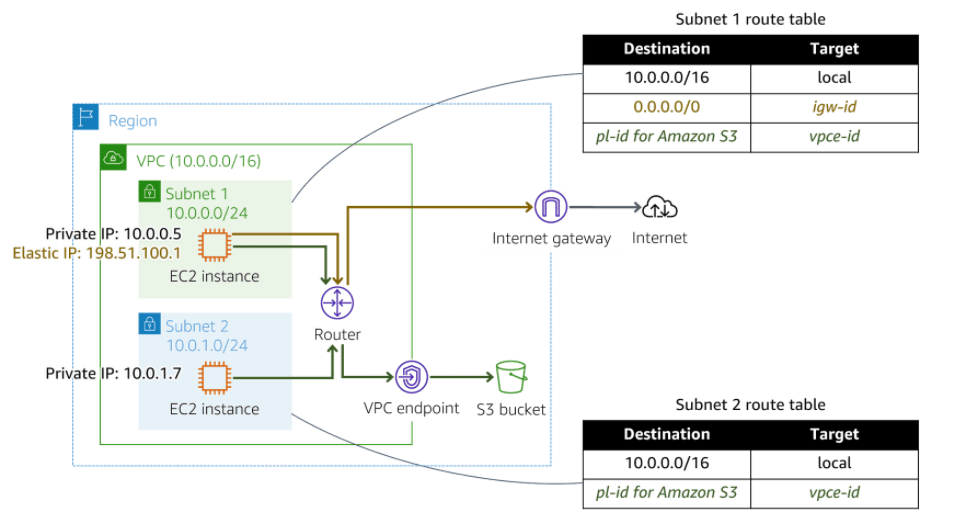
A gateway VPC endpoint targets specific IP routes in a VPC route table in the form of a prefix list. This is used for traffic destined to Amazon DynamoDB or Amazon Simple Storage Service (Amazon S3).
Instances in a VPC do not require public IP addresses to communicate with VPC endpoints. This is because interface endpoints use local IP addresses within the consumer VPC. Gateway endpoints are destinations that are reachable from within a VPC through prefix-lists within the VPC’s route table.
In the following diagram, instances in subnet 1 can send and receive traffic to and from the internet and the S3 bucket. Instances in subnet 2 only have access to the S3 bucket.
Interface endpoints
Powered by AWS PrivateLink, an interface endpoint is an elastic network interface with a private IP address from the IP address range of your subnet. It serves as an entry point for traffic destined to a supported AWS service or a VPC endpoint service.
Gateway Load Balancer endpoint
A Gateway Load Balancer endpoint is an elastic network interface with a private IP address from the IP address range of your subnet. This type of endpoint serves as an entry point to intercept traffic and route it to a service that you’ve configured using Gateway Load Balancers, for example, for security inspection. You specify a Gateway Load Balancer endpoint as a target for a route in a route table. Gateway Load Balancer endpoints are supported for endpoint services that are configured for Gateway Load Balancers only.
Like interface endpoints, Gateway Load Balancer endpoints are also powered by AWS PrivateLink.
What is AWS PrivateLink?
AWS PrivateLink provides a private connection between your VPCs and supported AWS services. This AWS service provides secure usage within the AWS network and avoids exposing traffic to the public internet.
Before AWS PrivateLink, services within a single VPC were connected to multiple VPCs in two ways:
- Public IP addresses using the internet gateway of the VPC
- Private IP addresses using VPC peering
With AWS PrivateLink, services establish a Transmission Control Protocol (TCP) connection between the service provider’s VPC and the service consumer’s VPC. This provides a secure and scalable solution.
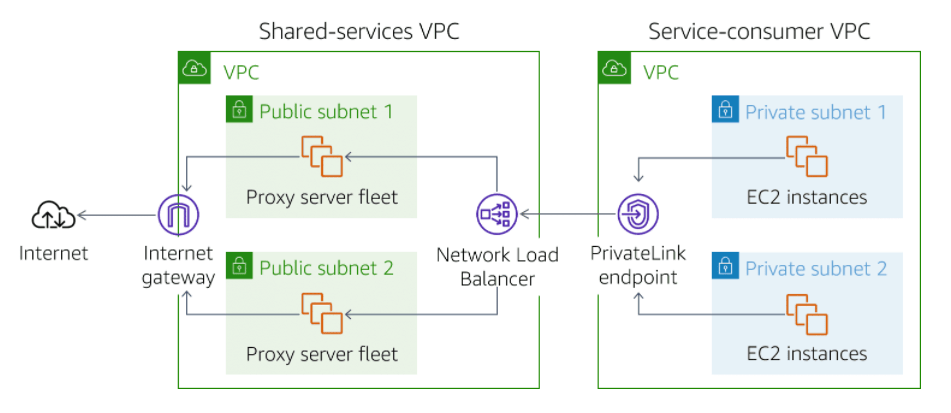
In the following diagram, traffic from Amazon Elastic Compute Cloud (Amazon EC2) instances in private subnets is routed to a Network Load Balancer. The Network Load Balancer is connected to instances in public subnets that communicate with the internet. This architecture permits backend EC2 instances to communicate with the front-end instances through the AWS PrivateLink endpoint. And it avoids the security and cost implications of data traveling through the public internet.
Benefits of AWS PrivateLink
- Security
- Simplification
- Capabilities
AWS PrivateLink considerations
- AWS PrivateLink does not support IPv6.
- Traffic will be sourced from the Network Load Balancer inside the service provider VPC. From the perspective of the service provider application, all IP traffic will originate from the Network Load Balancer. All IP addresses logged by the application will be the private IP addresses of the Network Load Balancer. The service provider application will never see the IP addresses of the customer or service consumer.
- You can activate Proxy Protocol v2 to gain insight into the network traffic. Network Load Balancers use Proxy Protocol v2 to send additional connection information such as the source and destination. This might require changes to the application.
- Endpoint services cannot be tagged.
- The private Domain Name System (DNS) of the endpoint does not resolve outside of the VPC. Private DNS hostnames can be configured to point directly to endpoint network interface IP addresses. Endpoint services are available in the AWS Region in which they are created and can be accessed in remote AWS Regions using inter-Region VPC peering.
- Availability Zone names in a customer account might not map to the same locations as Availability Zone names in another account. For example, the Availability Zone US-East-1A might not be the same Availability Zone as US-East-1A for another account. An endpoint service is configured in Availability Zones according to their mapping in a customer’s account.
Cheers
Osama