DaemonSets Example

Configure the cluster to create a pod on each worker node that periodically deleted the contents of the /etc/beebox/tmp on the worker node.

Very Simple by applying the following

apiVersion: apps/v1
kind: DaemonSet
metadata:
  name: beebox-cleanup
spec:
  selector:
    matchLabels:
      app: beebox-cleanup
  template:
    metadata:
      labels:
        app: beebox-cleanup
    spec:
      containers:
      - name: busybox
        image: busybox:1.27
        command: ['sh', '-c', 'while true; do rm -rf /beebox-temp/*; sleep 60; done']
        volumeMounts:
        - name: beebox-tmp
          mountPath: /beebox-temp
      volumes:
      - name: beebox-tmp
        hostPath:
          path: /etc/beebox/tmp

Apply

kubectl apply -f daemonset.yml

Cheers

Osama

Passing Configuration Data to a Kubernetes Container

One of these applications is a simple Nginx web server. This server is used as part of a secure backend application, and the company would like it to be configured to use HTTP basic authentication.

This will require an htpasswd file as well as a custom Nginx config file. In order to deploy this Nginx server to the cluster with good configuration practices, you will need to load the custom Nginx configuration from a ConfigMap (this already exists) and use a Secret to store the htpasswd data.

Create a Pod with a container running the nginx:1.19.1 image. Supply a custom Nginx configuration using a ConfigMap, and populate an htpasswd file using a Secret.

Generate an htpasswd file:

htpasswd -c .htpasswd user

View the file’s contents:

cat .htpasswd

Create a Secret containing the htpasswd data:

kubectl create secret generic nginx-htpasswd --from-file .htpasswd

Delete the .htpasswd file:

rm .htpasswd

Create the Nginx Pod

Create pod.yml:

apiVersion: v1
kind: Pod
metadata:
  name: nginx
spec:
  containers:
  - name: nginx
    image: nginx:1.19.1
    ports:
    - containerPort: 80
    volumeMounts:
    - name: config-volume
      mountPath: /etc/nginx
    - name: htpasswd-volume
      mountPath: /etc/nginx/conf
  volumes:
  - name: config-volume
    configMap:
      name: nginx-config
  - name: htpasswd-volume
    secret:
      secretName: nginx-htpasswd

View the existing ConfigMap:

kubectl get cm

we need to create the configMap for nginx-config:-

apiVersion: v1
kind: ConfigMap
metadata:
  name: nginx-config
data:
 nginx.conf: |
   user  nginx;
    worker_processes  1;

    error_log  /var/log/nginx/error.log warn;
    pid        /var/run/nginx.pid;

     events {
       worker_connections  1024;
      }
     http {
      server {
        listen       80;
        listen  [::]:80;
        server_name  localhost;
        location / {
            root   /usr/share/nginx/html;
            index  index.html index.htm;
        }
        auth_basic "Secure Site";
        auth_basic_user_file conf/.htpasswd;
      }
     }

Get more info about nginx-config:

kubectl describe cm nginx-config

Apply the pod

kubectl apply -f pod.yml

Within the existing busybox pod, without using credentials, verify everything is working:

kubectl exec busybox -- curl <NGINX_POD_IP>

We’ll see HTML for the 401 Authorization Required page — but this is a good thing, as it means our setup is working as expected.

curl: (6) Couldn't resolve host 'user'
  % Total    % Received % Xferd  Average Speed   Time    Time     Time  Current
                                 Dload  Upload   Total   Spent    Left  Speed
100   179  100   179    0     0  62174      0 --:--:-- --:--:-- --:--:-- 89500
<html>
<head><title>401 Authorization Required</title></head>
<body>
<center><h1>401 Authorization Required</h1></center>
<hr><center>nginx/1.19.1</center>
</body>
</html>

Run the same command again using credentials (including the password you created at the beginning of the lab) to verify everything is working:

kubectl exec busybox -- curl -u user:<PASSWORD> <NGINX_POD_IP>
  % Total    % Received % Xferd  Average Speed   Time    Time     Time  Current
                                 Dload  Upload   Total   Spent    Left  Speed
100   612  100   612    0     0  48846      0 --:--:-- --:--:-- --:--:-- 51000
<!DOCTYPE html>
<html>
<head>
<title>Welcome to nginx!</title>
<style>
    body {
        width: 35em;
        margin: 0 auto;        font-family: Tahoma, Verdana, Arial, sans-serif;
    }
</style>
</head>
<body>
<h1>Welcome to nginx!</h1>
<p>If you see this page, the nginx web server is successfully installed and
working. Further configuration is required.</p>

<p>For online documentation and support please refer to
<a href="http://nginx.org/">nginx.org</a>.<br/>
Commercial support is available at
<a href="http://nginx.com/">nginx.com</a>.</p>

<p><em>Thank you for using nginx.</em></p>
</body>
</html>

Cheers

Osama

Backing up and Restoring Kubernetes Data in etcd

Backups are an important part of any resilient system. Kubernetes is no exception. In this post , I will show you how to backup/restore kubernetes data.

Back Up the etcd Data

  1. Look up the value for the key cluster.name in the etcd cluster:
ETCDCTL_API=3 etcdctl get cluster.name \
  --endpoints=https://10.0.1.101:2379 \
  --cacert=/home/cloud_user/etcd-certs/etcd-ca.pem \
  --cert=/home/cloud_user/etcd-certs/etcd-server.crt \
  --key=/home/cloud_user/etcd-certs/etcd-server.key

2. Back up etcd using etcdctl and the provided etcd certificates:

ETCDCTL_API=3 etcdctl snapshot save /home/cloud_user/etcd_backup.db \
  --endpoints=https://10.0.1.101:2379 \
  --cacert=/home/cloud_user/etcd-certs/etcd-ca.pem \
  --cert=/home/cloud_user/etcd-certs/etcd-server.crt \
  --key=/home/cloud_user/etcd-certs/etcd-server.key

3. Reset etcd by removing all existing etcd data

Note: you don’t have to do this step if this is production, I am only doing this to show how to restore the data.

sudo systemctl stop etcd
sudo rm -rf /var/lib/etcd

Restore the etcd Data from the Backup

  1. Restore the etcd data from the backup (this command spins up a temporary etcd cluster, saving the data from the backup file to a new data directory in the same location where the previous data directory was):
sudo ETCDCTL_API=3 etcdctl snapshot restore /home/cloud_user/etcd_backup.db \
  --initial-cluster etcd-restore=https://10.0.1.101:2380 \
  --initial-advertise-peer-urls https://10.0.1.101:2380 \
  --name etcd-restore \
  --data-dir /var/lib/etcd

2. Set ownership on the new data directory

sudo chown -R etcd:etcd /var/lib/etcd

3. Start etcd

sudo systemctl start etcd

4. Verify the restored data is present by looking up the value for the key cluster.name again:

ETCDCTL_API=3 etcdctl get cluster.name \
  --endpoints=https://10.0.1.101:2379 \
  --cacert=/home/cloud_user/etcd-certs/etcd-ca.pem \
  --cert=/home/cloud_user/etcd-certs/etcd-server.crt \
  --key=/home/cloud_user/etcd-certs/etcd-server.key

Cheers

Osama

Upgrade k8s using kubeadm

First, upgrade the control plane node

Drain the control plane node.

kubectl drain master-node-name --ignore-daemonsets

Upgrade kubeadm.

sudo apt-get update && \
sudo apt-get install -y --allow-change-held-packages kubeadm=version

kubeadm version

Plan the upgrade.

sudo kubeadm upgrade plan v-version (for example v1.24.2)

Upgrade the control plane components.

sudo kubeadm upgrade apply v1.22.2

Upgrade kubelet and kubectl on the control plane node.

sudo apt-get update && \
sudo apt-get install -y --allow-change-held-packages kubelet=version kubectl=version 

Restart kubelet.

sudo systemctl daemon-reload
sudo systemctl restart kubelet

Uncordon the control plane node.

kubectl uncordon master-node-name

Verify that the control plane is working

Note:- you should not perform upgrades on all worker nodes at the same time. Make sure enough nodes are available at any given time to provide uninterrupted service.

Worker nodes

Run the following on the control plane node to drain worker node 1:

kubectl drain worker1-node-name --ignore-daemonsets --force

Log in to the first worker node, then Upgrade kubeadm.

sudo apt-get update && \ sudo apt-get install -y --allow-change-held-packages kubeadm=version

Upgrade the kubelet configuration on the worker node.

sudo kubeadm upgrade node

Upgrade kubelet and kubectl on the worker node.

sudo apt-get update && \ sudo apt-get install -y --allow-change-held-packages kubelet=version kubectl=verion

Restart kubelet.

sudo systemctl daemon-reload 
sudo systemctl restart kubelet

From the control plane node, uncordon worker node 1.

kubectl uncordon worker1-node-name

Repeat the upgrade process for worker nodes.

Cheers

Osama

k8s management tools

There is a variery of management tools that allow you to manage k8s and make your life much easier to proivde extra additional features.

  • kubectl

the official command line interface for k8s, this is the main method to interact you will use.

  • kubeadm

tools that allow you to setup control plane.

  • MiniKube

tool that runs a single-node Kubernetes cluster locally on your workstation for development and testing purposes.

Very simple tools you can find it here.

  • Helm

tool for managing packages of pre-configured Kubernetes resources. These packages are known as Helm charts.

Use Helm to:

  • Find and use popular software packaged as Kubernetes charts
  • Share your own applications as Kubernetes charts
  • Create reproducible builds of your Kubernetes applications
  • Intelligently manage your Kubernetes manifest files
  • Manage releases of Helm packages

  • Kompose

a tool to help Docker Compose users move to Kubernetes.

Use Kompose to:

  • Translate a Docker Compose file into Kubernetes objects
  • Go from local Docker development to managing your application via Kubernetes
  • Convert v1 or v2 Docker Compose yaml files or Distributed Application Bundles

and the last one which is kustomize.

Cheers

Osama

Install k8s as one control plane and one worker node

The first thing you will need to do which is configure the two servers, either you can choose one of the following options:-

  • VMWARE
  • Cloud

Master Node Setup

Step #1

Create configuration file for containerd:

cat <<EOF | sudo tee /etc/modules-load.d/containerd.conf
overlay
br_netfilter
EOF

After the above step, you need to load the modules.

sudo modprobe overlay
sudo modprobe br_netfilter

Step #2

Set system configurations for Kubernetes networking

cat <<EOF | sudo tee /etc/sysctl.d/99-kubernetes-cri.conf
net.bridge.bridge-nf-call-iptables = 1
net.ipv4.ip_forward = 1
net.bridge.bridge-nf-call-ip6tables = 1
EOF

Apply new settings

sudo sysctl --system

Step #3

Install Containerd

sudo apt-get update && sudo apt-get install -y containerd

Step #4

Create default configuration file for containerd

sudo mkdir -p /etc/containerd

Generate default containerd configuration and save to the newly created default file

sudo containerd config default | sudo tee /etc/containerd/config.toml

Load the new configuration

sudo systemctl restart containerd
sudo systemctl status containerd

Step #5

Disable Swap

sudo swapoff -a

Step #6

Install dependency packages:

sudo apt-get update && sudo apt-get install -y apt-transport-https curl

Download and add GPG key

curl -s https://packages.cloud.google.com/apt/doc/apt-key.gpg | sudo apt-key add -

Add Kubernetes to repository list

cat <<EOF | sudo tee /etc/apt/sources.list.d/kubernetes.list
deb https://apt.kubernetes.io/ kubernetes-xenial main
EOF

sudo apt-get update

Step #6

Install Kubernetes packages (Note: If you get a dpkg lock message, just wait a minute or two before trying the command again):

sudo apt-get install -y kubelet=1.24.0-00 kubeadm=1.24.0-00 kubectl=1.24.0-00

Just in case Turn off automatic updates

sudo apt-mark hold kubelet kubeadm kubectl

The above steps should be done on the worker node even if you have 3 or 4.

Initialize the Cluster

Initialize the Kubernetes cluster on the control plane node using kubeadm (Note: This is only performed on the Control Plane Node):

sudo kubeadm init --pod-network-cidr 192.168.0.0/16 --kubernetes-version 1.24.0

Set kubectl access:

mkdir -p $HOME/.kube
sudo cp -i /etc/kubernetes/admin.conf $HOME/.kube/config
sudo chown $(id -u):$(id -g) $HOME/.kube/config

You can test your cluster by run

kubectl get nodes

Install the Calico Network Add-On

On the control plane node, install Calico Networking

kubectl apply -f https://docs.projectcalico.org/manifests/calico.yaml

Check status of the control plane node:

kubectl get nodes

Join the Worker Nodes to the Cluster

In the control plane node, create the token and copy the kubeadm join command (NOTE:The join command can also be found in the output from kubeadm init command):

kubeadm token create --print-join-command

Copy the output

Worker node Setup.

from the above command of Kubeadm join run it using sudo command.

In the control plane node, view cluster status (Note: You may have to wait a few moments to allow all nodes to become ready)

kubectl get nodes

Cheers

Enjoy the DevOps

AUSOUG

The Australian Oracle User Group, AUSOUG, have a focus on bringing together our Oracle community and servicing their core technical, development and applications needs. A balanced program is aimed at all levels of skill and experience within a forum of User led independent knowledge sharing.

Register here

I will be speaking about Kubernetes in Depth But in simple way

Regards

Osama

Another year – Top 100 Oracle Blogs and Website

The best Oracle blogs from thousands of blogs on the web ranked by traffic, social media followers, domain authority & freshness.

Happy to share that my blog has been choosen for another year as the Top 100 Blogs around the world, the list contains talened, experience and professional people 🎉🎉🎉

Thank you all for the support.

Cheers

Osama

Deployment strategies

All-at-once

All-at-once deployments instantly shift traffic from the original (old) Lambda function to the updated (new) Lambda function, all at one time. All-at-once deployments can be beneficial when the speed of your deployments matters. In this strategy, the new version of your code is released quickly, and all your users get to access it immediately.

Canary

A linear deployment is similar to canary deployment. In this strategy, you direct a small amount of traffic to

In a canary deployment, you deploy your new version of your application code and shift a small percentage of production traffic to point to that new version. After you have validated that this version is safe and not causing errors, you direct all traffic to the new version of your code.

Linear

A linear deployment is similar to canary deployment. In this strategy, you direct a small amount of traffic to your new version of code at first. After a specified period of time, you automatically increment the amount of traffic that you send to the new version until you’re sending 100% of production traffic.

Comparing deployment strategies

To help you decide which deployment strategy to use for your application, you’ll need to consider each option’s consumer impact, rollback, event model factors, and deployment speed. The comparison table below illustrates these points.

DeploymentConsumer ImpactRollbackEvent Model FactorsDeployment Speed
All-at-onceAll at onceRedeploy older versionAny event model at low concurrency rateImmediate 
Canary/
Linear
1-10% typical initial traffic shift, then phased Revert 100% of traffic to previous deploymentBetter for high-concurrency workloadsMinutes to hours

Deployment preferences with AWS SAM

Traffic shifting with aliases is directly integrated into AWS SAM. If you’d like to use all-at-once, canary, or linear deployments with your Lambda functions, you can embed that directly into your AWS SAM templates. You can do this in the deployment preferences section of the template. AWS CodeDeploy uses the deployment preferences section to manage the function rollout as part of the AWS CloudFormation stack update. SAM has several pre-built deployment preferences you can use to deploy your code. See the table below for examples. 

Deployment Preferences TypeDescription
Canary10Percent30MinutesShifts 10 percent of traffic in the first increment. The remaining 90 percent is deployed 30 minutes later.
Canary10Percent5MinutesShifts 10 percent of traffic in the first increment. The remaining 90 percent is deployed 5 minutes later.
Canary10Percent10MinutesShifts 10 percent of traffic in the first increment. The remaining 90 percent is deployed 10 minutes later.
Canary10Percent15MinutesShifts 10 percent of traffic in the first increment. The remaining 90 percent is deployed 15 minutes later.
Linear10PercentEvery10MinutesShifts 10 percent of traffic every 10 minutes until all traffic is shifted.
Linear10PercentEvery1MinuteShifts 10 percent of traffic every minute until all traffic is shifted.
Linear10PercentEvery2MinutesShifts 10 percent of traffic every 2 minutes until all traffic is shifted.
Linear10PercentEvery3MinutesShifts 10 percent of traffic every 3 minutes until all traffic is shifted.
AllAtOnceShifts all traffic to the updated Lambda functions at once.

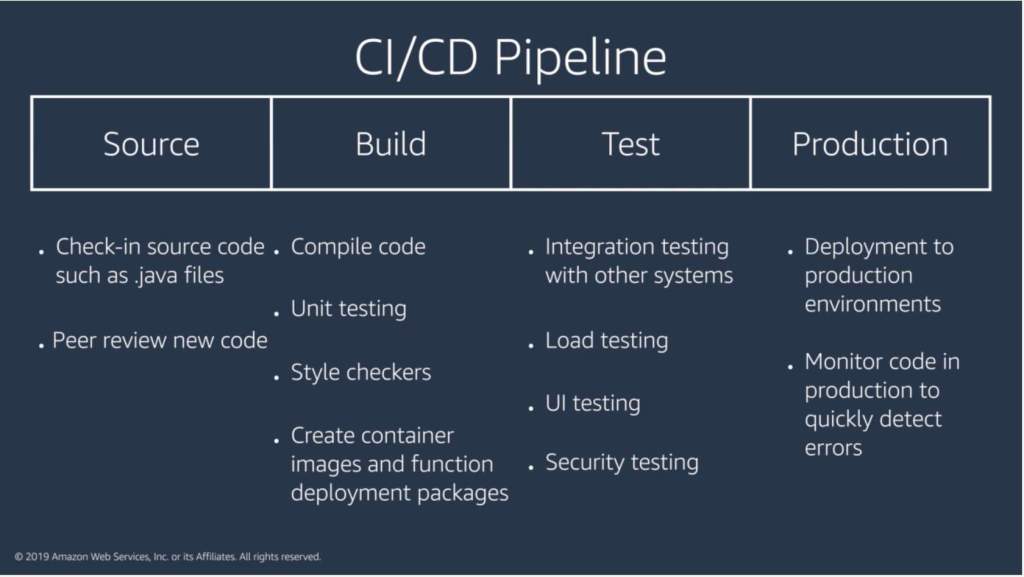
Creating a deployment pipeline

When you check a piece of code into source control, you don’t want to wait for a human to manually approve it or have each piece of code run through different quality checks. Using a CI/CD pipeline can help automate the steps required to release your software deployment and standardize on a core set of quality checks.

Reference

Redeploy and roll back a deployment with CodeDeploy

What is AWS Lambda?

Cheers

Osama