Quest Oracle Community is home to 25,000+ users of JD Edwards, PeopleSoft, Oracle Cloud apps and Oracle Database products. We connect Oracle users to technology leaders and Oracle experts from companies who are driving innovation and leading through their use of Oracle products.
The Quest Oracle Community is dedicated to helping Oracle users develop skills and expand knowledge by connecting with other Oracle users and experts for education and networking.
we’ll look at considerations for migrating existing applications to serverless and common ways for extending the serverless
At a high level, there are three migration patterns that you might follow to migrate your legacy your applications to a serverless model.
Leapfrog
As the name suggests, you bypass interim steps and go straight from an on-premises legacy architecture to a serverless cloud architecture
Organic
You move on-premises applications to the cloud in more of a “lift and shift” model. In this model, existing applications are kept intact, either running on Amazon Elastic Compute Cloud (Amazon EC2) instances or with some limited rewrites to container services like Amazon Elastic Kubernetes Service (Amazon EKS)/Amazon Elastic Container Service (Amazon ECS) or AWS Fargate.
Developers experiment with Lambda in low-risk internal scenarios like log processing or cron jobs. As you gain more experience, you might use serverless components for tasks like data transformations and parallelization of processes.
At some point in the adoption curve, you take a more strategic look at how serverless and microservices might address business goals like market agility, developer innovation, and total cost of ownership.
You get buy-in for a more long-term commitment to invest in modernizing your applications and select a production workload as a pilot. With initial success and lessons learned, adoption accelerates, and more applications are migrated to microservices and serverless.
Strangler
With the strangler pattern, an organization incrementally and systematically decomposes monolithic applications by creating APIs and building event-driven components that gradually replace components of the legacy application.
Distinct API endpoints can point to old vs. new components, and safe deployment options (like canary deployments) let you point back to the legacy version with very little risk.
New feature branches can be “serverless first,” and legacy components can be decommissioned as they are replaced. This pattern represents a more systematic approach to adopting serverless, allowing you to move to critical improvements where you see benefit quickly but with less risk and upheaval than the leapfrog pattern.
Migration questions to answer:
What does this application do, and how are its components organized?
How can you break your data needs up based on the command query responsibility (CQRS) pattern?
How does the application scale, and what components drive the capacity you need?
Do you have schedule-based tasks?
Do you have workers listening to a queue?
Where can you refactor or enhance functionality without impacting the current implementation?
Application Load Balancer vs. API Gateway for directing traffic to serverless targets
Application Load Balancer
Amazon API Gateway
Easier to transition existing compute stack where you are already using an Application Load Balancer
Good for building REST APIs and integrating with other services and Lambda functions
Supports authorization via OIDC-capable providers, including Amazon Cognito user pools
Supports authorization via AWS Identity and Access Management (IAM), Amazon Cognito, and Lambda authorizers
Charged by the hour, based on Load Balancer Capacity Units
Charged based on requests served
May be more cost-effective for a steady stream of traffic
May be more cost-effective for spiky patterns
Additional features for API management: Export SDK for clients Use throttling and usage plans to control access Maintain multiple versions of an APICanary deployments
Consider three factors when comparing costs of ownership:
The infrastructure cost to run your workload (for example, the costs for your provisioned EC2 capacity vs. the per-invocation cost of your Lambda functions)
The development effort to plan, architect, and provision resources on which the application will run
The costs of your team’s time to maintain the application once it is in production
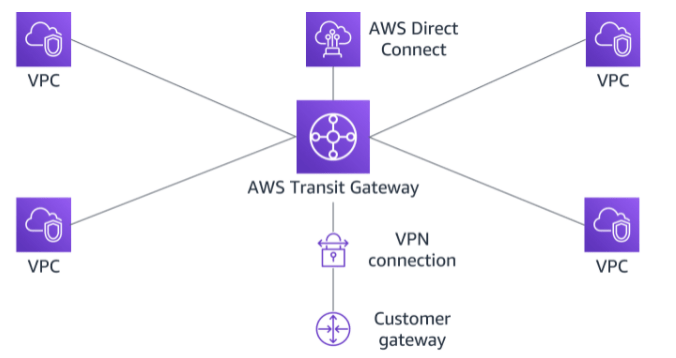
AWS Transit Gateway is a highly available and scalable service that provides interconnectivity between VPCs and your on-premises network. Within a Region, AWS Transit Gateway provides a method for consolidating and centrally managing routing between VPCs with a hub-and-spoke network architecture.
Between Regions, AWS Transit Gateway supports inter-regional peering with other transit gateways. It does this to facilitate routing network traffic between VPCs of different Regions over the AWS global backbone. This removes the need to route traffic over the internet. AWS Transit Gateway also integrates with hybrid network configurations when a Direct Connect or AWS Site-to-Site VPN connection is connected to the transit gateway.
AWS Transit Gateway concepts
Attachments
AWS Transit Gateway supports the following connections:
One or more VPCs
A compatible Software-Defined Wide Area Network (SD-WAN) appliance
A Direct Connect gateway
A peering connection with another transit gateway
A VPN connection to a transit gateway
AWS Transit Gateway MTU
AWS Transit Gateway supports an MTU of 8,500 bytes for:
VPC connections
Direct Connect connections
Connections to other transit gateways
Peering connections
AWS Transit Gateway supports an MTU of 1,500 bytes for VPN connections.
AWS Transit Gateway route table
A transit gateway has a default route table and can optionally have additional route tables. A route table includes dynamic and static routes that decide the next hop based on the destination IP address of the packet. The target of these routes can be any transit gateway attachment.
Associations
Each attachment is associated with exactly one route table. Each route table can be associated with zero to many attachments.
Route propagation
A VPC, VPN connection, or Direct Connect gateway can dynamically propagate routes to a transit gateway route table. With a Direct Connect attachment, the routes are propagated to a transit gateway route table by default.
With a VPC, you must create static routes to send traffic to the transit gateway.
With a VPN connection or a Direct Connect gateway, routes are propagated from the transit gateway to your on-premises router using BGP.
With a peering attachment, you must create a static route in the transit gateway route table to point to the peering attachment.
AWS Transit Gateway inter-regional peering
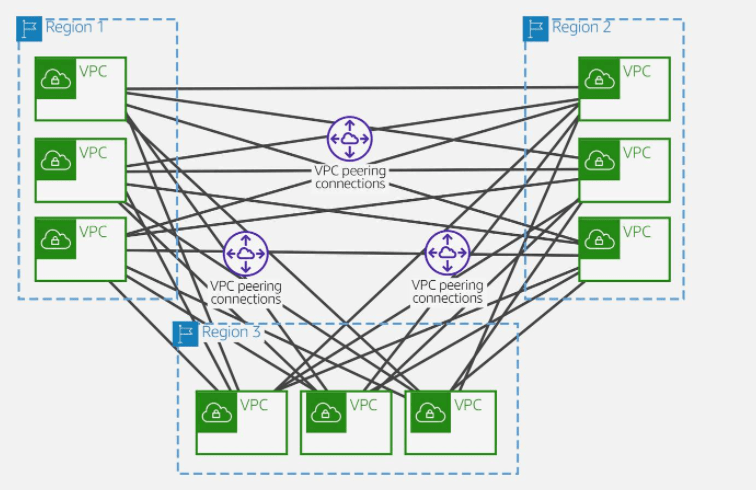
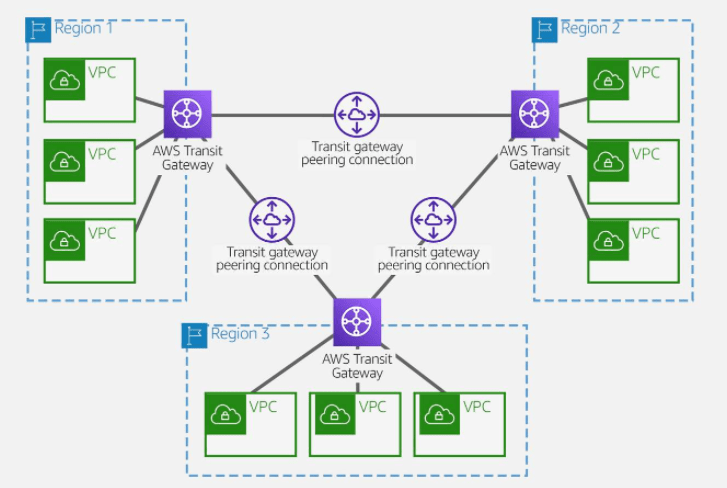
AWS offers two types of peering connections for routing traffic between VPCs in different Regions: VPC peering and transit gateway peering. Both peering types are one-to-one, but transit gateway peering connections have a simpler network design and more consolidated management.
Suppose a customer has multiple VPCs in three different Regions. As the following diagram illustrates, to permit network traffic to route between each VPC requires creating 72 VPC peering connections. Each VPC needs 8 different routing configurations and security policies.
With AWS Transit Gateway, the same environment only needs three peering connections. The transit gateway in each Region facilitates routing network traffic to all the VPCs in its Region. Because all routing can be managed by the transit gateway, the customer only needs to maintain three routing configurations, simplifying management.
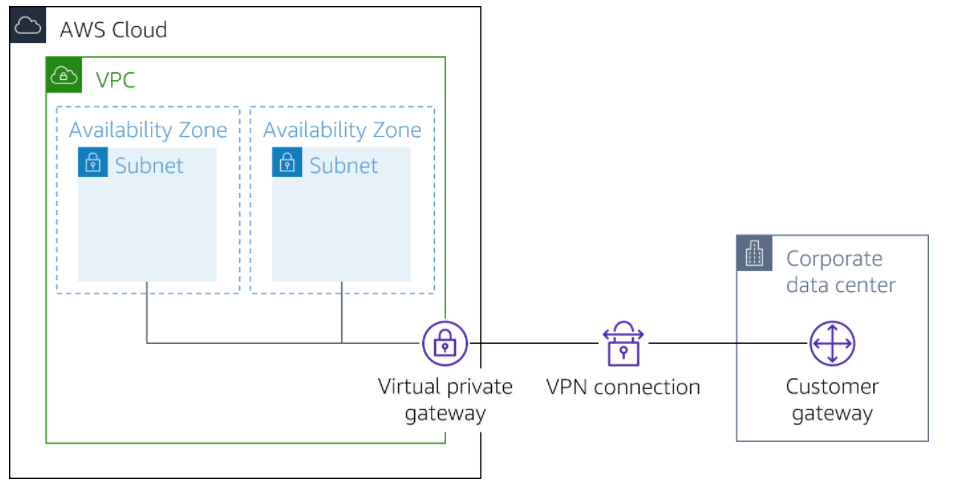
AWS Site-to-Site VPN enables you to securely connect your on-premises network to Amazon VPC, for example your branch office site.
AWS Client VPN enables you to securely connect users to AWS or on-premises networks, for example remote employees.
AWS Site-to-Site VPN
ased on IPsec technology, AWS Site-to-Site VPN uses a VPN tunnel to pass data from the customer network to or from AWS.
One AWS Site-to-Site VPN connection consists of two tunnels. Each tunnel terminates in a different Availability Zone on the AWS side, but it must terminate on the same customer gateway on the customer side.
AWS Site-to-Site VPN components
Customer gateway
A resource you create and configure in AWS that represents your on-premise gateway device. The resource contains information about the type of routing used by the Site-to-Site VPN, BGP, ASN and other optional configuration information.
Customer gateway device
A customer gateway device is a physical device or software application on your side of the AWS Site-to-Site VPN connection.
Virtual private gateway
A virtual private gateway is the VPN concentrator on the Amazon side of the AWS Site-to-Site VPN connection. You use a virtual private gateway or a transit gateway as the gateway for the Amazon side of the AWS Site-to-Site VPN connection.
Transit gateway
A transit gateway is a transit hub that can be used to interconnect your VPCs and on-premises networks. You use a transit gateway or virtual private gateway as the gateway for the Amazon side of the AWS Site-to-Site VPN connection.
AWS Site-to-Site VPN limitations
IPv6 traffic is partially supported. AWS Site-to-Site VPN supports IPv4/IPv6-Dualstack through separate tunnels for inner traffic. IPv6 for outer tunnel connection not supported.
AWS Site-to-Site VPN does not support Path MTU Discovery. The greatest Maximum Transmission Unit (MTU) available on the inside tunnel interface is 1,399 bytes.
Throughput of AWS Site-to-Site VPN connections is limited. When terminating on a virtual private gateway, only one tunnel out of the pair can be active and carry a maximum of 1.25 Gbps. However, real-life throughput will be about 1 Gbps. When terminating on AWS Transit Gateway, both tunnels in the pair can be active and carry an aggregate maximum of 2.5 Gbps. However, real-life throughput will be 2 Gbps. Each flow (for example, TCP stream) will still be limited to a maximum of 1.25 Gbps, with a real-life value of about 1 Gbps.
Maximum packets per second (PPS) per VPN tunnel is 140,000.
AWS Site-to-Site VPN terminating on AWS Transit Gateway supports equal-cost multi-path routing (ECMP) and multi-exit discriminator (MED) across tunnels in the same and different connection. ECMP is only supported for Site-to-Site VPN connections activated on an AWS Transit Gateway. MED is used to identify the primary tunnel for Site-to-Site VPN conncetions that use BGP. Note, BFD is not yet supported on AWS Site-to-Site VPN, though it is supported on Direct Connect.
AWS Site-to-Site VPN endpoints use public IPv4 addresses and therefore require a public virtual interface to transport traffic over Direct Connect. Support for AWS Site-to-Site VPN over private Direct Connect is not yet available.
For globally distributed applications, the accelerated Site-to-Site VPN option provides a connection to the global AWS backbone through AWS Global Accelerator. Because the Global Accelerator IP space is not announced over a Direct Connect public virtual interface, you cannot use accelerated Site-to-Site VPN with a Direct Connect public virtual interface.
In addition, when you connect your VPCs to a common on-premises network, it’s recommend that you use nonoverlapping CIDR blocks for your networks.
Client VPN
Based on OpenVPN technology, Client VPN is a managed client-based VPN service that lets you securely access your AWS resources and resources in your on-premises network. With Client VPN, you can access your resources from any location using an OpenVPN-based VPN client.
Client VPN components
Client VPN endpoint
Your Client VPN administrator creates and configures a Client VPN endpoint in AWS. Your administrator controls which networks and resources you can access when you establish a VPN connection.
VPN client application
This is the software application that you use to connect to the Client VPN endpoint and establish a secure VPN connection.
Client VPN endpoint configuration file
This is a configuration file that is provided to you by your Client VPN administrator. The file includes information about the Client VPN endpoint and the certificates required to establish a VPN connection. You load this file into your chosen VPN client application.
Client VPN limitations
Client VPN supports IPv4 traffic only. IPv6 is not supported.
Security Assertion Markup Language (SAML) 2.0-based federated authentication only works with an AWS provided client v1.2.0 or later.
SAML integration with AWS Single Sign-On requires a workaround. Better integration is being worked on.
Client CIDR ranges must have a block size of at least /22 and must not be greater than /12.
A Client VPN endpoint does not support subnet associations in a dedicated tenancy VPC.
Client VPN is not compliant with Federal Information Processing Standards (FIPS).
Client CIDR ranges cannot overlap with the local CIDR of the VPC in which the associated subnet is located. It also cannot overlap any routes manually added to the Client VPN endpoint’s route table.
A portion of the addresses in the client CIDR range is used to support the availability model of the Client VPN endpoint and cannot be assigned to clients. Therefore, we recommend that you assign a CIDR block that contains twice the number of required IP addresses. This will ensure the maximum number of concurrent connections that you plan to support on the Client VPN endpoint.
The client CIDR range cannot be changed after you create the Client VPN endpoint.
The subnets associated with a Client VPN endpoint must be in the same VPC.
You cannot associate multiple subnets from the same Availability Zone with a Client VPN endpoint.
AWS Certificate Manager (ACM) certificates are not supported with mutual authentication because you cannot extract the private key. You can use an ACM server as the server-side certificate. But, to add a client certificate to your customer configuration, you cannot use a general ACM certificate because you can’t extract the required private key details. So you must access the keys in one of two ways. Either generate your own certificate where you have the key or use AWS Certificate Manager Private Certificate Authority (ACM PCA), which gives the private keys. If the customer is authenticating based on Active Directory or SAML, they can use a general ACM-generated certificate because only the server certificate is required.
Moving to Docker container series blog post, I choose to continue with Kubernetes and discuss it more start with configuration and installation.
This configuration discuss on-premise side and to do that you have at least 2 servers
Server
purpose
description
The Master
node which controls and manages a set of worker nodes (workloads runtime) and resembles a cluster in Kubernetes. A master node has the following components to help manage worker nodes: … Kube-Controller-Manager, which runs a set of controllers for the running cluster.
The worker node
A Node is a worker machine in Kubernetes and may be either a virtual or a physical machine, depending on the cluster. … Each Node is managed by the Master. A Node can have multiple pods, and the Kubernetes master automatically handles scheduling the pods across the Nodes in the cluster.
Configure The Kubernetes cluster
On all nodes, add the Kubernetes repo to /etc/yum.repos.d:
cat <<EOF | sudo tee /etc/yum.repos.d/kubernetes.repo
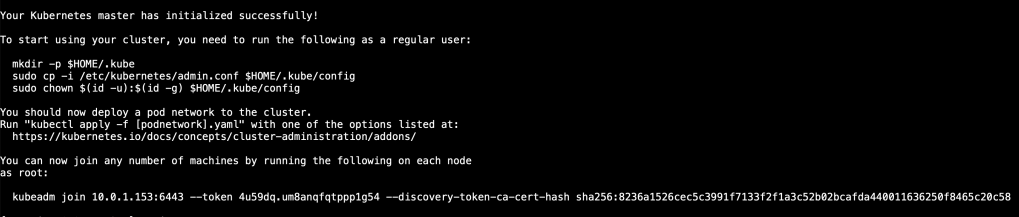
Copy the kubeadm join command, then paste and run it in your worker nodes terminal windows.
From the worker nodes, verify that they can see the cluster
docker ps -a
From Node 1 (Master), check the status of the nodes
kubectl get nodes
Now, Kubernetes installed but it’s empty to have pods or services the next will be for you, it can be change depends on your application type but it’s Just for testing to show the reader how it’s goes.
In this post I choose to work with GKE For change,
The Idea with this project which is Simple WordPress application connected to external database (MYSQL) you can change the database IP from the main.tf file.
To create your first server/VM on Azure cloud, you have different ways to do that :-
Azure Resource Manager
Azure PowerShell
Azure CLI
Azure REST API
Azure Client SDK
Azure VM Extensions
Azure Automation Services
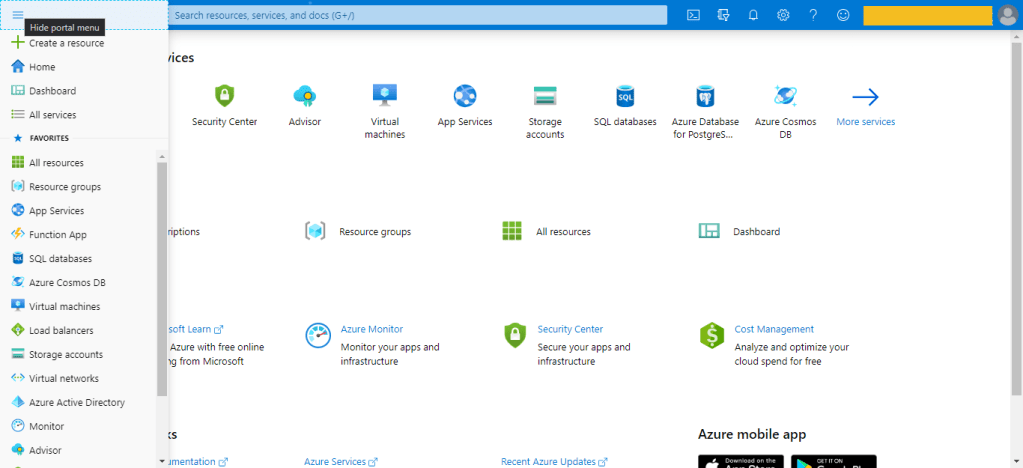
The Azure portal is the easiest way to create resources such as VMs, i will describe each one of them,
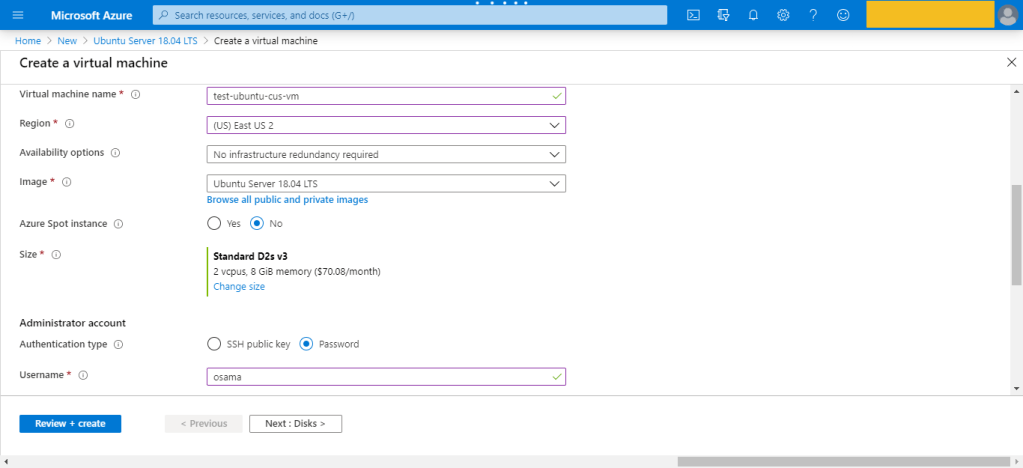
The first way which is The Portal here, to do this it’s very simple :-
Click on the Create a resource option in the top-left corner of the portal page.
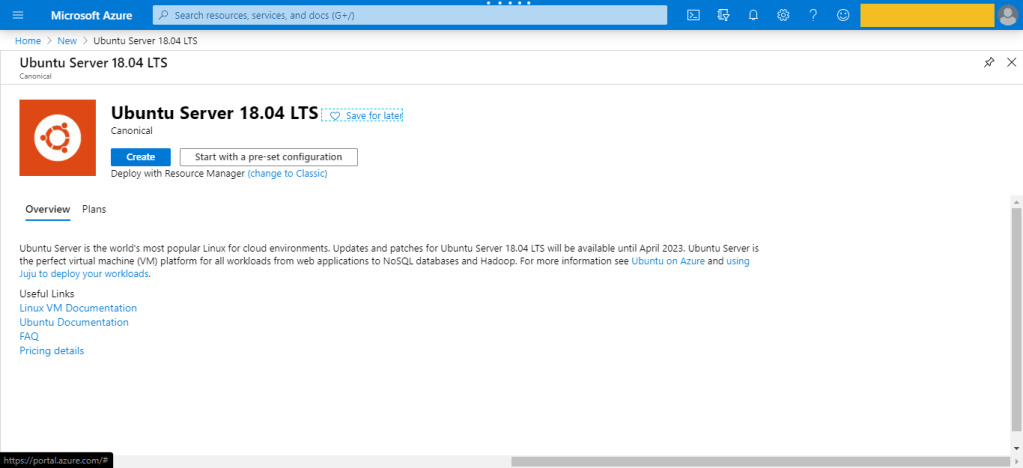
Use the Search the Marketplace search bar to find “Ubuntu Server” for example.
Press on Create , then new page will be open.
Configure the VM, by enter the name, the region, The Subscription,Availability options
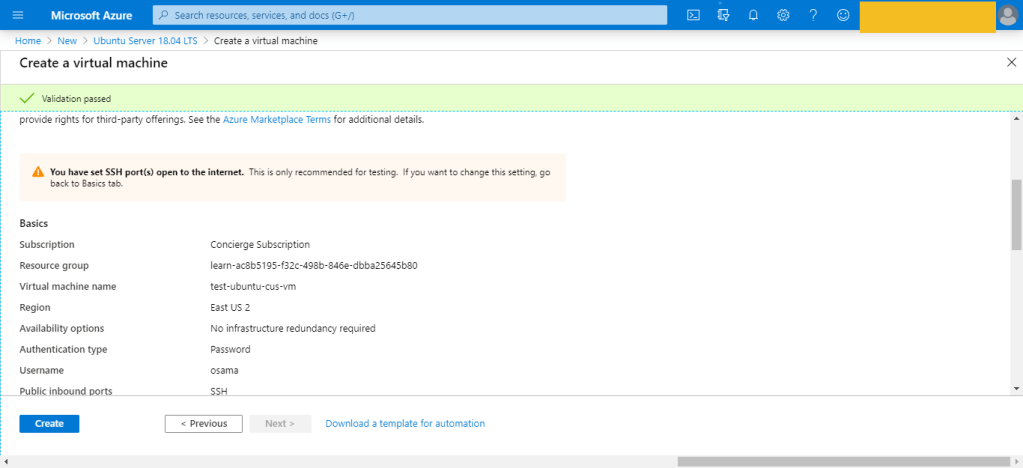
There are several other tabs you can explore to see the settings you can influence during the VM creation. Once you’re finished exploring, click Review + create to review and validate the settings.
On the review screen, Azure will validate your settings. You might need to supply some additional information based on the requirements of the image creator.
This is was the first way to create the VM which is consider the easiet one also.
Azure Resource Manager
assumig you want to create a copy of a VM with the same settings. You could create a VM image, upload it to Azure, and reference it as the basis for your new VM,Azure provides you with the option to create a template from which to create an exact copy of a VM.
You can do this, after create the VM –> Setting –> export template.
Azure PowerShell
Azure PowerShell is ideal for one-off interactive tasks and/or the automation of repeated tasks, note that PowerShell is a cross-platform shell that provides services like the shell window and command parsing.
The Azure CLI is Microsoft’s cross-platform command-line tool for managing Azure resources such as virtual machines and disks from the command line. It’s available for macOS, Linux, and Windows, this is also found in Different cloud vendor for example For Amazon it’s called aws cli, for Oracle it’s Called OCI-CLI and Google it’s called GCP-CLI.
az vm create --resource-group TestResourceGroup --name test-wp1-eus-vm --image win2016datacenter --admin-username osama --admin-password anything
Programmatic (APIs)
This is no my expertise so i will no go deep dive with it, But we were talking about Azure CLI and powershell, you can install something called Azure REST API and start using differen programing language to deal with Azure, i did this with python for AWS using Boto3 module, i post about it before here.
The same can be done for Azure or any Cloud vendor.
Azure VM Extensions
Azure VM extensions are small applications that allow you to configure and automate tasks on Azure VMs after initial deployment. Azure VM extensions can be run with the Azure CLI, PowerShell, Azure Resource Manager templates, and the Azure portal.
In this lesson i will show you how to configure AWS command line, and how to start working with your AWS account thru command line with very simple and basic steps :-
First of i will assume that you don’t have any user or group in your AWS console
from the AWS Console :-
From IAM ( Identity access management ) Choose Group Create Group with permission Administrator access and then hit create.
create user and add that user to the group in my case the group name shown above, save the secret key and access ID as CSV.
Now from this link here, Download AWS Command Line Interface depend on your operating system and open cmd , terminal … etc.
Now from Dos enter AWS configure and fill the information like the below:-
Open the command line and test if it’s connected to AWS now.
You can learn more about the command line from AWS documentation , if you recive the following error