This is another DevOps Project, the idea of this project like the following:-
sample django web application on with the following specs:–
app should be production ready taking into consideration things such as scalability, availability & security.
The infrastructure to run this application is up to you but it should be automated via terraform or cloud formation. Infrastructure well architected framework will be used to evaluate the infrastructure as a whole.
CI/CD Pipeline
harden the application for a production ready environment.
Imagine you are having multiple instances and you want to change something, if you will do this manually it will take time from you why not to automte the process ?
I upladed one of the projects to automate the process, this will allow to automate the simplest things for example new employee joined and you need to add his SSH key to your instances (You can even choose which VM you want to him/her to acces) , just add the key in the roles and configure the pipeline on your rep and the code will run Automtically.
Okay, I love to post free examples/projects on my github from while to while, i choose docker and kubernetes this time, the project idea it’s very nice and easy to implement.
What this project do ?
This can be a simple web app that reads a ‘hello world’ string from the MySQL database.Run a database app. Data volume should be persistent.Application from step 1 needs to discover the database from step 2 using Kubernetes native features. Database credentials should NOT be hardcoded in application or helm chart code.The application should be accessible from the outside of Kubernetes.Create a helm chart which implements all these steps
Create an application that connects to a database, reads some data, and returns this data upon HTTP request, This can be a simple web app that reads a ‘hello world’ string from the MySQL database.
Run a database app. Data volume should be persistent.
Application from step 1 needs to discover the database from step 2 using Kubernetes native features, Database credentials should NOT be hardcoded in application or helm chart code.
The application should be accessible from the outside of Kubernetes.
Create a helm chart which implements all these steps
I Choose to use Java as programing language because the springboot frameworkit’s already defined and easy to use.
Please follow the readme file and everything will working fine without any issue, if you have any question comment below and i will answer
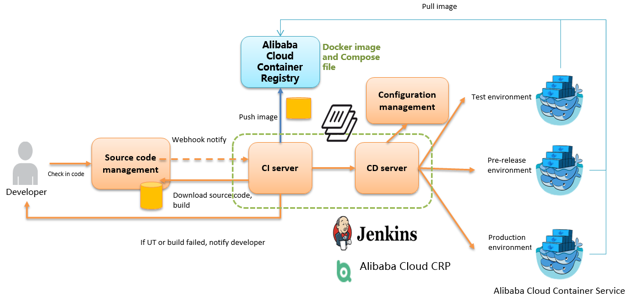
As an important step in agile development, continuous integration is designed to maintain high quality while accelerating product iteration. Every time when the codes are updated, an automatic test is performed to test the codes and function validity. The codes can only be delivered and deployed after they pass the automatic test, This post describes how to combine Jenkins, one of the most popular integration tools, with Alibaba Cloud Container Service to realize automatic test and image building pushing.
Deploying Jenkins Applications and the Slave Nodes
1. Create a Jenkins orchestration template.
Create a new template and create the orchestration based on the following content.
2. Use the template to create Jenkins applications and slave nodes.
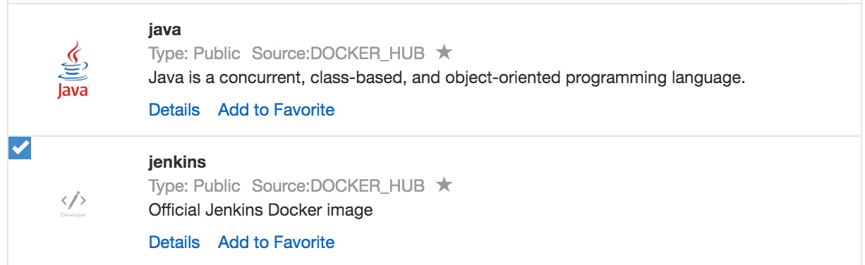
You can also directly use a Jenkins sample template provided by Alibaba Cloud Container Service to create Jenkins applications and slave nodes.
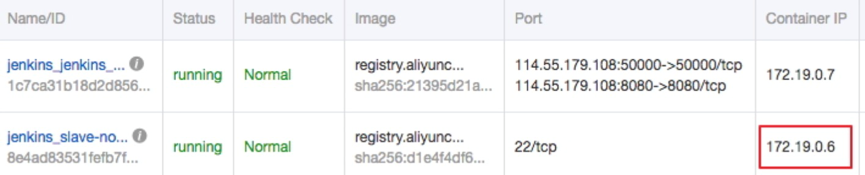
3. After the successful creation, Jenkins applications and slave nodes will be displayed in the service list.
4. After opening the access endpoint provided by the Container Service, you can use the Jenkins application deployed just now.
Realizing Automatic Test and Automatic Build and Push of Image
Configure the slave container as the slave node of the Jenkins application.
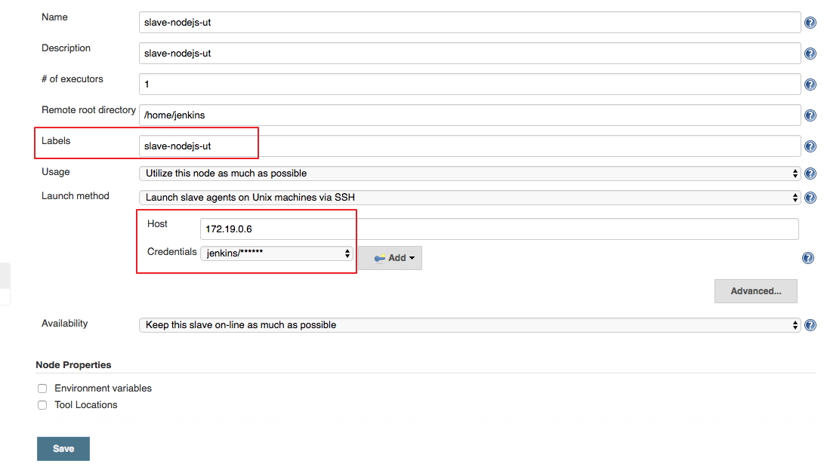
Open the Jenkins application and enter the System Settings interface. Select Manage Node > Create Node, and configure corresponding parameters. See the figure below.
Note: Label is the only identifier of the slave. The slave container and Jenkins container run on the Alibaba Cloud platform at the same time. Therefore, you can fill in a container node IP address that is inaccessible to the Internet to isolate the test environment.
Use the jenkins account and password (the initial password is jenkins) in Dockerfile for the creation of the slave-nodejs image when adding Credential. Image Dockerfile address HERE
1. Create a project to implement the automatic test.
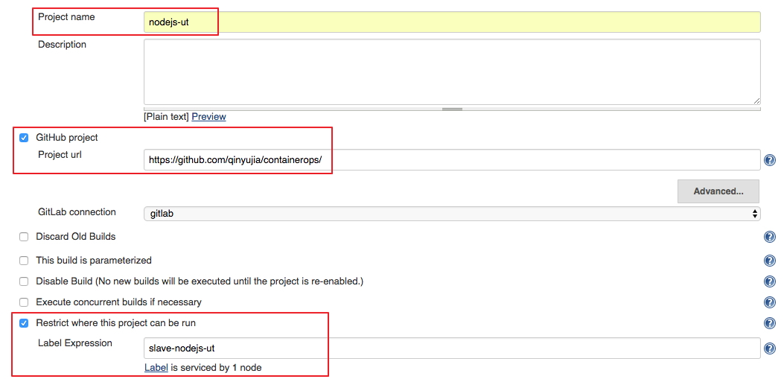
Create an item and choose to build a software project of free style.
Enter the project name and select a node for running the project. In this example, enter the slave-nodejs-ut node created above.
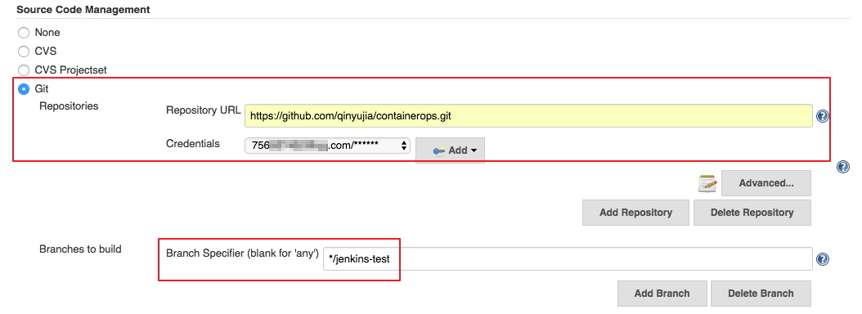
Configure the source code management and code branch. In this example, use GitHub to manage source codes.
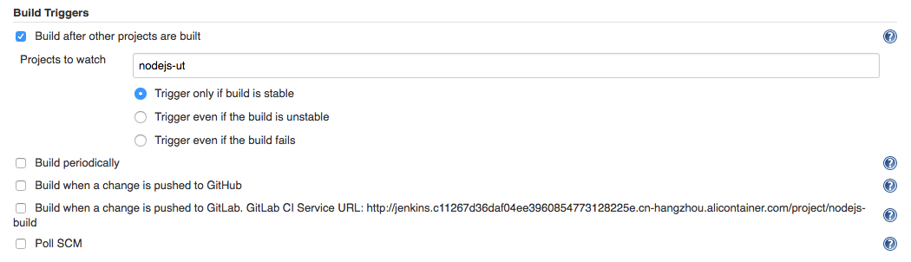
Configure the trigger for building. In this example, automatically trigger project execution by combining GitHub Webhooks and services.
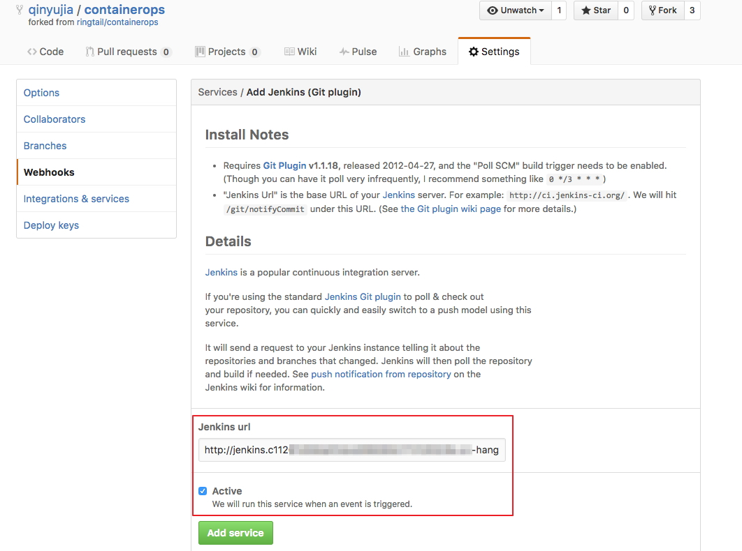
Add the Jenkins service hook to GitHub to implement automatic triggering.
Click the Settings tab on the Github project homepage, and click Webhooks & services > Add service and select Jenkins (Git plugin). Enter ${Jenkins IP}/github-webhook/ in the Jenkins hook URL dialog box.
1. Select the application nodejs-demo just created, and create the trigger.
Add a line to the shell scripts you wrote in Realize automatic test and automatic build and push of image. The address is the trigger link given by the trigger created above.
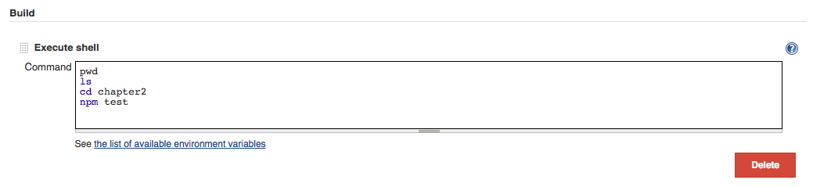
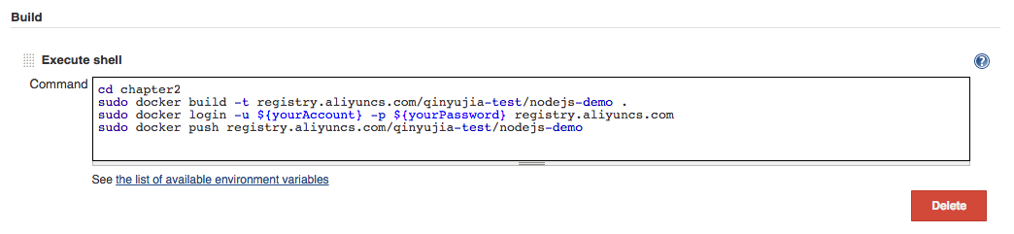
Change the Command in the example from Realize automatic test and automatic build and push of image as follows.
i. cd chapter2
ii. docker build -t registry.aliyuncs.com/qinyujia-test/nodejs-demo .
iii. docker login -u ${yourAccount} -p ${yourPassword} registry.aliyuncs.com iv.docker push registry.aliyuncs.com/qinyujia-test/nodejs-demo
v. curl 'https://cs.console.aliyun.com/hook/trigger?triggerUrl=***==&secret=***'
After pushing the image, Jenkins automatically triggers redeployment of the nodejs-demo application.
Configure The Email Notification for the Results
If you want to send the unit test or image configuration results to relevant developers or project execution initiators through email, perform the following configurations.
On the Jenkins homepage, click System Management > System Settings, and configure a Jenkins system administrator email.
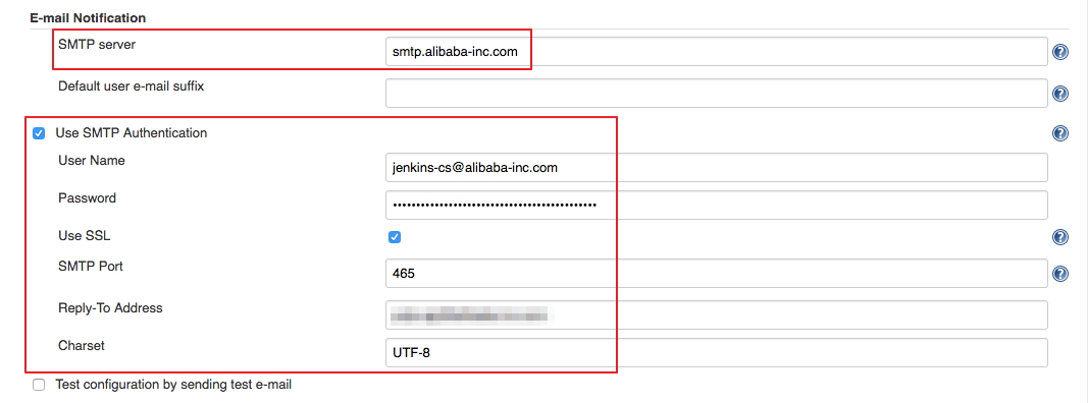
Install the Extended Email Notification plugin, configure SMTP server and other relevant information, and set the default recipient list. See the figure below.
The above example shows the parameter settings of the Jenkins application system. The following example shows the relevant configurations for Jenkins projects whose results are to be pushed through email.
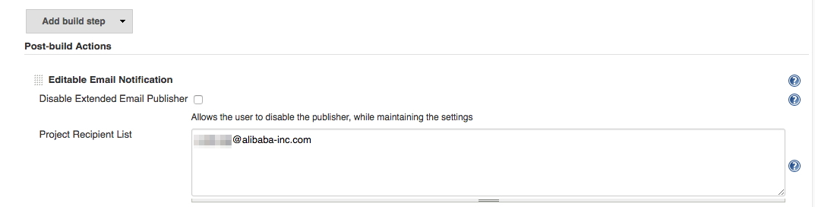
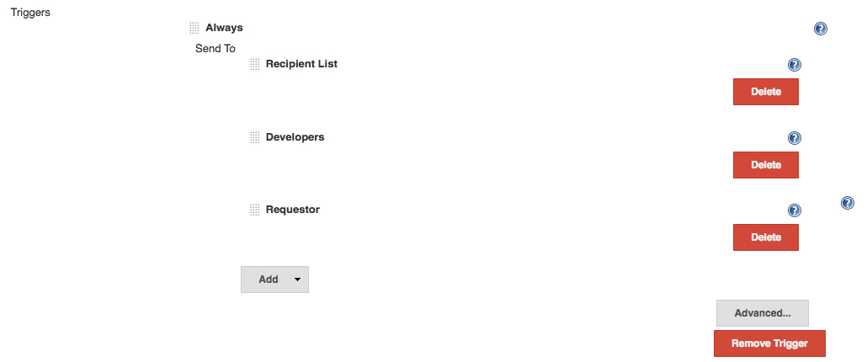
1. Add post-building operation steps in the Jenkins project, select Editable Email Notification, and enter a recipient list.
Regarding to Wikipedia, Serverless computing is a cloud computing execution model in which the cloud provider runs the server, and dynamically manages the allocation of machine resources. Pricing is based on the actual amount of resources consumed by an application, rather than on pre-purchased units of capacity
Today i will show you an example how to create serverless website but this time not using Amazon AWS, Azure or OCI but Alibaba Cloud Provider.
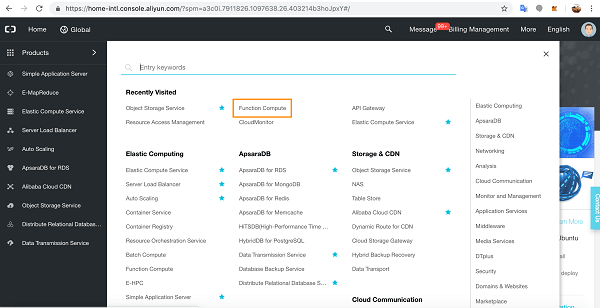
Create a Function Compute Service
Go to the console page and click through to Function Compute.
Click the add button beside Services.
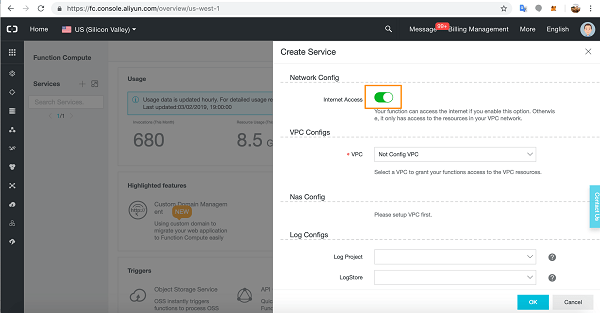
In the Service slide out, give your service a name, an optional description, and then slide open the Advanced Settings.
In Advanced Settings you can grant access for Functions to the Internet, to VPC resources, and you can attach storage and a log service to a Function. You can also configure roles.
For our tutorial, we will need Internet access so make sure this configuration is on.
We will leave VPC and Log Configs as they are.
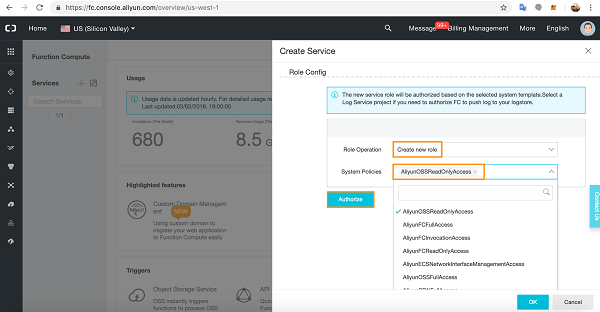
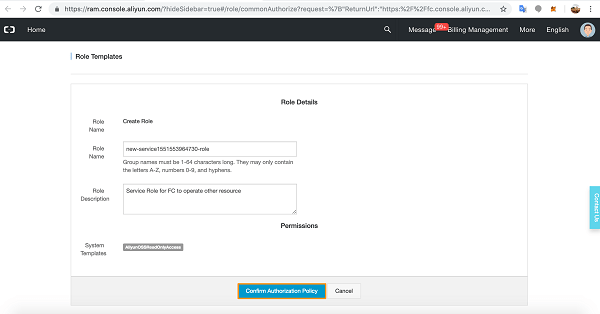
In the Role Config section, select Create New Role, and in the dropdown list pick AliyunOSSReadOnlyAccess as we will be accessing our static webpages from an Object Storage Service bucket.
Click Authorize.
You will see a summary of the Role you created.
Click Confirm Authorization Policy.
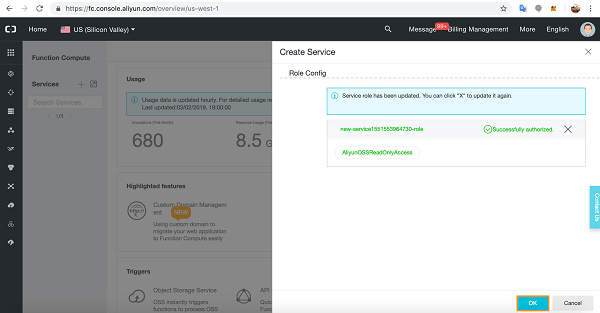
You have successfully added the Role to the Service.
Click OK.
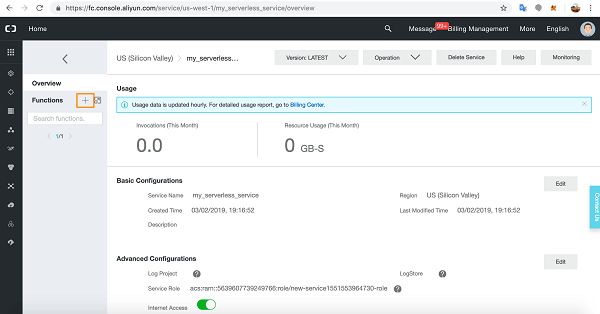
ou will see the details of the Function Compute Service you just created.
Now let’s create a Function in the Service. Click the add button next to Functions.
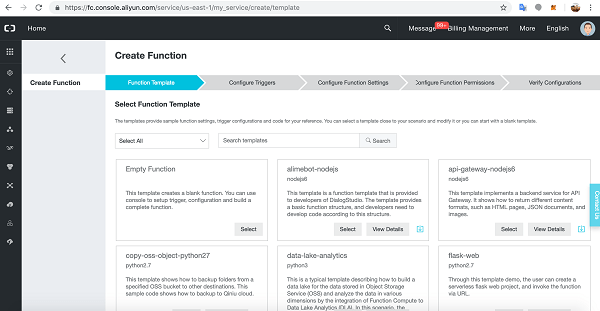
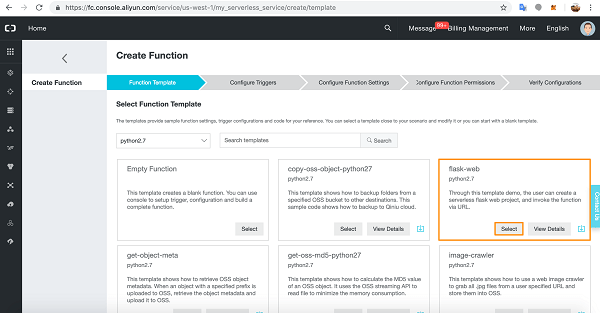
You will see the Create Function process. The first part of the process is Function Template.
There are many Function Templates available, including an empty Function for writing your own bespoke Functions.
Alibaba Cloud-supplied Template Functions are very useful as they have relevant method invocation and demo code for getting started quickly with Function Compute.
let’s choose the flask-web Function written in Python2.7.
Click Select.
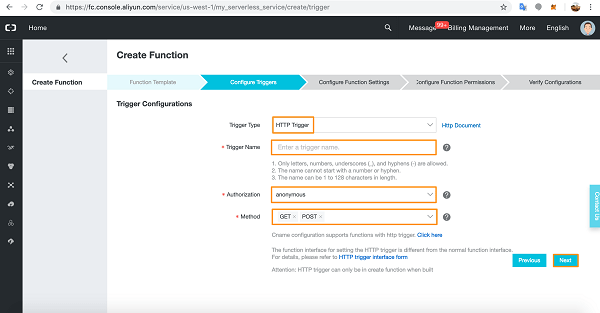
We are now at the Configure Triggers section of creating a Function.
Select HTTP Trigger from the dropdown list. Give the Trigger a name and choose Authorization details (anonymous does not require authorization).
Choose your HTTP methods and click Next. We are going to build a simple web-form application so we will need both the GET and POST HTTP methods.
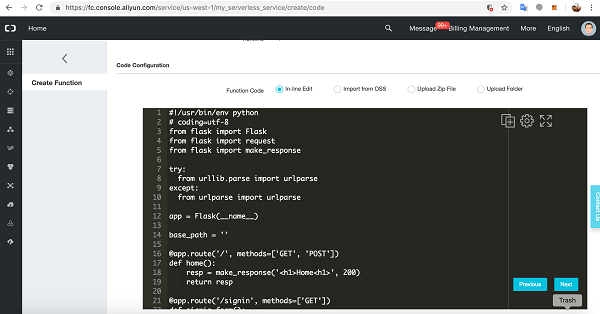
Now we arrive at the Configure Function Settings.
Give the Function a name then scroll down to Code details.
We’ll leave the supplied code for now. Scroll down to below the code sample.
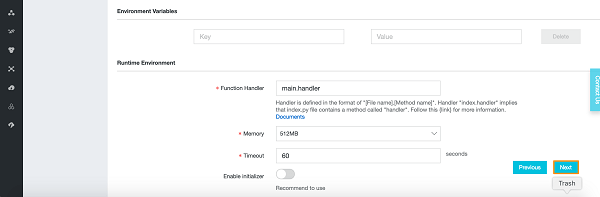
You will see Environment Variable input options and Runtime Environment details.
Click Next.
Click Next at Configure Function Permissions.
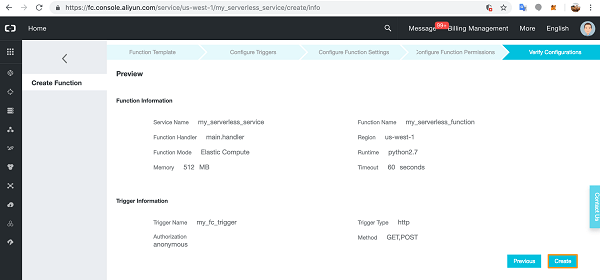
Verify the Configuration details and click Create.
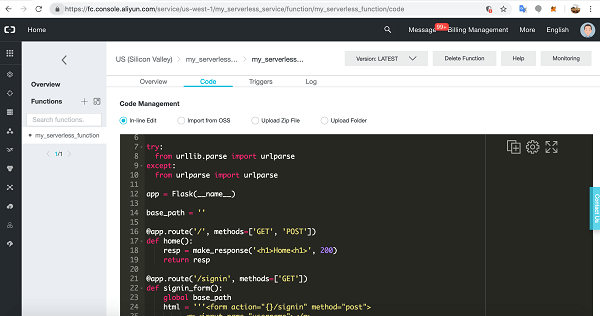
You will arrive at the Function’s IDE. Here you can enter new code, edit the code directly, upload code folders, run, test, and fix your code.
Scroll down.
Copy the URL as we will need to add this to our static webpages so they can connect to our Function Compute Service and Function.
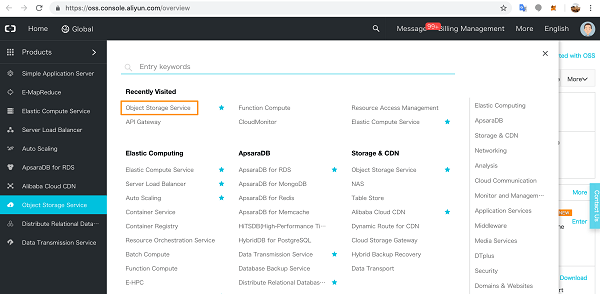
Set Up and Configure an OSS Bucket
Click through to Object Storage Service on the Products page.
If you haven’t yet activated Object Storage Service, go ahead and activate it. In the OSS console, click Create Bucket.
Choose a name for the OSS Bucket and pick the region – you cannot change the region later. Select the Storage Class – you also cannot change this later.
We have selected Public Read for the Access Control List.
When you’re ready, click OK.
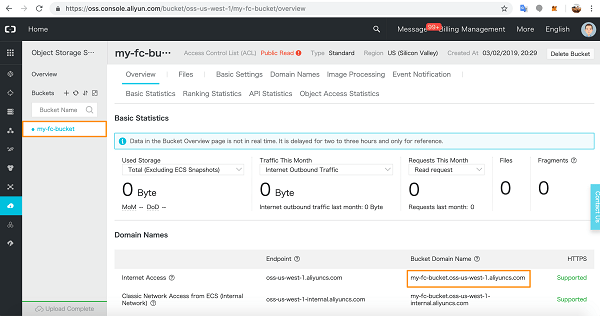
You will see the Overview page for your bucket. Make a note of the public Internet URL.
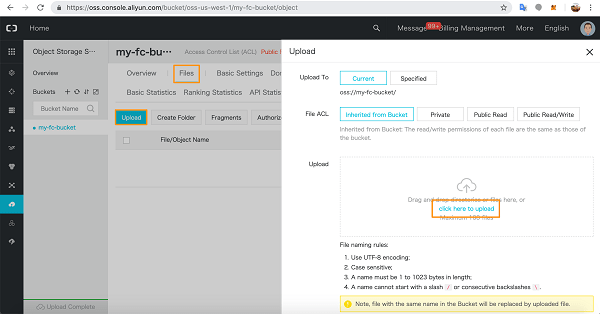
In the Files tab, upload your static web files.
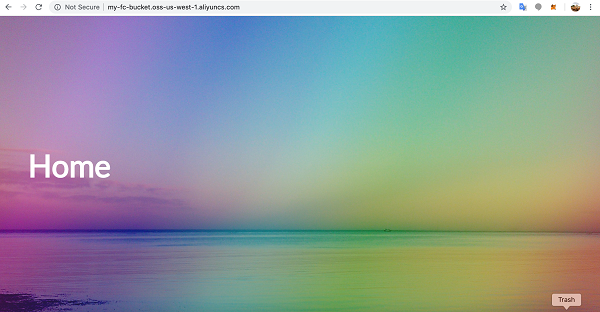
I uploaded a simple index.html homepage and a background picture.
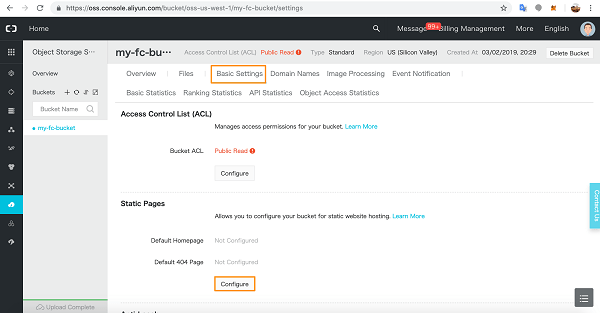
In Basic Settings, click Configure to configure your Static Pages.
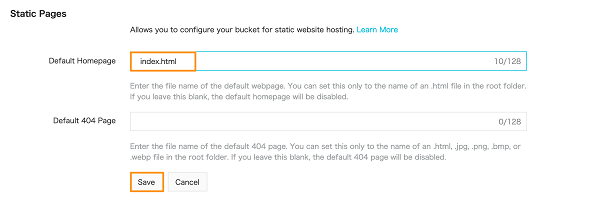
Add the homepage details and click Save.
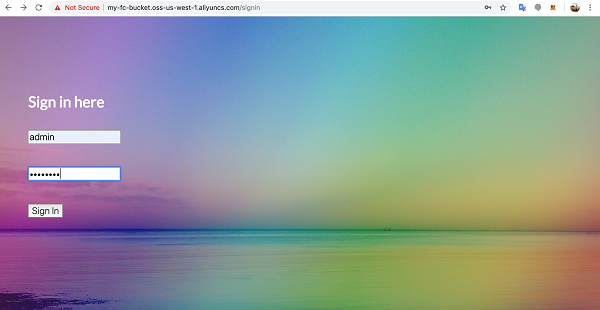
Now go to a new browser window and access the OSS URL you saved earlier.
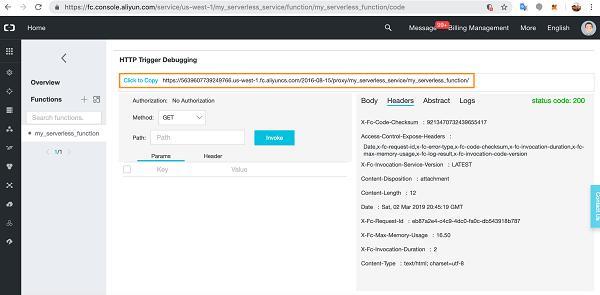
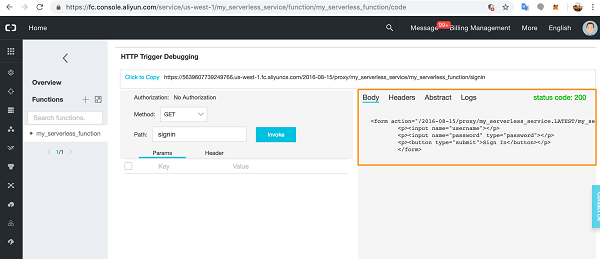
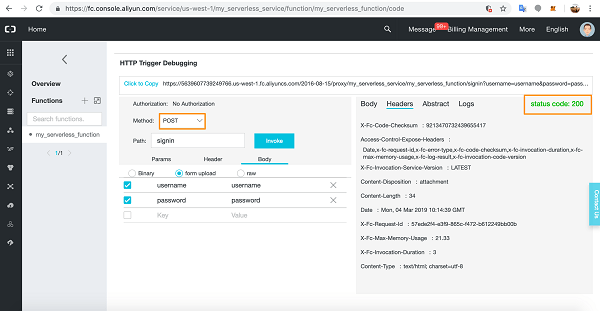
Back in the Function Compute console, you can now test the flask-app paths directly from the code.
We already tested index.html with no Path variable. Next, we test the app route signin with GET and check the Headers and status code.
The signin page code is working correctly. You can also check the Body to make sure the correct HTML will render on the page. Notice that because I entered the path variable, signin is appended to the URL.
Of course, any errors you encounter will show up in the Logs section for easy debugging.
Now, let’s test this page on the Internet.
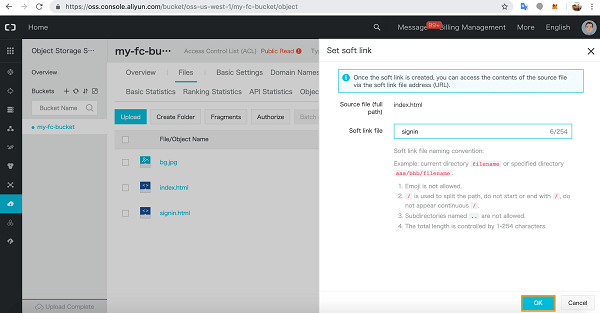
If you get an error here, implement a soft link for the page in OSS. Go to the OSS bucket and click More dropdown for the HTML file in question and choose Set soft link.
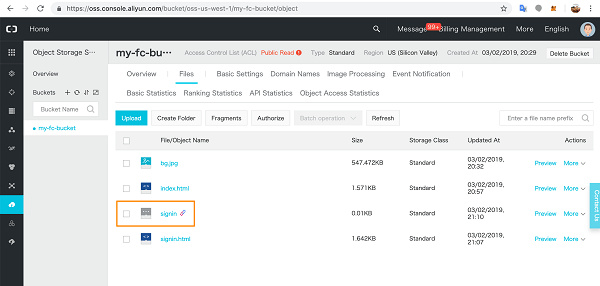
Give the link a name and click OK.
A link file will appear in the list of static files and you will now be able to access the page online with the relevant soft link and it will render as above.
Back in Function Compute, we can test the POST method in the console with the correct username and password details in the same way.
Add the POST variables to the form upload section in the Body tab.
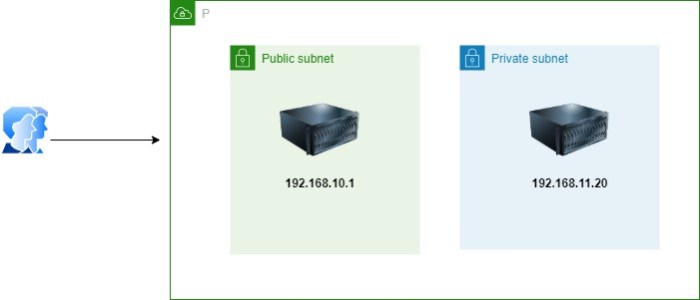
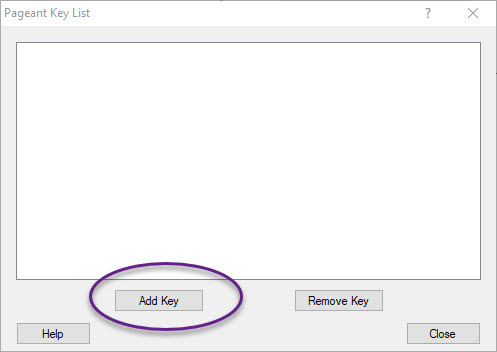
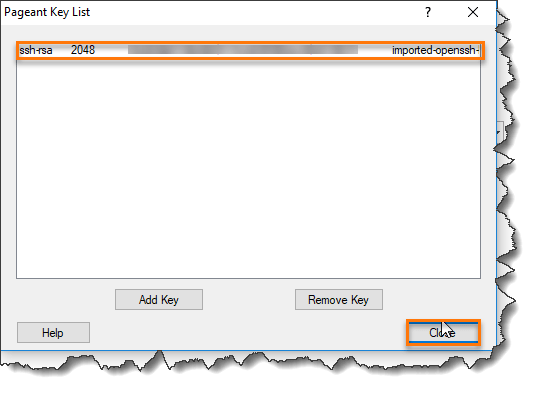
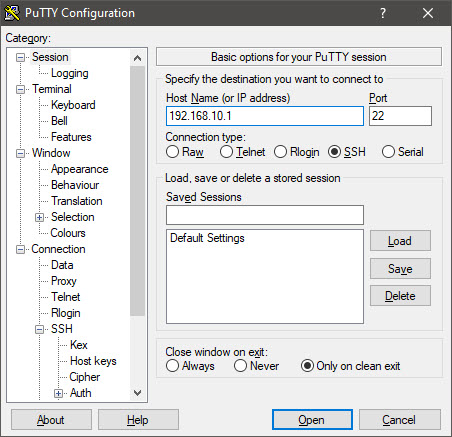
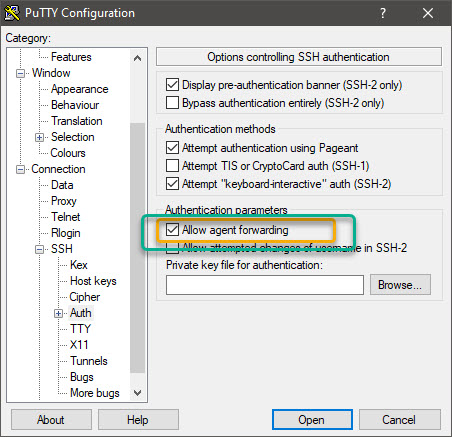
If you ever worked with cloud and configured different subnet, there will be public and private subnet, both having a different number of servers, for the public or even private have you also wonder how to access the environment without associate the VM to Public IP, in this post I will show you how.
For the figure shows one of the simple example of that, In this post you will learn how to connect to an instance that is hosted in a private subnet
This blog post is one of that kind that took much time and consume so much energy, to complete this post it took me around ten days to make sure that I will cover most of the available services and make it readable for people, Be sure the services can change while you are reading this post ; if you have any comments,or add something to this post, please send me an email – using contact us page or by comments below.
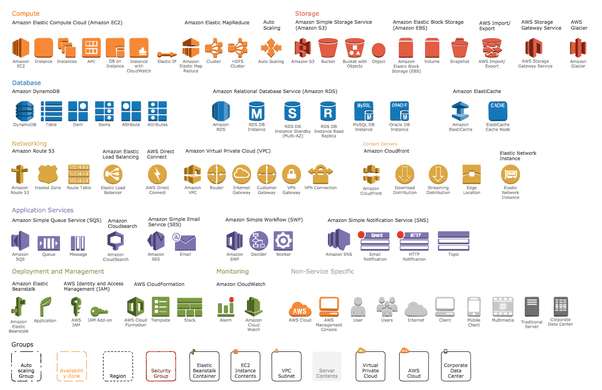
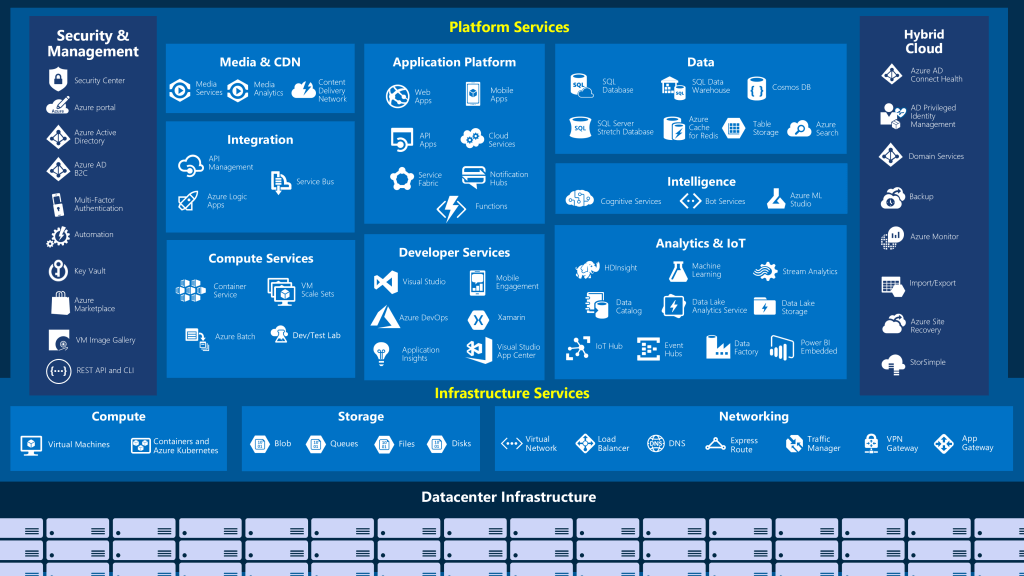
I am writing this post to share a different cloud providers services and the comparison between each one of them, this will show various naming services for each one of them.
Earlier we used to store our data to H.D.D or USB flash, Cloud Computing services have replaced such hard drive technology. Cloud Computing service is nothing but providing services like Storage, Databases, Servers, networking, and software through the Internet.
Cloud Computing is moving so fast, in 2020 the cloud now is more mature, going multi-cloud, and likely to become more focused on vertical and a sales ground war as the leading vendors battle for market share.
Notes :
GCP : Google Cloud Provider
OCI :- oracle cloud infrastructure
None : not meaning the services is not available necessarily by cloud provider but i didn’t look deeper into this or i didn’t use it before.
Just quick post to show and share what services for each cloud provider, be notice that the services can be change while we are talking now, and this is not a complete list of services but it’s only shows the basic one.