Building a Scalable Data Pipeline on OCI with Data Flow

In this blog, we will explore how to build a scalable data pipeline on Oracle Cloud Infrastructure (OCI) using OCI Data Flow. We’ll cover the end-to-end process, from setting up OCI Data Flow to processing large datasets, and integrating with other OCI services.

Introduction to OCI Data Flow

  • Overview of OCI Data Flow and its key features.
  • Benefits of using a serverless, scalable data processing service.
  • Common use cases for OCI Data Flow, including ETL, real-time analytics, and machine learning.

Setting Up OCI Data Flow

Prerequisites

  • An active Oracle Cloud account.
  • Necessary permissions and quotas for creating OCI resources.

Configuration Steps

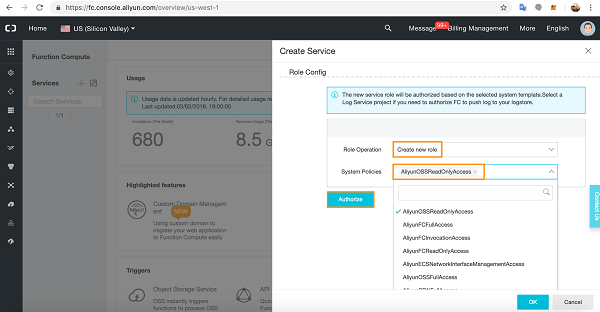
  1. Create a Data Flow Application:
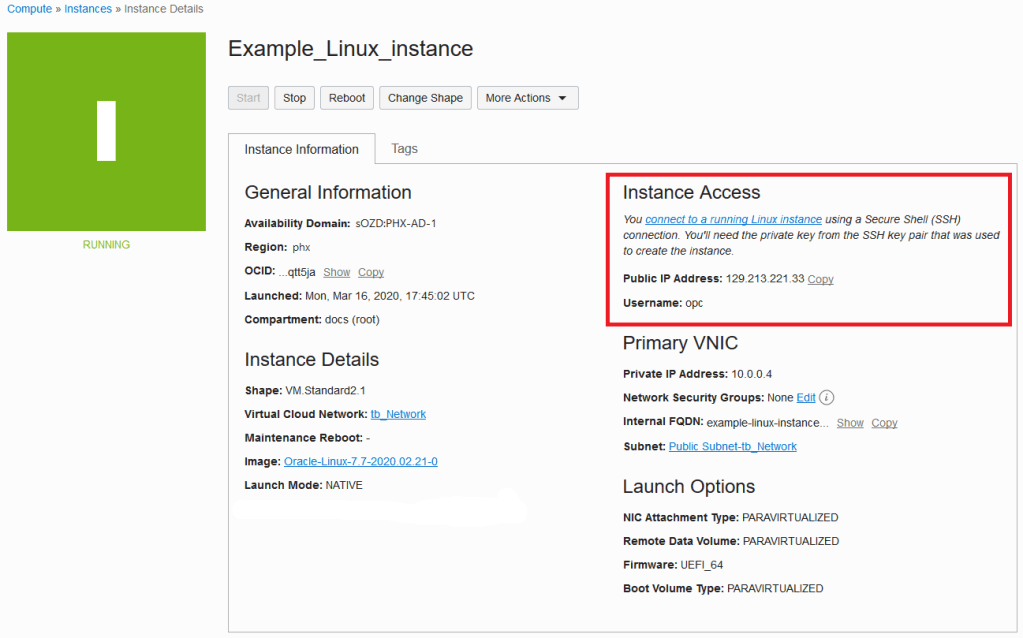
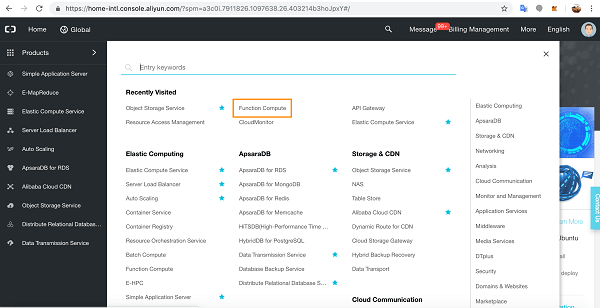
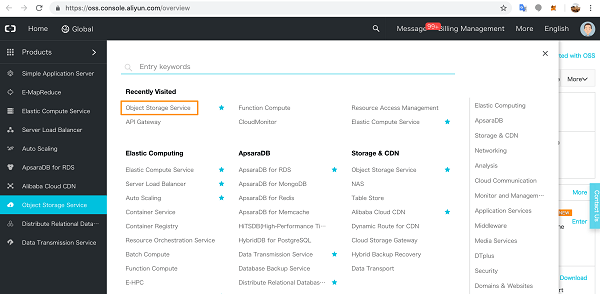
    • Navigate to the OCI Console and open the Data Flow service.
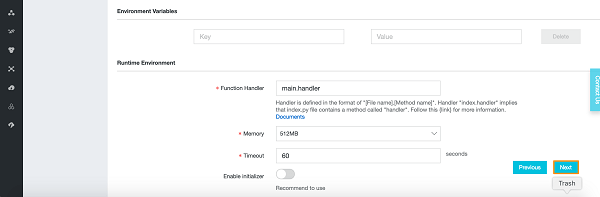
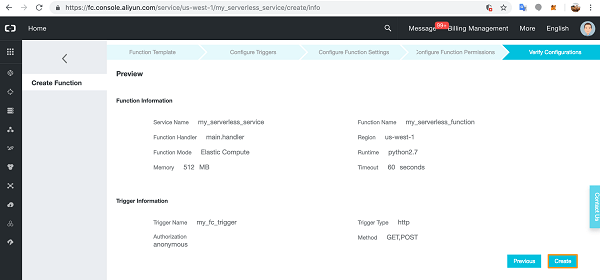
    • Click on “Create Application” and provide the necessary details.
    • Define your application’s parameters and Spark version.
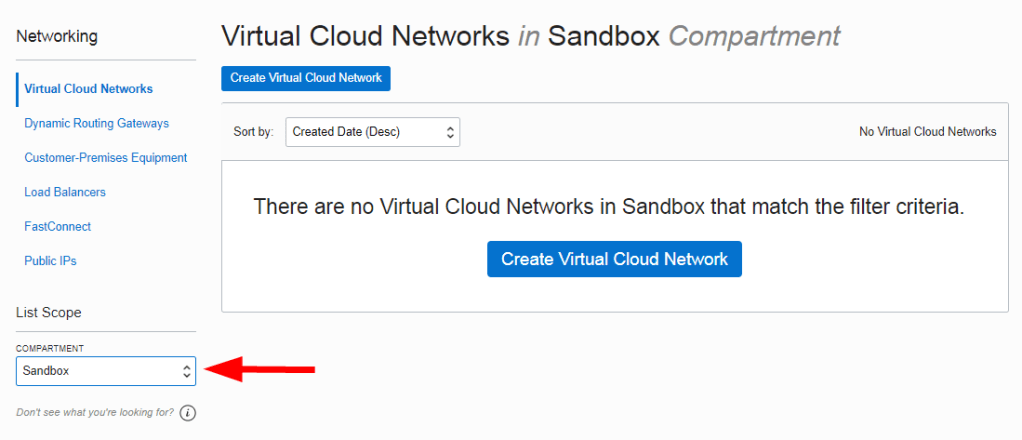
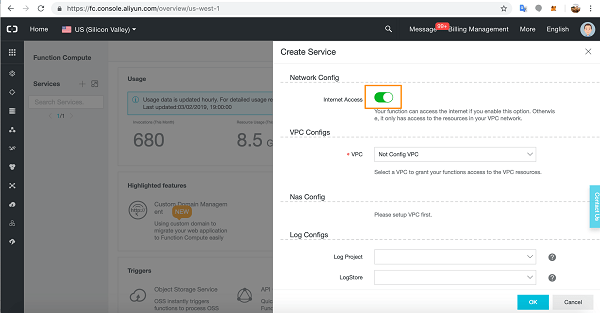
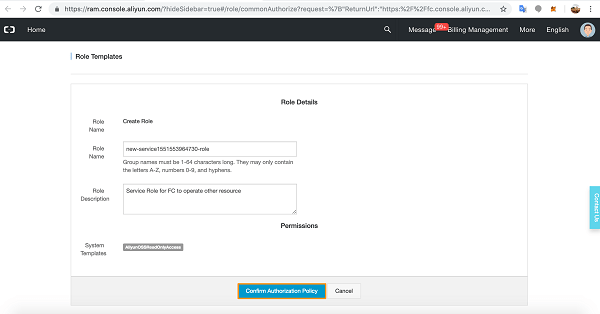
  2. Configure Networking:
    • Set up Virtual Cloud Network (VCN) and subnets.
    • Ensure proper security lists and network security groups (NSGs) for secure communication.

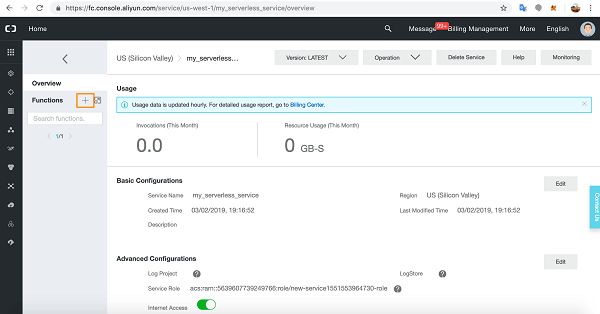
3. Creating a Scalable Data Pipeline

Designing the Data Pipeline

  • Outline the flow of data from source to target.
  • Example pipeline: Ingest data from OCI Object Storage, process it using Data Flow, and store results in an Autonomous Database.

Developing Data Flow Jobs

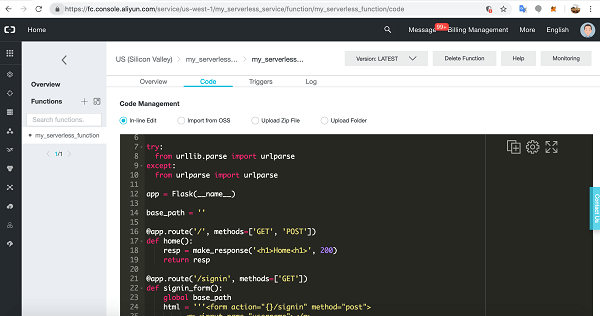
  • Write Spark jobs in Scala, Python, or Java.
  • Example Spark job to process data:
val df = spark.read.json("oci://<bucket_name>@<namespace>/data/")
df.filter("age > 30").write.csv("oci://<bucket_name>@<namespace>/output/")

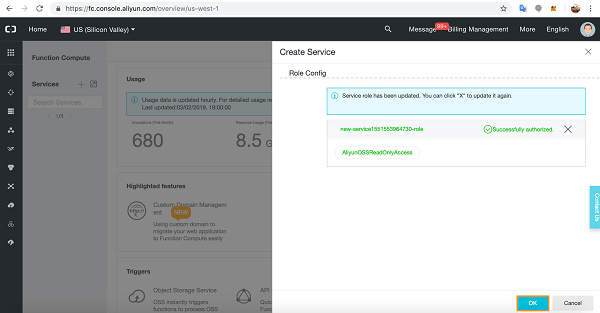
Deploying and Running Jobs

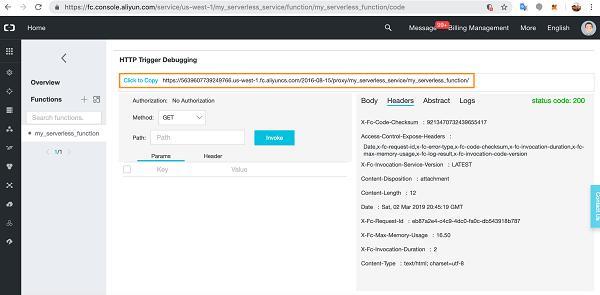
  • Deploy the Spark job to OCI Data Flow.
  • Schedule and manage job runs using OCI Console or CLI.

Processing Large Datasets

Handling Big Data

  • Techniques for optimizing Spark jobs for large datasets.
  • Using partitions and caching to improve performance.

Example: Processing a 1TB Dataset

  • Step-by-step guide to ingest, process, and analyze a 1TB dataset using OCI Data Flow.

5. Integrating with Other OCI Services
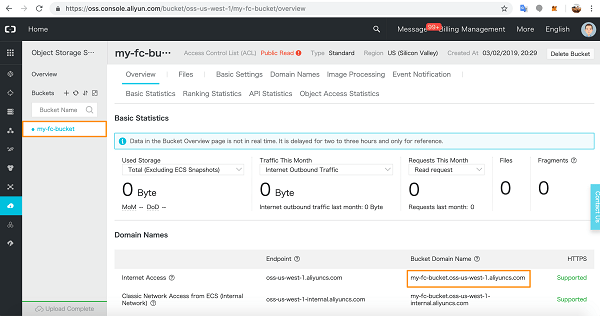
OCI Object Storage

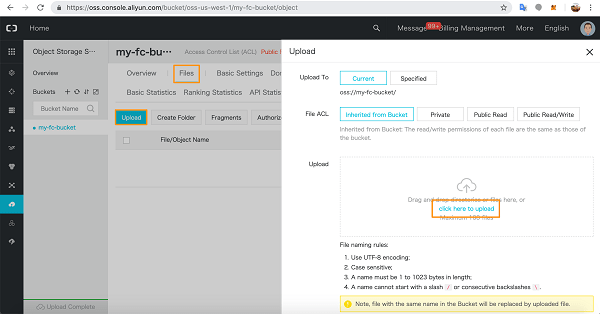
  • Use Object Storage for data ingestion and storing intermediate results.
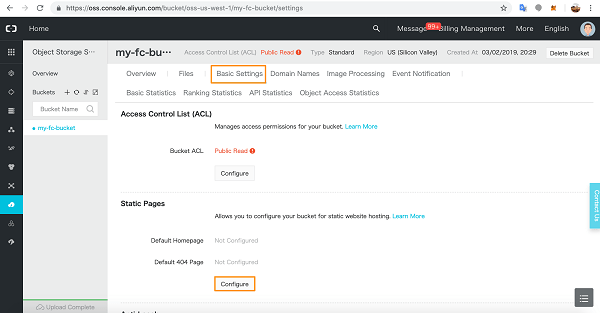
  • Configure Data Flow to directly access Object Storage buckets.

OCI Autonomous Database

  • Store processed data in an Autonomous Database.
  • Example of loading data from Data Flow to Autonomous Database.

OCI Streaming

  • Integrate with OCI Streaming for real-time data processing.
  • Example: Stream processing pipeline using OCI Streaming and Data Flow.

Optimizing Data Flow Jobs

Performance Tuning

  • Tips for optimizing resource usage and job execution times.
  • Adjusting executor memory, cores, and dynamic allocation settings.

Cost Management

  • Strategies for minimizing costs while running Data Flow jobs.
  • Monitor job execution and cost metrics using the OCI Console.

Implementing Data Replication and Disaster Recovery with OCI Autonomous Database

Introduction

  • Overview of OCI Autonomous Database and its capabilities.
  • Importance of data replication and disaster recovery for business continuity.

Step-by-Step Guide

  1. Setting Up OCI Autonomous Database
  • Creating an Autonomous Database Instance:
oci db autonomous-database create --compartment-id <compartment_OCID> --db-name "MyDatabase" --cpu-core-count 1 --data-storage-size-in-tbs 1 --admin-password "<password>" --display-name "MyAutonomousDB" --db-workload "OLTP" --license-model "BRING_YOUR_OWN_LICENSE" --wait-for-state AVAILABLE

2. Configuring Data Replication

  • Creating a Database Backup:
oci db autonomous-database backup create --autonomous-database-id <db_OCID> --display-name "MyBackup" --wait-for-state COMPLETED

3. Setting Up Data Guard for High Availability:

  • Creating a Data Guard Association:
oci db autonomous-database create-data-guard-association --compartment-id <compartment_OCID> --primary-database-id <primary_db_OCID> --standby-database-id <standby_db_OCID> --display-name "MyDataGuardAssociation"

4. Implementing Disaster Recovery

  • Configuring Backup Retention Policies:
  • Set up automated backups with a specific retention period through the OCI Console or CLI:
oci db autonomous-database update --autonomous-database-id <db_OCID> --backup-retention-period 30
  • Restoring a Database from Backup:
oci db autonomous-database restore --autonomous-database-id <db_OCID> --restore-timestamp "2024-01-01T00:00:00Z" --display-name "RestoredDatabase"

4. Testing and Validating Disaster Recovery

  • Performing a Failover Test:
    • Failover to Standby Database:
oci db autonomous-database failover --autonomous-database-id <standby_db_OCID>
  • Verifying Data Integrity:
    • Connect to the standby database and validate data consistency and application functionality.

5. Automating and Monitoring

  • Automating Backups and Replication:
    • Use OCI’s built-in scheduling features to automate backup creation and data replication.
  • Monitoring Database Health and Performance:
  • Use OCI Monitoring to set up alarms and dashboards for tracking the health and performance of your Autonomous Database.
  • Example Alarm:
oci monitoring alarm create --compartment-id <compartment_OCID> --display-name "HighIOWaitTime" --metric-name "io_wait_time" --threshold 1000 --comparison ">" --enabled true

Building a Secure Data Pipeline with OCI Data Flow and OCI Data Integration

Setting Up OCI Data Flow

Creating a Data Flow Application:

oci data-flow application create --compartment-id <compartment_OCID> --display-name "MyDataFlowApp" --image-id <image_OCID> --description "Data processing application"

Creating a Data Flow Run:

oci data-flow run create --application-id <application_OCID> --display-name "MyDataFlowRun" --compartment-id <compartment_OCID> --arguments '{"input":"<input_data_location>", "output":"<output_data_location>"}' --wait-for-state SUCCEEDED

Setting Up OCI Data Integration

  • Creating a Data Integration Task:
    • Go to Data IntegrationData TasksCreate Task.
    • Define your task type (e.g., Copy Data, Data Mapping) and configure source and target data stores.
  • Setting Up Data Flows:
  • Define and configure data flows that transform and move data between different sources and targets.
  • Example: Copy data from an OCI Object Storage bucket to a database
  • Securing Your Data Pipeline
  • Data Encryption:
    • At Rest: Ensure data stored in OCI Object Storage is encrypted using server-side encryption.
    • In Transit: Use HTTPS for secure data transfers between services.
  • Access Control:
    • Configure IAM policies to restrict access to data sources and pipelines.
    • Example IAM Policy:
allow group <group_name> to manage data-integrations in compartment <compartment_OCID>

Network Security:

  • Use VCNs and subnets to isolate data processing environments.
  • Example: Set up a private endpoint for data flow applications.

Monitoring and Managing Data Pipelines

Monitoring Data Flow Runs:

oci data-flow run list --compartment-id <compartment_OCID> --application-id <application_OCID>

Setting Up Alarms:

  • Use OCI Monitoring to create alarms based on metrics from data flows and integration tasks.

Example Alarm:

oci monitoring alarm create --compartment-id <compartment_OCID> --display-name "HighErrorRate" --metric-compartment-id <compartment_OCID> --metric-name "error_rate" --threshold 5 --comparison "<" --enabled true

putting in place a safe data pipeline that uses OCI Data Integration to import log data into an OCI Autonomous Database, OCI Data Flow to process the log data, and OCI Object Storage bucket to modify it. To protect the security and integrity of the data, the pipeline has access controls, encryption, and monitoring.

Thank you
Osama

How to setup the OCI CLI

Setting up the OCI CLI (Command Line Interface) involves several steps to authenticate, configure, and start using it effectively. Here’s a detailed guide to help you set up OCI CLI.

Step 1: Prerequisites

  1. OCI Account: Ensure you have an Oracle Cloud Infrastructure account.
  2. Access: Make sure you have appropriate permissions to create and manage resources.
  3. Operating System: OCI CLI supports Windows, macOS, and Linux distributions.

Step 2: Install OCI CLI

Install Python: OCI CLI requires Python 3.5 or later. Install Python if it’s not already installed:

On Linux:

sudo apt update
sudo apt install python3

On macOS:
Install via Homebrew:

brew install python3
  • On Windows: Download and install Python from python.org.

Install OCI CLI: Use pip, Python’s package installer, to install OCI CLI:

pip3 install oci-cli

Step 3: Configure OCI CLI

  1. Generate API Signing Keys: OCI CLI uses API signing keys for authentication. If you haven’t created keys yet, generate them through the OCI Console:
    • Go to IdentityUsers.
    • Select your user.
    • Under Resources, click on API Keys.
    • Generate a new key pair if none exists.

Configure OCI CLI: After installing OCI CLI, configure it with your tenancy, user details, and API key:

  • Open a terminal or command prompt.
  • Run the following command:
oci setup config
  • Enter a location for your config file: Choose a path where OCI CLI configuration will be stored (default is ~/.oci/config).
  • Enter a user OCID: Enter your user OCID (Oracle Cloud Identifier).
  • Enter a tenancy OCID: Enter your tenancy OCID.
  • Enter a region name: Choose the OCI region where your resources are located (e.g., us-ashburn-1).
  • Do you want to generate a new API Signing RSA key pair?: If you haven’t generated API keys, choose yes and follow the prompts.

Once configured, OCI CLI will create a configuration file (config) and a key file (oci_api_key.pem) in the specified location.

Thank you

Osama

Exploring Oracle Cloud Infrastructure (OCI)

In today’s rapidly evolving digital landscape, choosing the right cloud infrastructure is crucial for organizations aiming to scale, secure, and innovate efficiently. Oracle Cloud Infrastructure (OCI) stands out as a robust platform offering a comprehensive suite of cloud services tailored for enterprise-grade performance and reliability.

1. Overview of OCI: Oracle Cloud Infrastructure (OCI) provides a highly scalable and secure cloud computing platform designed to meet the needs of both traditional enterprise workloads and modern cloud-native applications. Key components include:

  • Compute Services: OCI offers Virtual Machines (VMs) for general-purpose and high-performance computing, Bare Metal instances for demanding workloads, and Container Engine for Kubernetes clusters.
  • Storage Solutions: Includes Block Volumes for persistent storage, Object Storage for scalable and durable data storage, and File Storage for file-based workloads.
  • Networking Capabilities: Virtual Cloud Network (VCN) enables customizable network topologies with VPN and FastConnect for secure and high-bandwidth connectivity. Load Balancer distributes incoming traffic across multiple instances.
  • Database Options: Features Autonomous Database for self-driving, self-securing, and self-repairing databases, MySQL Database Service for fully managed MySQL databases, and Exadata Cloud Service for high-performance databases.

Example 2: Implementing Autonomous Database

Autonomous Database handles routine tasks like patching, backups, and updates automatically, allowing the IT team to focus on enhancing customer experiences.

Security and Compliance: OCI provides robust security features such as Identity and Access Management (IAM) for centralized control over access policies, Security Zones for isolating critical workloads, and Web Application Firewall (WAF) for protecting web applications from threats.

Management and Monitoring: OCI’s Management Tools offer comprehensive monitoring, logging, and resource management capabilities. With tools like Oracle Cloud Infrastructure Monitoring and Logging, organizations gain insights into performance metrics and operational logs, ensuring proactive management and troubleshooting.

Integration and Developer Tools: For seamless integration, OCI offers Oracle Integration Cloud and API Gateway, enabling organizations to connect applications and services securely across different environments. Developer Tools like Oracle Cloud Developer Tools and SDKs support agile development and deployment practices.

Oracle Cloud Infrastructure (OCI) emerges as a robust solution for enterprises seeking a secure, scalable, and high-performance cloud platform. Whether it’s deploying mission-critical applications, managing large-scale databases, or ensuring compliance and security, OCI offers the tools and capabilities to drive innovation and business growth.

Creating a Kubernetes Cluster Environment But this Time OCI

let’s talka about DevOps but this time on OCI, one section of it, which is kuberneters.

There are different ways to do that, either by CLI or console

Using CLI

To create a a Kubernetes cluster environment, run the create-oke-cluster-environment command:

oci devops deploy-environment create-oke-cluster-environment

Console

  1. Open the navigation menu and click Developer Services. Under DevOps, click Projects.
  2. Create project for the kuberenetes.
  3. For Environment type, select Oracle Kubernetes Engine.
  4. Enter a name and optional description for the environment.
  5. (Optional) To add tags to the environment, click Show tagging options. Tagging is a metadata system that lets you organize and track the resources in your tenancy. If you have permissions to create a resource, you also have permissions to add free-form tags to that resource. To add a defined tag, you must have permissions to use the tag namespace.
  6. Click Next.
  7. Select the region where the cluster is located.
  8. Select the compartment in which the cluster is located.
  9. Select an OKE cluster. You can select either a public or a private cluster.
  10. Click Create environment.

Cheers

Osama

Launching Windows Instance on OCI

In this post  I will show you how to launch and connect to a Windows instance.

  • Create a cloud network and subnet that enables internet access
  • Launch an instance
  • Connect to the instance
  • Add and attach a block volume

I already posted a post how to Launch Linux Instance on OCI here, in the post you will have to follow the first two steps which is creating

  • Choose a compartment for your resources.
  • Create a cloud network.

Once you are done, you can start with steps #3 which will allow you to launch a instance – windows one.

  1. Open the navigation menu and click Compute. Under Compute, click Instances.
  2. Click Create instance.
  3. In the Placement section, accept the default Availability domain.
  4. In the Image and shape section, do the following:
    • In the Image source list, select Platform images.
    • Select Windows. Then, in the OS version list, select Server 2019 Standard.
    • Review and accept the terms of use, and then click Select image.
  5. In the Shape section, click Change Shape. Then, do the following:
    • For Instance type, accept the default, Virtual machine.
    • For Shape series, select AMD, and then choose either the VM.Standard.E4.Flex shape or the VM.Standard.E3.Flex shape (it doesn’t matter which). Accept the default values for OCPUs and memory.
    • The shape defines the number of CPUs and amount of memory allocated to the instance.
  6. In the Networking section, configure the network details for the instance. Do not accept the defaults.
    • For Primary network, leave Select existing virtual cloud network selected.
    • Select the cloud network that you created. If necessary, click Change Compartment to switch to the compartment containing the cloud network that you created.
  7. In the Boot volume section, leave all the options cleared.

Your instance now is ready.

Connect to the windows instance done by using Remote desktop, enter the public ip, username which is (opc), and the password.

Cheers

Osama

Tutorial – Launching OCI Linux Instance

Steps:

  • Create a key pair.
  • Choose a compartment for your resources.
  • Create a cloud network.
  • Launch an instance.

Choosing a Compartment

  1. The first resource you create is the cloud network. Open the navigation menu, click Networking, and then click Virtual Cloud Networks.
  2. Select the Sandbox compartment (or the compartment designated by your administrator) from the list on the left, as shown in the image. If the Sandbox compartment does not exist, you can create it as described in Creating a Compartment.

Create a cloud network.

  1. Open the navigation menu, click Networking, and then click Virtual Cloud Networks.
  2. Click Start VCN Wizard.
  3. Select Create VCN with Internet Connectivity, and then click Start VCN Wizard.
  4. Enter the values depends on what you want press next.

Launch an instance.

  1. Open the navigation menu and click Compute. Under Compute, click Instances.
  2. Click Create instance.
  3. Enter a name for the instance, for example: <your initials>-Instance. Avoid entering confidential information.
  4. In the Placement section, accept the default Availability domain.
  5. In the Image and shape section, make the following selections:
  6. In the Image section, accept the default, Oracle Linux.
  7. In the Shape section, click Change shape. which will allow you to choose the instance size.
  8. In the Networking section, For Primary network, leave Select existing virtual cloud network selected and For Subnet, leave Select existing subnet selected.
  9. Select the Assign a public IPv4 address option. This creates a public IP address for the instance, which you need to access the instance. If you have trouble selecting this option, confirm that you selected the public subnet that was created with your VCN, not a private subnet.
  10. In  Add SSH keys section, generate an SSH key pair or upload your own public key

Enjoy
osama

Create a Serverless Website with Alibaba Cloud Function Compute

Regarding to Wikipedia, Serverless computing is a cloud computing execution model in which the cloud provider runs the server, and dynamically manages the allocation of machine resources. Pricing is based on the actual amount of resources consumed by an application, rather than on pre-purchased units of capacity

Today i will show you an example how to create serverless website but this time not using Amazon AWS, Azure or OCI but Alibaba Cloud Provider.

Create a Function Compute Service

Go to the console page and click through to Function Compute.

Click the add button beside Services.

In the Service slide out, give your service a name, an optional description, and then slide open the Advanced Settings.

In Advanced Settings you can grant access for Functions to the Internet, to VPC resources, and you can attach storage and a log service to a Function. You can also configure roles.

For our tutorial, we will need Internet access so make sure this configuration is on.

We will leave VPC and Log Configs as they are.

In the Role Config section, select Create New Role, and in the dropdown list pick AliyunOSSReadOnlyAccess as we will be accessing our static webpages from an Object Storage Service bucket.

Click Authorize.

You will see a summary of the Role you created.

Click Confirm Authorization Policy.

You have successfully added the Role to the Service.

Click OK.

ou will see the details of the Function Compute Service you just created.

Now let’s create a Function in the Service. Click the add button next to Functions.

You will see the Create Function process. The first part of the process is Function Template.

There are many Function Templates available, including an empty Function for writing your own bespoke Functions.

Alibaba Cloud-supplied Template Functions are very useful as they have relevant method invocation and demo code for getting started quickly with Function Compute.

let’s choose the flask-web Function written in Python2.7.

Click Select.

We are now at the Configure Triggers section of creating a Function.

Select HTTP Trigger from the dropdown list. Give the Trigger a name and choose Authorization details (anonymous does not require authorization).

Choose your HTTP methods and click Next. We are going to build a simple web-form application so we will need both the GET and POST HTTP methods.

Now we arrive at the Configure Function Settings.

Give the Function a name then scroll down to Code details.

We’ll leave the supplied code for now. Scroll down to below the code sample.

You will see Environment Variable input options and Runtime Environment details.

Click Next.

Click Next at Configure Function Permissions.

Verify the Configuration details and click Create.

You will arrive at the Function’s IDE. Here you can enter new code, edit the code directly, upload code folders, run, test, and fix your code.

Scroll down.

Copy the URL as we will need to add this to our static webpages so they can connect to our Function Compute Service and Function.

Set Up and Configure an OSS Bucket

Click through to Object Storage Service on the Products page.

If you haven’t yet activated Object Storage Service, go ahead and activate it. In the OSS console, click Create Bucket.

Choose a name for the OSS Bucket and pick the region – you cannot change the region later. Select the Storage Class – you also cannot change this later.

We have selected Public Read for the Access Control List.

When you’re ready, click OK.

You will see the Overview page for your bucket. Make a note of the public Internet URL.

In the Files tab, upload your static web files.

I uploaded a simple index.html homepage and a background picture.

<script type="text/javascript">
        const functionURL = '<<Function URL>>';
        const doHome = new XMLHttpRequest();
doHome.open('GET', functionURL, true);
doHome.onload = function () {    
document.getElementById('home_message').innerHTML = doHome.responseText;
        };
        doHome.send();
</script>

In Basic Settings, click Configure to configure your Static Pages.

Add the homepage details and click Save.

Now go to a new browser window and access the OSS URL you saved earlier.

Back in the Function Compute console, you can now test the flask-app paths directly from the code.

We already tested index.html with no Path variable. Next, we test the app route signin with GET and check the Headers and status code.

The signin page code is working correctly. You can also check the Body to make sure the correct HTML will render on the page. Notice that because I entered the path variable, signin is appended to the URL.

Of course, any errors you encounter will show up in the Logs section for easy debugging.

Now, let’s test this page on the Internet.

If you get an error here, implement a soft link for the page in OSS. Go to the OSS bucket and click More dropdown for the HTML file in question and choose Set soft link.

Give the link a name and click OK.

A link file will appear in the list of static files and you will now be able to access the page online with the relevant soft link and it will render as above.

Back in Function Compute, we can test the POST method in the console with the correct username and password details in the same way.

Add the POST variables to the form upload section in the Body tab.

Now you can test this function online.

Cheers

Osama